


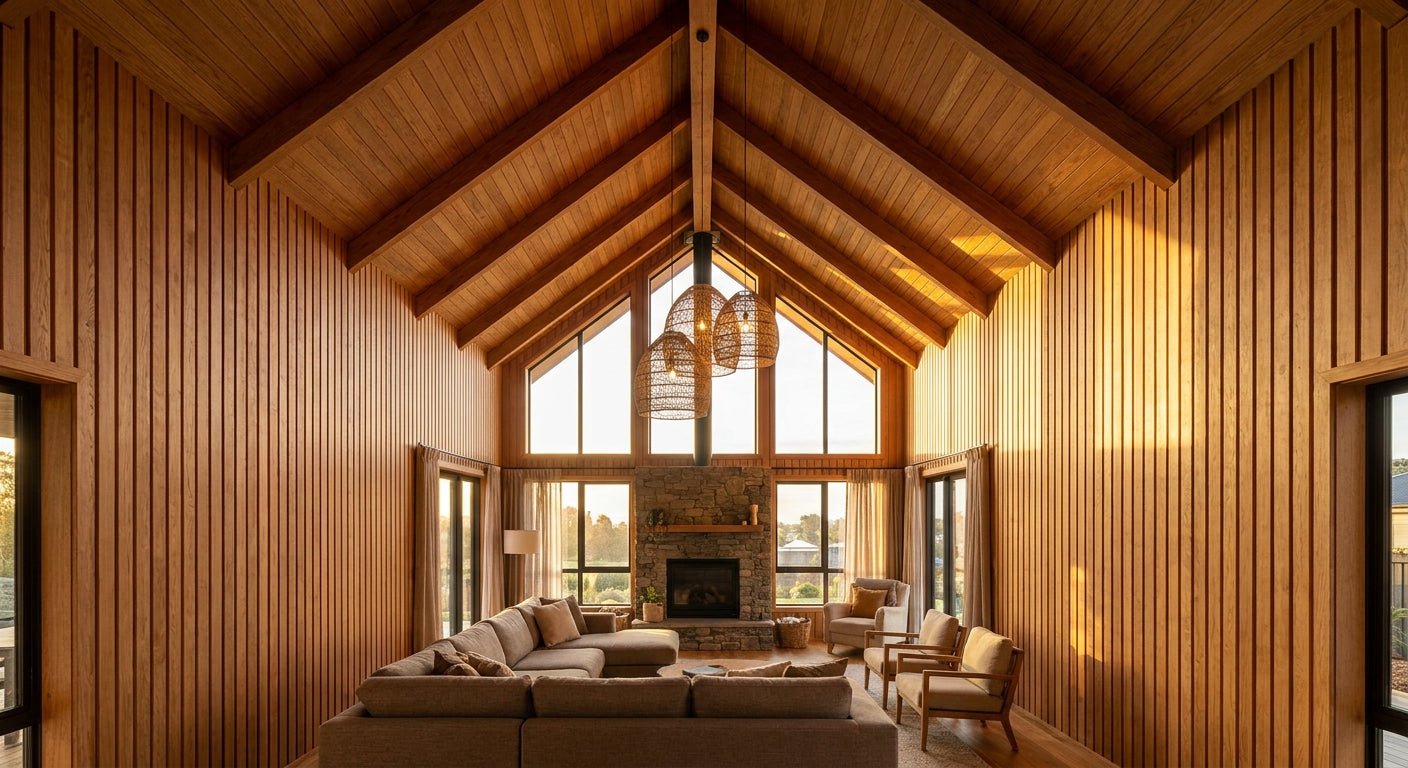
Cathedral ceilings amplify every footstep, dish clatter, and dinner-party conversation into a wash of echo, and a slat panel installation fixes both that noise problem and the bare-drywall look in one project. This guide walks through the layout math, the fastening approach for angled framing, and the mistakes that turn a weekend job into a redo.
TL;DR
Installing wood slat panels on a cathedral ceiling in 2026 means running the slats parallel to the ridge beam, cutting each row to a custom angle where the roof pitch changes, and backing the panels with felt for actual sound absorption rather than just visual texture. The AKU Woodpanel acoustic slat wall panel in natural oak is the Buy for most vaulted great rooms because the gray felt backing does real acoustic work, not just decoration. Budget one full weekend for a 200 to 300 square foot vault, plus a second person for anything above 12 feet.
Why this matters
A cathedral ceiling has more exposed hard surface than a standard flat ceiling of the same square footage, and hard surfaces reflect sound instead of absorbing it. That's why open-plan living rooms under a vault often feel louder than a room half their size with a flat ceiling.
Wood slat panels solve this two ways: the felt backing behind each slat absorbs mid- and high-frequency reflections, and the visual rhythm of the slats breaks up what would otherwise be one continuous slab of drywall or exposed rafters. For homeowners dealing with an echoey great room in 2026, this is one of the few upgrades that changes both how a room sounds and how it photographs.
What you'll need
- Slat wall panels rated for ceiling use — the acoustic slat wall panel in natural oak with felt backing covers roughly 20.4 square feet per panel at standard sizing
- A laser level with a slope/angle function, not just a standard bubble level
- A miter saw capable of bevel cuts up to 45 degrees
- Construction adhesive rated for interior wood-to-wood or wood-to-drywall bonds
- 1.5-inch to 2-inch trim screws, spaced every 16 inches along studs or rafters
- A stud finder that reads through drywall into rafter framing
- Painter's tape and a chalk line for marking your first reference row
- A second person for anything above an 8-foot ladder — cathedral ceilings routinely run 14 to 18 feet at the ridge
The steps
1. Map the pitch before you touch a saw
Measure the roof pitch at two or three points along the ceiling, because older builds and additions often have inconsistent framing even on a single slope. A 6/12 pitch and an 8/12 pitch look similar from the floor but produce noticeably different bevel angles on every board.
Write the actual pitch angle in degrees, not the rise-over-run ratio, since that's what your miter saw needs. Skipping this step is the single biggest cause of gaps at the ridge line.
2. Snap a reference line parallel to the ridge
Chalk a straight line running parallel to the ridge beam, roughly 12 inches down from the peak, and use this as your starting reference for every row below it. Cathedral ceilings rarely have a perfectly straight ridge, so this line — not the ceiling edge — is your true north for alignment.
Check the line with a laser level at three points across its length. A line that's off by even a quarter inch over 10 feet will compound into a visibly crooked pattern by the time you reach the eaves.
3. Dry-fit the first row without adhesive
Lay the first row of panels along your reference line using painter's tape only, no glue, no screws. This lets you catch angle mistakes before they're permanent and confirms your bevel cuts actually meet flush at the ridge.
Expected outcome: a tight seam at the peak with no visible gap wider than 1/16 inch. If you're seeing gaps, your pitch measurement from step one was off and needs rechecking before you commit adhesive.
4. Fasten from the ridge downward
Apply construction adhesive to the back of each panel in a zigzag bead, press it into place along your chalk line, then drive trim screws into rafters at 16-inch intervals for permanent hold — adhesive alone won't carry ceiling weight over time. Work in horizontal rows moving away from the ridge toward the eaves.
This top-down order matters because any small angle error gets corrected before it reaches the next row, rather than compounding toward the peak where mismatches are most visible.
5. Cut angled end pieces for the transition to wall
Where the ceiling meets a vertical wall, the slats need a mitered end cap rather than a raw cut edge. An oak end piece panel gives you a finished edge instead of an exposed slat core, which matters more on a cathedral ceiling because the transition line is visible from almost every angle in the room.
Measure twice at this junction specifically — the wall-to-ceiling angle is rarely a clean 90 degrees once framing settles over a decade or two.
6. Check acoustic coverage, not just visual coverage
Wood look alone won't reduce echo — it's the felt layer behind the slats doing the acoustic work, so cover at least 60 to 70 percent of the total ceiling surface if noise reduction is the actual goal, not just accent styling. A narrow feature strip along the ridge looks good but does almost nothing for sound.
Rooms over 300 square feet with 14-foot-plus vaults typically need felt-backed coverage on both the ceiling slope and at least one adjacent wall to meaningfully cut reverberation.
Troubleshooting
- Panels won't sit flush at the ridge. Your bevel angle is off by a degree or two — recheck the actual pitch with a digital angle finder rather than eyeballing the rise-over-run math.
- Visible gap between rows on the slope. Rafters aren't perfectly straight over long spans; add shims behind low spots before the next row goes up, don't try to force the panel flat.
- Adhesive isn't holding overhead. Ceiling installs need adhesive rated for overhead/vertical bonding, not general-purpose construction adhesive — check the label specifically for ceiling use.
- Room still echoes after installation. Coverage is likely too sparse; a decorative accent strip covering 15 percent of the ceiling won't touch the acoustics the way 60-plus percent coverage will.
- Screws are stripping out in rafters. You're likely missing the rafter and hitting drywall alone — recheck with the stud finder and mark rafter centers with tape before fastening.
- Color mismatch between panels from different batches. Real wood veneer varies by batch; order a sample first and buy all panels for one room in a single order to keep grain and tone consistent.
Tools and resources
- Miter saw with bevel capability, digital angle finder, laser level, and a stud finder rated for rafter depth
- A full sample box to confirm veneer tone and felt color against your actual ceiling lighting before ordering a full room's worth
- A second person on ladders for any vault over 10 feet — this is a two-person job past that height, not a solo one
- For the specific mechanics of working on an angled surface rather than a flat wall, the sloped ceiling installation guide covers fastening patterns that apply directly to cathedral vaults
What to do next
Once the ceiling is done, most homeowners find the adjacent wall now looks bare by comparison — plan the wall treatment before you're standing in the finished room deciding on the fly. Order one sample box before committing to a full room order; veneer tone under skylight or clerestory glazing common in cathedral ceilings can read differently than it does on a sample card under indoor lighting.
FAQ
Do wood slat panels actually reduce echo on a cathedral ceiling? Yes, but only the felt-backed versions — plain decorative slats with no acoustic backing add visual texture but do almost nothing for reverberation. Coverage matters too: aim for 60 to 70 percent of the sloped surface for a measurable difference in a great room.
What's the best angle to cut slat panels for a vaulted ceiling? Match the actual roof pitch measured in degrees at your specific location, not a generic 45-degree assumption. Pitches vary from 4/12 to 12/12 across different homes, and even within one house the angle can shift slightly between the main vault and a dormer.
Can one person install wood slat panels on a cathedral ceiling alone? Below 8 feet, yes. Above that — and most cathedral ceilings run 14 to 18 feet at the ridge — plan on a second person for safety and for holding panels steady during the adhesive cure window.
How much ceiling coverage do I need for noticeable noise reduction? Sixty to seventy percent of the total ceiling surface is the practical minimum for acoustic performance; anything less functions as decoration rather than sound treatment.
Is natural oak or smoked oak better for a cathedral ceiling? Natural oak reflects more ambient light back into the room, which matters in vaults that already run darker at the ridge; smoked oak reads better in rooms with strong natural light from clerestory windows or skylights. Both come with the same felt-backed acoustic construction.
Do I need special adhesive for ceiling installation versus wall installation? Yes — use adhesive specifically rated for overhead bonding, since gravity works against a standard wall-rated adhesive on a ceiling application over the 2026 building season and beyond.
How long does a cathedral ceiling slat panel installation take? A 200 to 300 square foot vault typically takes one full weekend for two people, longer if the pitch changes at multiple points or if extensive shimming is needed for uneven rafters.
Should I order samples before buying panels for a full ceiling? Order a sample box first, always. Vaulted ceilings often have unusual light sources — skylights, clerestory glazing, exposed beams — that shift how a veneer tone reads compared to a flat sample card under standard room lighting.
One last thing
The part people miss on cathedral ceilings isn't the cutting — it's the lighting plan. Recessed can lights or track lighting installed after the panels go up will throw shadows along every slat gap, exaggerating the ridge line in a way that looks like a mistake even when the install is perfectly square. Plan the lighting layout before the first panel goes up, not after.



 Better performance and aesthetic appeal
 In Stock




