


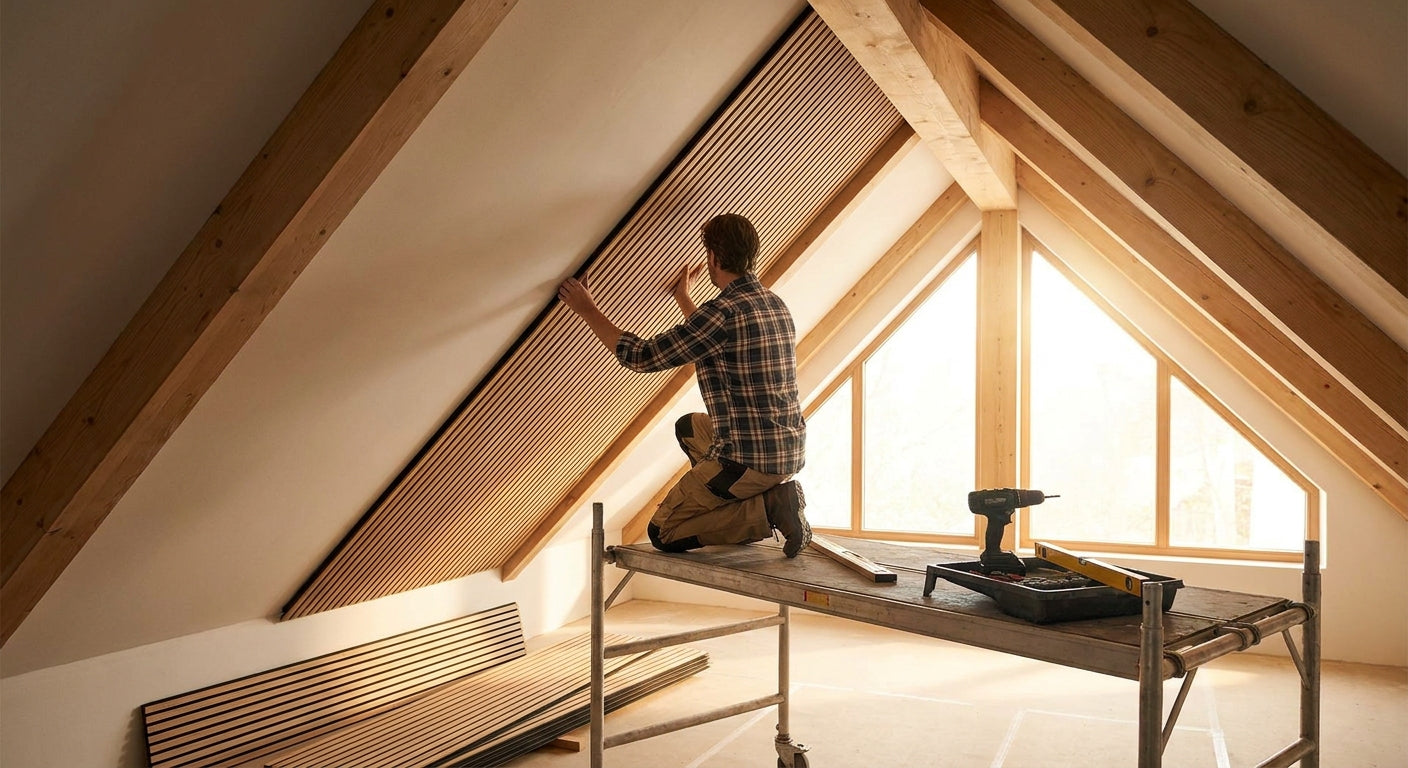
Sloped ceilings look great with wood slat paneling, but the pitch changes every measurement, cut angle, and fastening point compared to a flat wall install. This guide walks through the exact steps for installing wood slat panels on a sloped ceiling in 2026, from battens to final trim.
TL;DR
Installing wood slat panels on a sloped ceiling means running horizontal battens perpendicular to the rafters, cutting panel ends at the roof pitch angle (usually between 15 and 45 degrees), and fixing with construction adhesive plus mechanical screws because gravity works against you overhead. Verdict: doable in a weekend for a single attic room or dormer, but budget an extra 20-30% on materials for angle-cut waste. AKU Woodpanel's acoustic slat wall panels work on ceilings as well as walls since the felt backing adds sound absorption to a space that otherwise reflects noise hard off exposed roof timber. Skip the project if your ceiling has active moisture or insulation gaps larger than 1 inch — seal those first.
Why this matters
Sloped ceilings in attic conversions, dormers, and A-frame rooms bounce sound in ways flat ceilings don't. The angled surface reflects noise downward at a sharper trajectory, which is why converted attics often sound louder than their square footage suggests.
Acoustic slat wall panels solve two problems at once on a sloped surface: they hide uneven drywall or exposed rafters, and the felt backing absorbs mid-to-high frequency noise that would otherwise ricochet around the room. That's a meaningful upgrade for a home office, bedroom, or media room tucked under the roofline.
The install itself isn't harder than a wall — it's different. Get the batten layout and angle cuts wrong and you'll fight the whole install. Get them right and the ceiling goes up almost as fast as a wall would.
What you'll need
- Tape measure, pencil, and a digital angle finder (or a protractor) to capture the roof pitch
- A miter saw capable of bevel cuts at the pitch angle you measured
- Wood battens, 18-25mm thick, enough to run every 400mm (16 inches) across the sloped section
- A stud finder rated for rafters, since you're fixing into structural timber, not just drywall
- Construction adhesive rated for interior wood-to-wood or wood-to-drywall bonding
- Wood screws, 40-50mm, plus a driver with a depth stop
- AKU Woodpanel's acoustic slat wall panel in natural oak, or your chosen finish, enough panels to cover the sloped run plus 15-20% overage for angle cuts
- Safety glasses, a dust mask, and a step ladder rated for ceiling-height work
Order one sample panel before committing to a full run — matching the felt color and veneer grain to the rest of the room matters more on a sloped ceiling because the angle catches light differently than a vertical wall.
The steps
1. Measure the pitch and mark your reference line
Use the angle finder against the rafter or existing ceiling surface to get the exact pitch in degrees. Most residential attic conversions run between 30 and 45 degrees, but dormers can go as low as 15.
Snap a chalk line at the top of the sloped section, typically where it meets the flat ceiling or the wall plate. This line is your reference for every batten below it. Getting this line level and consistent is what keeps your slat lines straight once panels go up — a line off by even 5mm at the top compounds visibly by the time you reach the bottom of a 3-meter slope.
Common mistake: measuring the pitch once at the top and assuming it's constant. Older roof structures shift over decades — check the angle at three points along the run.
2. Install the battens perpendicular to the rafters
Mount your battens running horizontal to the floor, spaced every 400mm, fixed directly into rafters wherever possible. On a sloped ceiling, battens do double duty: they create the mounting surface for the panels and they correct for any waviness in the roof deck underneath.
Use screws long enough to bite at least 25mm into solid rafter timber, not just the drywall or sheathing. A batten that's only screwed into drywall on an overhead sloped surface will eventually sag under the weight of the panel run.
Common mistake: spacing battens by eye instead of measuring from the reference line. Inconsistent spacing shows up as visible waviness once the slat pattern is running across it.
3. Cut your first panel to the pitch angle
Set your miter saw bevel to match the pitch angle you measured in step one. Cut a test piece from scrap first and hold it against the top reference line to confirm the fit before cutting your actual panels — a 2-degree error is invisible on paper but obvious once 15 panels are stacked side by side.
Most AKU Woodpanel slat panels ship in standard lengths, so plan your cut list before you start so the angled offcut from one panel can become the starting piece for the next row where possible. This cuts material waste and, on a sloped run, waste adds up fast because every single top-edge cut is angled.
4. Dry-fit the full first row before fixing anything
Lay out every panel for the first horizontal row across the battens without adhesive or screws. Check that slat lines run continuous and level across seams, and that the angled top edge sits flush against your reference line the entire length of the run.
This step catches spacing errors before they're permanent. Expected outcome: a clean, level first row with no visible gap wider than 2mm at any seam.
5. Fix panels with adhesive plus mechanical screws
Apply construction adhesive in a zigzag bead across the back of each panel, then press firmly into the battens. On a ceiling, adhesive alone isn't enough — gravity pulls at the bond immediately, so back every panel with 2-3 screws driven through the panel into the batten, countersunk just below the surface.
Work row by row, checking the pitch line every third row with your angle finder to make sure you haven't drifted off the true slope.
6. Finish edges with end pieces or trim
Where the sloped run meets a flat ceiling, a wall, or a window, use end piece trim in a matching oak finish rather than leaving raw cut edges exposed. Raw MDF or veneer edges on a sloped ceiling catch light at odd angles and look unfinished even when the rest of the install is clean.
Common mistake: skipping end pieces to save on cost, then having to touch up exposed core material with paint or filler that never quite matches the veneer.
7. Check panel weight against your batten fixing
Before final fixing on longer runs, confirm your batten screws can support the cumulative weight of the full sloped section — a 3-meter run of panel is heavier than most people expect once the felt backing and veneer layers are totaled. If in doubt, add an extra batten mid-run rather than widening the spacing.
Troubleshooting
- Panels won't sit flush against the pitch — Your angle measurement is off. Re-check the pitch at the specific point where the gap is happening; roof pitches aren't always perfectly consistent along a single run.
- Slat lines look wavy across seams — Battens weren't spaced or leveled consistently. Pull the affected section and re-measure from your original reference line rather than eyeballing a fix.
- Panel edges are separating from the ceiling over weeks — Adhesive alone was used without mechanical screws, or screws didn't reach solid rafter timber. Add screws now before the section fails completely.
- Visible gap at the top reference line — The chalk line wasn't level, or the pitch measurement was taken at a single point instead of three. Re-snap the line and adjust the top row.
- Panel color looks different on the ceiling than on the wall sample — Overhead lighting hits sloped surfaces at a different angle than vertical walls, which changes how the veneer grain reads. Always test a sample panel installed at the actual angle before ordering the full run.
- Cutting angle drifts partway through the batch — Miter saw bevel settings can shift slightly with vibration. Recheck the angle setting every 5-6 cuts against your test piece.
Tools and resources
- Digital angle finder or protractor for pitch measurement
- Miter saw with bevel capability
- Stud finder rated for rafter detection
- Construction adhesive plus wood screws with a depth-stop driver
- Guide to cutting acoustic wood slat panels to size for panel-specific cutting technique before you touch the sloped angle
A single test panel costs less than one wasted full-size sheet — order a sample and test-fit it against the pitch before committing to the full material list.
What to do next
Once the sloped section is up, the flat ceiling or adjoining walls in the same room often need matching treatment for the acoustic benefit to carry through the whole space. The guide to using acoustic panels on a sloped attic wall covers the wall-side install for the same room type, including where the wall meets the ceiling pitch.
FAQ
What's the best angle to cut slat panels for a sloped ceiling? Match the exact pitch of your roof, measured with an angle finder at a minimum of three points along the run. Most residential attic conversions in 2026 fall between 30 and 45 degrees, but there's no universal number — measure your own ceiling.
Can you install acoustic slat panels directly on rafters without drywall? Yes, if the rafters are spaced consistently and you run battens perpendicular to them first. Battens correct for any unevenness in exposed rafter timber and give you a flat, consistent surface to fix panels to.
Is adhesive alone strong enough for a ceiling install? No. Gravity acts on overhead installs immediately, so mechanical screws through the panel into solid batten or rafter timber are required in addition to adhesive, not instead of it.
How much extra material should I order for angle cuts? Budget 15-20% over your flat square footage measurement. Every top-edge cut on a sloped run is angled, which increases offcut waste compared to a standard wall install.
Do slat panels need extra support on a sloped ceiling versus a flat wall? Yes — add a batten roughly every 400mm and check that fixing points reach solid rafter timber, not just drywall or sheathing, since the panel weight pulls downward against gravity on an overhead surface.
How long does a sloped ceiling slat panel install take? A single attic room or dormer section typically takes one full weekend for someone with basic DIY tools, once battens and cut angles are dialed in from the first row.
Do acoustic slat panels actually reduce echo in an attic conversion? The felt backing on AKU Woodpanel's acoustic slat panels absorbs mid-to-high frequency sound, which noticeably cuts the sharper echo common in angled attic spaces compared to bare drywall or exposed timber.
Can I mix panel finishes on a sloped ceiling and adjoining wall? Yes, but match undertones carefully — natural oak and smoked oak read differently under angled ceiling light than on a vertical wall, so test a sample at the actual install angle before ordering both finishes.
One last thing
The angle cut at the very top row, where the slope meets the flat ceiling, is the single cut that's hardest to hide if it's wrong — get that one dead-on before cutting the rest of the run, because every panel below it references that first line.



 Better performance and aesthetic appeal
 In Stock




