


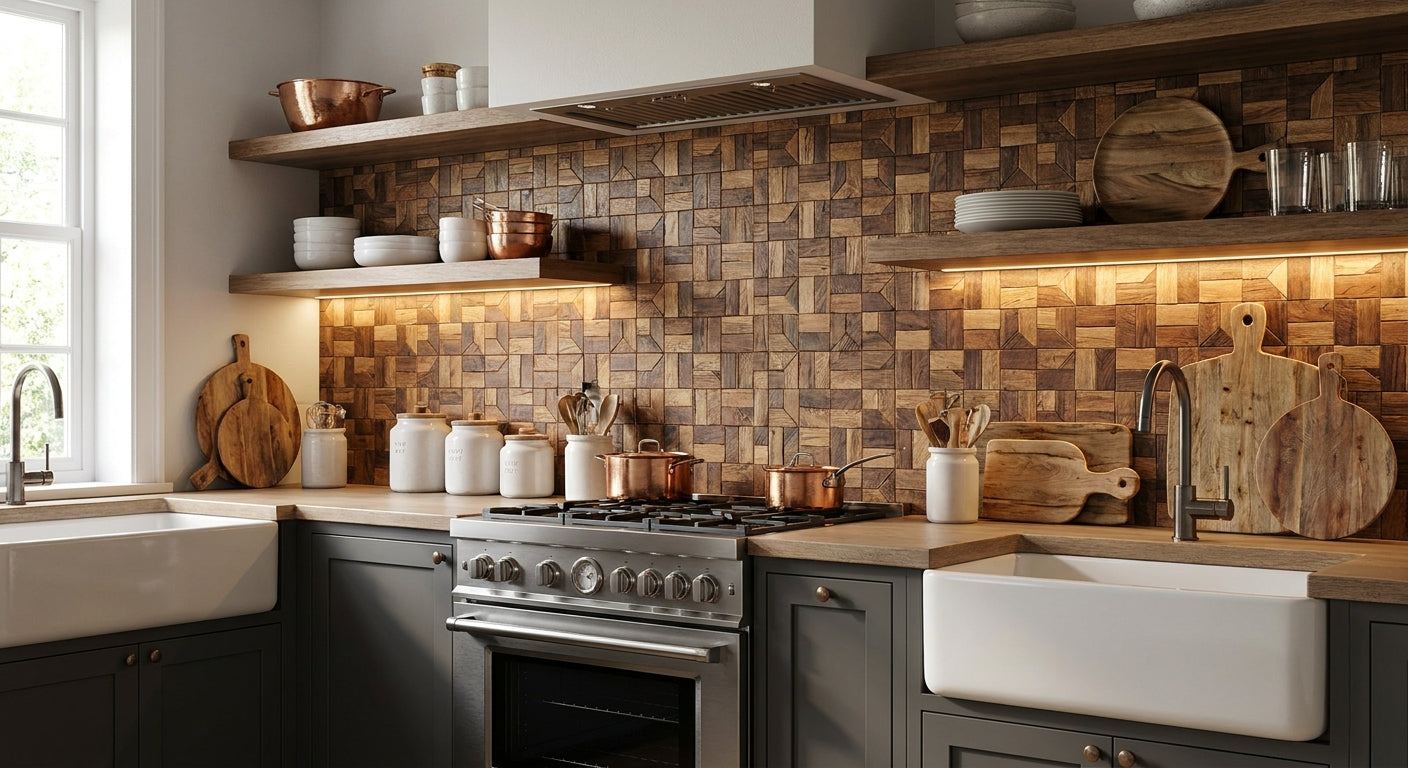
Wood mosaic panels turn a plain kitchen wall into a textured focal point behind the stove or sink, and the peel-and-stick versions install in an afternoon without tile spacers or grout float.
- Peel-and-stick wood mosaic panels install directly over a clean, flat backsplash wall in under 4 hours for most kitchens.
- AKU Woodpanel's peel-and-stick backsplash tiles skip grout and mortar entirely - buy for a weekend project.
- Standard backsplash height runs 18 to 20 inches behind counters, more behind a stove.
- Skip mosaic panels near open flame gas ranges without a heat-rated clearance - check manufacturer specs first.
Why this matters
A tile backsplash job traditionally means a wet saw, a bucket of thinset, and a full weekend lost to grout haze. Wood mosaic panels for kitchen backsplash use skip most of that: many are peel-and-stick, self-adhesive, and cut with a utility knife.
The tradeoff is heat and moisture exposure right behind the cooktop, so where you place the panel matters as much as how you install it. Get the substrate prep and the heat clearance right in 2026 and the panel outlasts a laminate backsplash by years.
What you'll need
- A clean, dry, flat wall surface (drywall, painted plaster, or existing tile with a scuff-sanded finish)
- Wood mosaic backsplash panels - peel-and-stick backsplash tiles or a hexagon mosaic tile in dark copper
- Tape measure, level, and a pencil
- Utility knife with fresh blades (dull blades tear the veneer edge)
- Degreasing cleaner and lint-free cloth
- Fine-grit sandpaper (220-grit) for glossy or existing tile surfaces
- Painter's tape to mark layout lines
- Silicone sealant for edges near the sink or stove
- A J-channel or trim strip for clean panel edges, if your wall has an exposed end
The steps
1. Measure the wall and plan your layout
Get the exact square footage of the backsplash zone before you order anything. Measure width times height in inches, divide by 144 for square feet, and add 10% for waste and cut pieces.
Mark the vertical centerline of the wall with a pencil and level - most kitchens look best when the mosaic pattern is centered on the range or the sink, not on the wall's edge. A common mistake here: centering on the cabinets instead of the visual focal point, which throws the whole pattern off by inches once appliances are installed.
2. Clean and degrease the wall surface
Kitchen walls near a stove carry a thin film of grease even if they look clean. Wipe the entire surface with a degreasing cleaner and let it dry fully - adhesive backing will not bond to a greasy or damp wall.
If the wall has existing tile or a glossy painted finish, scuff it with 220-grit sandpaper first. This gives the panel's adhesive backing something to grip; smooth glossy surfaces are the number-one cause of peel-and-stick failure within the first year.
3. Dry-fit the first row before peeling any backing
Hold the first panel or tile section against the wall, aligned to your centerline, and check it against outlets, switches, and the countertop edge. Trace cutout locations directly onto the panel with a pencil.
Dry-fitting catches layout problems before adhesive is committed - once a peel-and-stick panel touches the wall, repositioning it damages the backing. Expect to dry-fit 2-3 panels around the sink and outlet zones specifically.
4. Cut around outlets and switches
Use a sharp utility knife and a straightedge to score cutouts for outlet boxes and switches. Score both sides of thin veneer mosaic tiles to avoid splintering the wood grain.
Remove the outlet cover plates first - installing around them instead of behind them is the mistake that makes a backsplash look unfinished. Reinstall the cover plates after the panel is set so they sit flush against the wood surface.
5. Peel and apply from the bottom row up
Start at the countertop line, not the top. Peel back 2-3 inches of backing, position the panel against your level line, and press firmly from the center outward to push out air bubbles.
Work in one continuous direction across the wall so pattern repeats and seam lines stay consistent. Use a flat block wrapped in cloth to apply even pressure across the whole panel face - fingertip pressure alone leaves soft spots that lift within weeks.
6. Seal edges near the sink and stove
Run a thin bead of silicone sealant along any edge that meets the countertop, sink backsplash lip, or stove surround. Water that gets behind an unsealed edge is the leading cause of peel-and-stick lifting in kitchens.
Skip sealant on the top edge if it's not exposed to splashing - over-sealing traps moisture instead of blocking it.
7. Finish exposed edges with trim
Where the mosaic panel ends at an open wall edge, corner, or cabinet gap, close it with a trim strip rather than leaving a raw cut edge exposed. A clean trim line is what separates a backsplash that looks installed from one that looks applied.
Verdict: buy peel-and-stick wood mosaic panels for kitchens with electric or induction ranges; skip them for the zone directly behind an open-flame gas burner unless the product's heat rating explicitly covers that clearance.
Troubleshooting
- Panel won't stick to the wall. The surface still has grease or moisture on it. Re-clean with degreaser, let it dry 24 hours, and try again.
- Bubbles appear after a day. Air got trapped during application. Reheat the area gently with a hairdryer on low and press the bubble flat toward the nearest edge.
- Grain doesn't line up between panels. Panels were installed in mixed orientation. Always check the grain direction arrow or pattern printed on the backing before peeling.
- Edge lifting near the sink. Missing or thin sealant bead. Strip the loose section, dry it fully, and reapply sealant before pressing the edge back down.
- Color looks patchy under kitchen lighting. Natural wood veneer varies by panel batch. Order from the same batch or run and mix panels from multiple boxes evenly across the wall rather than installing box by box.
- Cut edges look rough. Blade was dull or dragged instead of scored. Score lightly first, then cut through on a second pass with a fresh blade.
Tools and resources
- Peel-and-stick backsplash tile in brick 3D gold - the closest match to a classic subway layout with a metallic wood-tone finish
- Peel-and-stick mini hexagon 3D dark copper - a tighter mosaic pattern that suits smaller backsplash runs
- Tile acoustic slat wall panel in natural oak - for kitchens where the panel wraps past the backsplash onto a dining wall
- Utility knife, degreasing cleaner, level, and 220-grit sandpaper from any hardware store
- Silicone sealant rated for kitchen and bath use
What to do next
Once the backsplash zone is done, most homeowners extend the same wood mosaic look onto the adjacent wall or a kitchen island face. The full breakdown of pattern options and coverage math lives in the guide on wood mosaic panels for kitchen splashback walls - read that before ordering a second batch so the pattern repeat lines up wall to wall.
FAQ
What's the best wood mosaic panel for a kitchen backsplash?
A peel-and-stick wood mosaic panel is the best fit for most kitchen backsplashes in 2026 because it skips grout and mortar entirely. AKU Woodpanel's peel-and-stick backsplash tiles in brick and hexagon patterns install directly over a clean, flat wall.
Is wood mosaic backsplash safe behind a gas stove?
Only with the correct heat clearance, typically 30 inches from the burner per most local codes. Check the specific panel's heat rating before installing it directly behind an open-flame gas range.
How much wall space does a kitchen backsplash usually cover?
Most kitchen backsplashes run 18 to 20 inches tall between the counter and upper cabinets. Measure your exact width and height in inches, divide by 144, and add 10% for cuts and waste before ordering panels.
Do peel-and-stick wood panels need sealant?
Yes, at any edge that meets a sink, countertop lip, or stove surround. A thin bead of silicone sealant at those seams is what prevents water from getting behind the panel and causing it to lift.
Can you install wood mosaic panels over existing tile?
Yes, as long as the tile surface is scuff-sanded with 220-grit sandpaper first and fully degreased. A smooth, glossy tile surface without sanding is the most common reason peel-and-stick panels fail to bond.
How long does a peel-and-stick backsplash installation take?
Most kitchens take under 4 hours from wall prep to the final trim piece. Outlet cutouts and sink-area edges add the most time, so budget extra minutes around those zones.
Do wood mosaic backsplash panels need grout?
No, peel-and-stick wood mosaic panels are designed to butt together without grout lines. This is one of the main reasons they install faster than ceramic or stone mosaic tile.
What causes wood mosaic panels to lift after installation?
Grease or moisture left on the wall before application is the leading cause, followed by missing sealant at wet edges. Re-cleaning the surface and resealing edges usually fixes lifted sections without a full reinstall.
One last thing
The pattern repeat is what separates a backsplash that reads as a design choice from one that reads as a patch job - center the mosaic on the stove or sink, not on the wall's raw edges, and the whole kitchen reads intentional even before the cabinets go back up.




 Better performance and aesthetic appeal
 In Stock




