


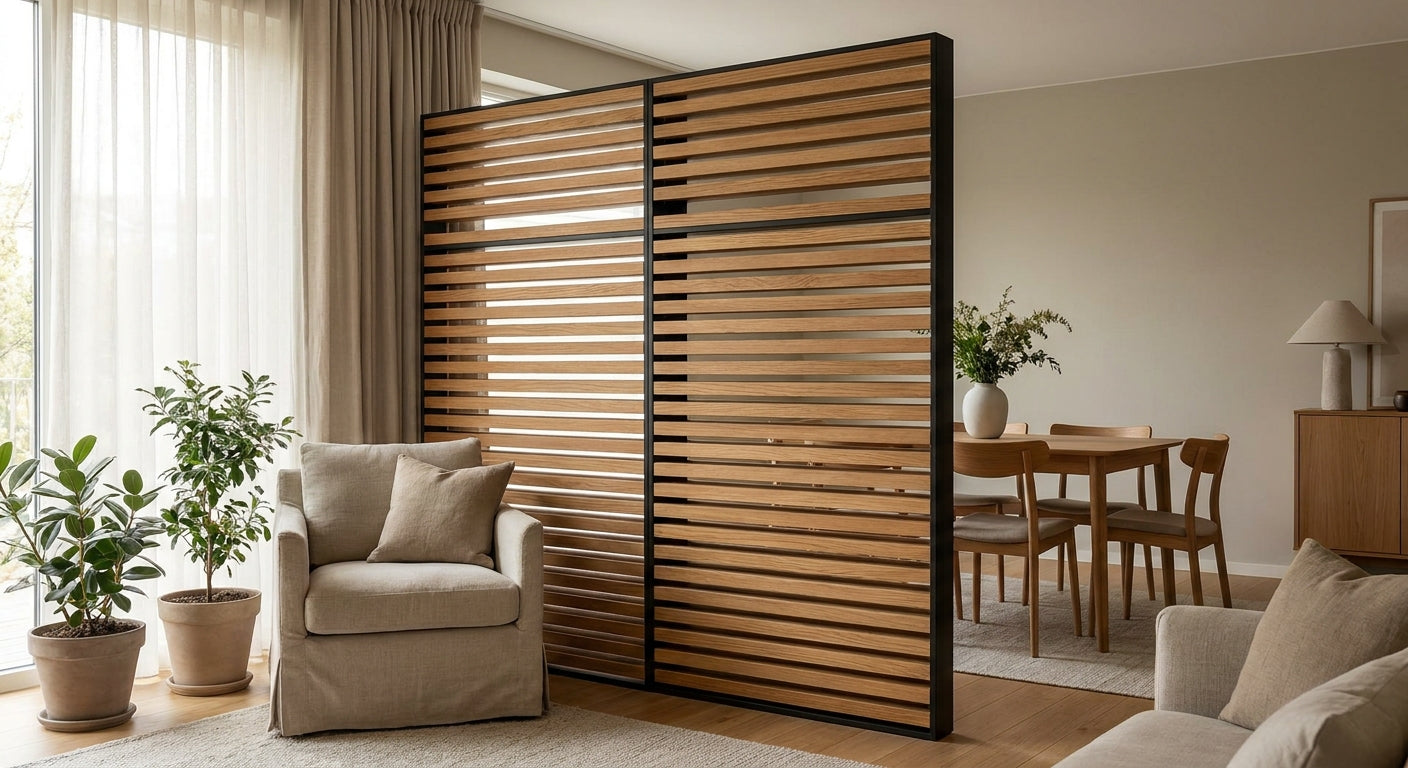
Building a double-sided room divider from slat panels turns one open-plan space into two distinct zones without a single stud wall — and it looks finished on both sides, not just the one facing your sofa.
A slat panel room divider double sided works because you're layering two panel faces onto a shared frame core, which means neither side reads as "the back." Verdict: build it yourself with a simple stud or track frame, acoustic slat wall panels on both faces, and a felt or rockwool core — expect a 6 to 8 foot tall divider to take a weekend, roughly 4 to 6 hours of actual work once the frame is up. Akuwood Panel's acoustic slat wall panels are the right pick here because the grooved veneer face and felt backing do double duty: they hide the framing and they cut down on the flutter echo that untreated dividers create in open kitchens and living rooms.
Why this matters
Open-plan layouts sound great on a floor plan and terrible in real life once furniture, hard floors, and a lack of walls send sound bouncing everywhere. A solid divider fixes the visual privacy problem but usually makes the echo worse, because you've added another hard, flat surface for sound to bounce off.
A double-sided acoustic slat divider solves both problems at once. The slats break up sound reflections on each face while the felt-backed core absorbs some of what gets through, and dividing an open-plan space with wood slat panels is one of the more common ways homeowners are zoning larger rooms in 2026 without losing natural light or ceiling height. You get a finished piece of furniture-grade partition instead of a plasterboard wall that needs paint, tape, and a permit conversation.
What you'll need
- Wood studs (2x2 or 2x3) or a metal track system for the frame
- Acoustic slat wall panels for both faces — Akuwood Panel's natural oak acoustic slat wall panel is a straightforward starting point at standard panel widths
- Rockwool insulation or extra felt backing for the core, if you want maximum sound absorption
- Construction adhesive plus finish nails or screws
- A level, stud finder, tape measure, miter saw or fine-tooth handsaw
- Floor and ceiling mounting hardware (L-brackets, floor track, or a ceiling-anchored top plate)
- 4 to 6 hours of build time for a 6 to 8 foot divider, plus drying time for adhesive
If you're not sure how the veneer and felt color will read in your room, order samples before you commit to a full run of panels — it saves you from discovering the tone is off after the frame is built.
The steps
1. Measure and plan the frame footprint
Measure the width and height you want the divider to cover, then decide whether it will be freestanding (floor-anchored only) or fixed floor-to-ceiling. A freestanding divider under 6 feet tall can usually stand on a weighted or wide base; anything taller performs better anchored top and bottom. Expected outcome: a cut list for your studs and a panel count for both faces. Common mistake: forgetting to account for the frame depth (typically 2 to 3 inches) when measuring the room's remaining floor space.
2. Build the stud frame
Frame a simple ladder structure — vertical studs every 16 inches with horizontal cross braces top, middle, and bottom. This gives both panel faces something solid to nail or glue into and creates cavities for insulation. Why it matters: slat panels need a flat, even substrate behind them or the veneer will show waves once it's fixed. Expected outcome: a rigid frame that doesn't flex when you push on it from either side.
3. Add the acoustic core
Fill the stud cavities with rockwool batts or layer in extra acoustic felt before you close up either face. This is the step people skip, and it's the difference between a divider that just looks good and one that actually dampens sound between the two zones. Common mistake: packing insulation too tight, which reduces its absorption performance — leave it loose enough to stay fluffy.
4. Attach the first face
Apply construction adhesive to the back of each acoustic slat wall panel and press it into the frame, working from one edge across. Back up the adhesive with finish nails or screws into the studs every 12 to 16 inches. Specific detail: let the adhesive cure for at least an hour before you flip the frame or start the second face, so the panels don't shift. Expected outcome: one fully covered, flush face with no visible frame edges.
5. Attach the second face with offset seams
Flip the frame and repeat the process on the opposite side, but stagger the panel seams so they don't line up with the seams on the first face. This keeps the divider from having a weak point where both faces meet at the same joint. Why it matters: offset seams add rigidity and hide any minor gaps that show up as the panels settle over the following weeks.
6. Finish the edges
Use matching end pieces along the exposed vertical edges so raw panel ends aren't visible from the side — this is what separates a professional-looking double-sided divider from one that clearly has two faces glued to a frame. End piece slat wall panels in natural oak are made to match the standard acoustic panel veneer, so the edge reads as intentional rather than patched. Common mistake: skipping end pieces entirely and leaving cut panel edges exposed, which shows the plywood substrate underneath.
7. Anchor top and bottom
Secure the finished divider to the floor with an L-bracket track, or run a discreet top plate into the ceiling joists if you want it fully fixed. A divider taller than 6 feet with no top anchor is a tip-over risk, especially in homes with kids or pets. Expected outcome: a divider that doesn't rock or shift when leaned on from either side.
8. Test the acoustics
Stand on each side and talk normally, then clap once near the divider from both zones. You should notice a clear drop in flutter echo compared to before the divider went up. If it still sounds hard and bright, that's your signal to add a rug, curtain, or a second acoustic panel section rather than assuming the divider alone will carry the whole room.
Troubleshooting
- Panels bow slightly after installation — usually means the adhesive didn't get full contact. Re-press with clamps overnight rather than adding more adhesive.
- Visible gap where the two faces meet at the top — the frame likely isn't perfectly square. Check with a level before attaching either face next time; on an existing build, a matching trim strip covers it.
- Divider still sounds echoey — the acoustic core is probably too thin or missing in spots. Open one face and check the insulation fill before blaming the panels.
- Divider wobbles when pushed — the base anchor is undersized for the height. Add a wider floor track or a discreet ceiling anchor.
- Veneer color looks different than expected once installed — natural wood veneer varies by batch and by light. This is why ordering a sample first matters more on a large double-sided build than on a single accent wall.
- Seams on both faces line up and create a visible weak line — this happens when panels aren't staggered during the second-face install; there's no fix short of pulling and restaggering that section.
Tools and resources
- Miter saw or fine-tooth handsaw for panel cuts
- Stud finder and 4-foot level
- Construction adhesive rated for wood veneer
- Full sample box of slat wall panel finishes to compare tones side by side before ordering a full run
- Rockwool insulation batts or extra felt sheeting for the acoustic core
What to do next
Before you order panels for both faces, work out the exact count you need — a double-sided divider uses roughly double the panels of a single accent wall covering the same footprint, and running short mid-build stalls the whole project. Calculating how many wall panels you need before you buy is the fastest way to avoid a second shipping wait in the middle of a weekend build.
FAQ
What's the best way to build a slat panel room divider double sided? Build a simple stud frame, insulate the core with rockwool or felt, and attach acoustic slat wall panels to both faces with offset seams. This gives you a divider that looks finished from either side and absorbs sound rather than just reflecting it.
Is a double-sided divider heavier than a single-sided one? Yes — you're doubling the panel weight since both faces are covered, plus the insulation core. Anchor it to the floor and, ideally, the ceiling if it's over 6 feet tall.
How much does a double-sided slat panel divider cost to build? Costs scale with the square footage of both faces combined, since you need roughly twice the panels of a single-face wall covering the same footprint — check current panel pricing before estimating a total.
Do slat panels actually reduce echo, or is that just marketing? Slat panels with felt backing measurably reduce flutter echo by breaking up flat reflective surfaces and absorbing some sound energy in the felt layer, which is why they're used in open offices and studios, not just homes.
Can I use a double-sided divider in a rental apartment? A freestanding, floor-anchored version works in rentals since it doesn't require attaching to walls or ceiling — just make sure the base is wide enough to stay stable without a ceiling anchor.
What's the minimum thickness needed for the acoustic core? A single layer of standard rockwool batt inside a 2 to 3 inch stud cavity is enough for noticeable echo reduction in a typical room; thicker cores absorb more but add weight and depth.
Should I match the panel finish on both faces or mix them? Matching finishes look more intentional and cohesive from every angle in the room, while mixed finishes work if each side of the divider serves a visually distinct zone, like a kitchen on one side and a living room on the other.
How long does a double-sided slat panel divider take to build? A 6 to 8 foot divider takes roughly 4 to 6 hours of hands-on work across a weekend, not counting adhesive cure time between steps.
One last thing
Most people build the frame and skip straight to attaching panels, then wonder why the divider still sounds hollow when they knock on it — the acoustic core isn't optional decoration, it's doing more of the sound work than the slats themselves. Fill the cavity before you close up either face, or you've built an expensive-looking wall that performs like drywall.




 Better performance and aesthetic appeal
 In Stock




