


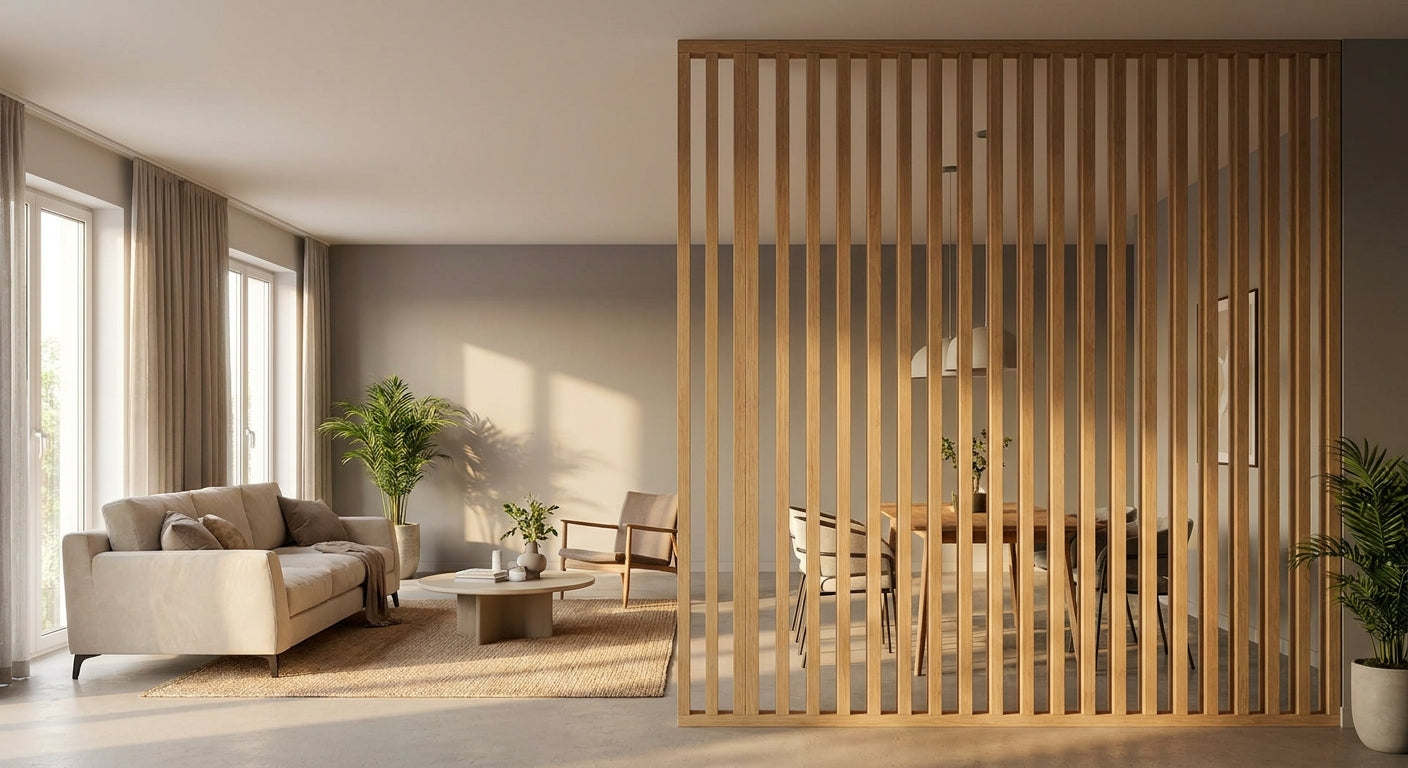
Open-plan living rooms and kitchen-diners look great in photos and sound like a food court in real life. Wood slat panels solve both problems at once: they break a single room into zones and knock down the echo that comes with hard floors, high ceilings, and no walls to stop sound.
TL;DR
Building a wood slat panels room divider open plan setup means framing a freestanding or ceiling-hung partition, cladding both faces with acoustic slat panels, and finishing the edges so it reads as furniture, not construction. The AKU Wood Panel Acoustic Slat Wall Panel in Natural Oak is the Buy pick for this project because the felt backing absorbs sound from both sides of the divider, not just one. Budget a full weekend for a room-width divider; a narrow accent screen goes up in an afternoon. This guide covers materials, the build steps, and the mistakes that make a slat divider look like a leftover office cubicle wall.
Why this matters
Open-plan layouts got popular because they photograph well and make small square footage feel bigger. What nobody mentions on the listing is what happens acoustically once you remove interior walls: sound bounces between hard surfaces with nothing to catch it, so a dishwasher running in the kitchen competes with a conversation on the couch 15 feet away.
A slat wall divider does two jobs a curtain or a bookshelf can't. It gives your eye a visual break between zones, and if you pick a felt-backed panel, it absorbs mid-to-high frequency noise instead of just deflecting it back into the room. That's the difference between a divider that looks nice and one that actually changes how the room sounds in 2026.
What you'll need
- Slat panels — enough to clad both faces of your divider. A standard partition 8 feet tall by 4 feet wide needs roughly 6-8 panels per side depending on panel width.
- Framing lumber — 2x4s for a freestanding stud frame, or a top track if you're hanging the divider from the ceiling.
- End pieces or corner trim to finish exposed edges so the plywood core never shows.
- Construction adhesive and finish nails, or panel-specific mounting clips if your panels use them.
- A miter saw or fine-tooth handsaw for cutting panels to height.
- Level, stud finder, and tape measure — non-negotiable if the divider is anchored to the floor or ceiling.
- One sample panel before you commit. The AKU Wood Panel sample slat wall panel in Natural Oak shows you the actual veneer grain and felt color under your room's lighting, not a screen rendering.
The steps
1. Decide freestanding vs. ceiling-anchored
A freestanding divider sits on a weighted or floor-bolted base and can be moved later; a ceiling-anchored version is sturdier and disappears visually because there's no baseboard-level frame to see. For rentals or anyone who might rearrange the space, freestanding wins. For a permanent zone split in a kitchen-diner, anchor it top and bottom.
Common mistake: skipping the weight calculation on a freestanding base. A divider clad on both sides in wood panel is heavier than drywall — undersize the base and it tips.
2. Frame the partition
Build a simple 2x4 stud frame at 16-inch centers, matching the height and width you measured. If you're hanging from the ceiling, locate joists first with a stud finder — screwing into drywall alone won't hold the weight of a double-clad panel wall.
This step accomplishes the structural backbone everything else attaches to. Expected outcome: a square, plumb frame that doesn't rack when you push on a corner.
3. Plan your panel layout before cutting anything
Dry-fit panels against the frame and mark where seams will fall. Vertical slat orientation reads taller and works well in rooms under 9-foot ceilings; horizontal orientation widens a narrow divider visually.
Common mistake: cutting the first panel to fit and discovering the last panel on that face needs an odd 2-inch sliver. Measure the full run first, then decide whether to center a full panel or split the difference on both end pieces.
4. Cut and dry-fit both faces
Cut panels to height with a fine-tooth blade to avoid chipping the veneer. Dry-fit every panel on both faces of the divider before any adhesive goes down — this is the point where layout mistakes are still free to fix.
5. Mount the panels
Apply construction adhesive to the panel back in a zigzag bead, press into place, and secure with finish nails near the top and bottom edges where end pieces will hide the nail heads. Work top to bottom on each face so gravity helps you keep panels aligned.
Why it matters: adhesive alone flexes over time in a room with temperature swings; nails at the edges keep panels from creeping.
6. Finish the edges
This is the step that separates a professional-looking divider from a DIY-looking one. Cap every exposed panel edge — top, bottom, and both vertical ends — with matching end pieces. The AKU Wood Panel end piece slat wall panel in Natural Oak is built for exactly this: it wraps the plywood core so the divider looks finished from every angle in the room, since a room divider gets viewed from both sides.
Common mistake: leaving the top edge unfinished because "nobody looks up there." In a room divider, people absolutely see the top edge — it's at eye level for anyone standing across the room.
7. Check the sound performance
Clap once on each side of the finished divider. A felt-backed panel installation should noticeably dull the clap's sharpness compared to a bare wall. If it still sounds sharp, you likely have gaps behind the panels letting sound bounce through the frame cavity instead of into the felt backing.
Troubleshooting
- Divider wobbles when bumped. The base isn't heavy enough or isn't anchored. Add ballast to a freestanding base, or add a discreet ceiling anchor if the design allows it.
- Visible seam lines between panels. Panels weren't dry-fit before adhesive went down. On a future run, dry-fit the full face first and adjust spacing before committing.
- Echo hasn't improved much. Slat panels absorb some sound but they're not a full acoustic treatment on their own — pair the divider with a rug and soft furnishings in the same zone for a bigger drop in reverb.
- Panel color doesn't match under evening light. Warm bulbs shift oak tones amber; check your sample panel under the actual bulbs you use at night, not daylight through a window.
- Gaps at the ceiling on a freestanding unit. Rooms are rarely perfectly level. Scribe the top panel to the ceiling line instead of assuming a flat cut will fit.
- Nail heads showing through the veneer. Use finish nails sized for panel thickness and countersink slightly — end pieces and trim should cover the rest.
Tools and resources
- Miter saw or fine-tooth handsaw for panel cuts
- Stud finder and 4-foot level
- Construction adhesive rated for wood veneer
- The AKU Wood Panel sample slat wall panel in Natural Oak to confirm color and felt tone before ordering a full run
- A helper for holding panels plumb while adhesive sets — this is a two-person job past 6 feet of panel height
What to do next
Once the divider is up, the next decision is scale. A single accent screen and a full room-width partition need different panel counts and framing approaches — the AKU Wood Panel guide on XL slat wall panels for large open-plan walls covers sizing a bigger run so you're not guessing on panel quantity for a wall-length divider.
FAQ
What's the best wood for a slat panel room divider in an open-plan space? Natural oak and smoked oak are the two most common picks for open-plan dividers in 2026 because the grain reads as neutral against both light and dark flooring. Walnut works if the rest of the room already leans warm and dark.
Do slat panels actually reduce noise between zones? Felt-backed slat panels absorb mid-to-high frequency sound on the side facing the felt, which noticeably softens echo and voice carry between an open kitchen and living area. They don't block sound the way a solid wall does — they reduce reflection, not transmission.
How tall should a room divider be in an open-plan layout? Most open-plan dividers run 6 to 8 feet tall, tall enough to create a visual break while keeping sightlines to the ceiling so the room doesn't feel chopped up. Full ceiling-height dividers work better in rooms with 9-foot-plus ceilings.
Can I build a freestanding divider without anchoring it to the ceiling? Yes, with a weighted or floor-bolted base sized for the panel weight on both faces. Freestanding works best for renters or anyone who expects to reconfigure the layout within a year or two.
Is a double-sided slat panel divider more expensive than a single wall of panels? It roughly doubles panel count since both faces need cladding, but it also means both rooms get the acoustic benefit and the finished look. Check current panel pricing directly on the product page since quantities vary by project size.
How many panels do I need for an 8-foot by 4-foot divider? Expect 6 to 8 panels per face depending on individual panel width, plus end pieces for every exposed edge on both sides. Measure the exact run before ordering — cutting waste adds up fast on a double-faced build.
Should slats run vertical or horizontal on a room divider? Vertical orientation is the default for dividers because it reads taller and pairs naturally with a ceiling-to-floor build. Horizontal works if the divider is wider than it is tall, like a low partition behind a sofa.
What finishes hide seams best on a room divider? Matching end pieces at every panel edge, not just the outer frame, keep seams from reading as unfinished plywood. Skipping interior seam caps between panel runs is the single most common reason a DIY divider looks unfinished.
One last thing
Most people finish the panel install and stop, but the felt backing only does its job if the frame cavity behind it isn't hollow and echoing on its own. Pack the stud cavity loosely with the same insulation you'd use in an interior wall — it's a $30 add and it's the difference between a divider that looks acoustic and one that actually is.



 Better performance and aesthetic appeal
 In Stock




