


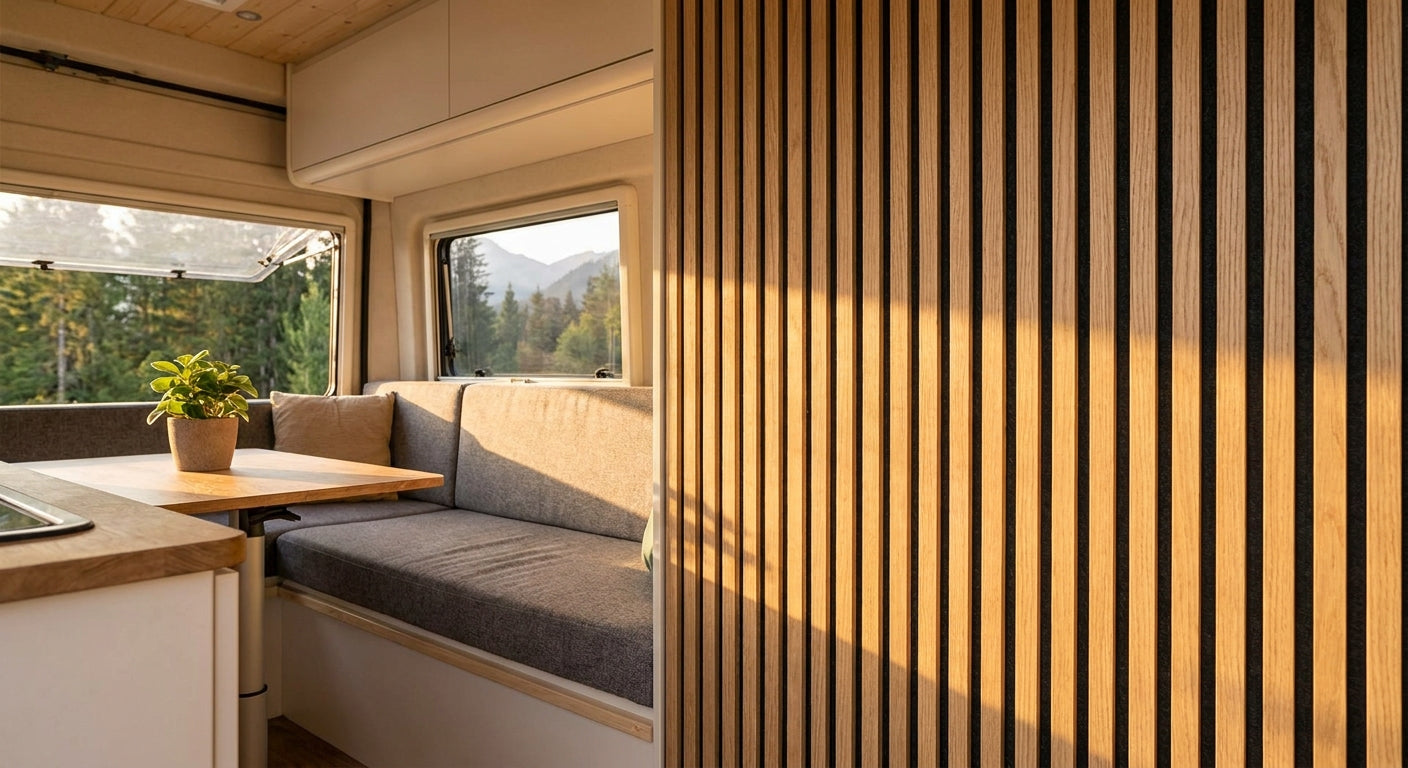
Wood slat panels turn cramped RV and camper van interiors into warm, finished spaces that feel intentional rather than industrial. Whether you're renovating a sprinter van, Airstream, or travel trailer, choosing the right wood slat panels means balancing weight, durability, moisture resistance, and aesthetic appeal—all in a confined space where every inch counts.
- Acoustic slat panels in walnut or natural oak add warmth without bulk; ideal for RV living rooms and sleeping areas.
- Fluted and 3D panels create visual depth in tight quarters while managing engine noise and road rumble.
- Lightweight wood veneers (not solid wood) save weight critical for RV payload capacity in 2026.
- Gray felt-backed panels absorb sound better than bare wood, essential for open-plan van layouts.
- Install horizontally to emphasize width in narrow spaces; vertical for low ceilings.
Why this matters
Most RV interiors ship with plastic laminate or bare aluminum, functional but impersonal. Wood slat panels change that in two ways: they anchor your space visually and dampen the mechanical noise that makes long drives exhausting. A camper van interior finished with wood panels feels like a cabin, not a cargo hold. The key is choosing panels light enough to keep your rig within payload limits while durable enough to handle the vibration, humidity swings, and constant movement of mobile life.
Who this is for
You're converting or refreshing an RV, sprinter van, or travel trailer interior. You want something warmer than white plastic but aren't buying a luxury motorhome. You're comfortable with a 2 to 4 day install (or hiring it out) and willing to spend $800 to $3,000 on materials to transform a 100 to 200 square foot interior. You likely tow or drive regularly and care about sound dampening during highway miles.
What to look for in wood slat panels for RV interiors
Lightweight construction
RVs operate under strict weight limits. Your dry weight plus cargo and passengers cannot exceed the GVWR (Gross Vehicle Weight Rating). Wood veneer panels weigh 40 to 60% less than solid wood, critical when you're already carrying water tanks, appliances, and gear. In 2026, most RV converters choose 5 to 8mm thick veneer over plywood substrate rather than 1-inch solid wood. The visual impact stays the same; the payload savings let you load camping equipment without sacrificing sleeping comfort.
Moisture and humidity resistance
RV interiors experience extreme humidity swings, over 80% when parked in rain, 20% in desert conditions. Wood that isn't sealed or backed with a moisture barrier will warp, swell, and cup within months. Acoustic slat panels with gray felt backing act as a vapor buffer and hide any minor movement. Natural finishes on wood veneer hold up better than stains that can peel under flexing walls.
Acoustic properties (NRC rating)
Engine and road noise inside a van is relentless. Felt-backed acoustic panels carry an NRC (Noise Reduction Coefficient) of 0.60 to 0.75, meaning they absorb 60 to 75% of sound energy hitting them. Bare slat panels without backing absorb only 0.30 to 0.40 NRC. For a bedroom or living area, felt-backed walnut or natural oak slat panels turn a tin-can echo into something livable. This matters most in compact vans where walls are only 12 to 18 inches from your ears while driving.
Flexibility for curved or angled surfaces
RV walls slope, taper, and curve. Ceiling heights drop toward the back, corners are rounded, and wheel wells intrude. Rigid 3D panels work only on flat sections. Fluted wall panels made from real wood veneer flex slightly around gentle curves and fit around cabinets and windows more forgivingly than brittle 3D tiles. In 2026, converters favor flexible fluted panels for the main living area and reserve 3D panels for accent walls or flat ceiling sections.
Fire and building code compliance
If you're selling the converted van or renting it on Airbnb, fire rating matters. Many insurance policies and short-term rental platforms require Class A fire ratings. Wood veneers alone don't meet this; they must be paired with fire-rated substrate or treated with fire-retardant coatings. Check the spec sheet before ordering; most retail acoustic panels carry ratings, while raw slat panels do not.
Top picks for RV and camper van wood slat panels
Natural Oak slat panels — the versatile favorite
Natural oak reads light and Scandinavian without feeling cheap or plastic. The open grain texture absorbs light naturally, making a small van interior feel less confined. Paired with gray felt backing, these panels hit 0.75 NRC and weigh roughly 2.5 lbs per 10x48 inch panel. One kit covers approximately 48 square feet (enough for a 6x8 bedroom area) and costs around $400 to $500 in 2026. The light finish works with both minimalist and rustic decor, and the panels are straightforward to cut around windows and appliances. Buy it for interior walls, bedroom accent, or ceiling soffit. See the natural oak slat panels.
Walnut slat panels — the moody statement
Walnut reads dark and warm, perfect for creating a cozy bedroom nook or living zone in an open-plan van. The deep brown tones hide dust and road grime better than lighter finishes, important in mobile life where cleaning happens in truck stops, not daily. Walnut acoustic panels with gray felt backing cost about $450 to $550 per 48 sq ft in 2026. The darker tone absorbs more visual light than oak, so pair it with good LED lighting strips run along the top edge of walls or embedded in ceiling channels. Buy it for sleeping areas or the galley; skip for the entire interior if your van is under 200 sq ft, since it can feel closed-in. See the walnut slat panels.
Fluted panels — the flexible option
Fluted panels feature parallel grooves that create shadow lines and visual rhythm. They flex slightly (important for curved RV walls), absorb sound well (0.65 to 0.70 NRC with felt), and cost slightly less than acoustic slat panels, roughly $350 to $450 per 48 sq ft in 2026. Fluted panels work especially well for galley backsplashes, bathroom walls, and around curved wheel wells. The grooves also hide imperfect seams and fastener lines better than flat slats. Buy it for secondary spaces and curved sections; consider it for main living areas if your budget is tight. See the fluted wall panel.
3D wood wall panels — the accent investment
3D panels (also called wood tiles) feature carved, raised patterns in deep dusk walnut, slim walnut, or fresh pine styles. They're heavier than slats (4 to 5 lbs each) and more brittle, so reserve them for flat accent walls: a headboard, galley backsplash, or ceiling feature in the seating area. At $40 to $55 per panel, they add visual drama but aren't practical for full-wall coverage in a tight RV. They also absorb less sound (NRC around 0.40) without felt backing. Buy it as a 1 to 2 panel accent; skip for load-bearing areas or tight curves. See the 3D wood wall panel.
Sample box — before you commit
RV interiors are small, and color and finish choices feel large. Order a full sample box (usually $30 to $50) that includes pieces of walnut, natural oak, and fluted options, plus end caps and trim samples. Install a small section (2 to 3 feet) in your van under natural light and LED nighttime lighting. Live with it for a few days before ordering the full kit. Buy it first, always. See the full sample box.
What to avoid
Bare (unfelt-backed) slat panels in sleeping areas. They look the same as felt-backed panels but provide half the sound absorption. Highway noise and your travel partner's breathing become exhausting over weeks in a van. Spend the extra $50 to $100 per kit for felt backing; it's the difference between a livable bedroom and an insomniac's nightmare.
Stained finishes on high-humidity walls. Stains sit on the wood surface and flake under expansion cycles. Sealed or naturally finished panels handle RV moisture better. If you choose walnut or smoked oak, verify the factory finish includes a UV-stable topcoat; ask the seller before ordering.
Heavy solid-wood panels in payload-constrained vehicles. A fully loaded sprinter van or travel trailer is already at or near GVWR. Solid 1-inch oak or walnut adds 200 to 300 lbs unnecessarily. Veneer over plywood or substrate gives you the look with half the weight. In 2026, even luxury RV builders use veneers; it's not a budget compromise, it's an engineering choice.
Comparison table
| Panel type | Weight per 48 sq ft | NRC (felt-backed) | Cost range | Best for | Install difficulty |
|---|---|---|---|---|---|
| Natural oak slat | 2.5 lbs | 0.75 | $400-500 | Bedrooms, living areas, light interiors | Easy |
| Walnut slat | 2.5 lbs | 0.75 | $450-550 | Accent walls, galley, moody spaces | Easy |
| Fluted panels | 2.8 lbs | 0.65-0.70 | $350-450 | Curved walls, bathrooms, budget builds | Easy |
| 3D wood tile | 4-5 lbs each | 0.40-0.50 | $40-55 per panel | Accent walls, headboard feature | Moderate |
| Smoked oak slat | 2.5 lbs | 0.75 | $475-575 | High-contrast modern builds | Easy |
Installation essentials for RV spaces
Substrate prep: RV walls are often aluminum-framed or plywood. Sand or prep lightly to remove gloss, then attach quarter-inch plywood shims or furring strips using corrosion-resistant fasteners. Never attach panels directly to thin aluminum; the metal flexes, and fasteners loosen within weeks.
Horizontal vs vertical orientation: Horizontal (running left to right) emphasizes width; use this for narrow sprinter vans and enclosed trailers to fight the tunnel effect. Vertical emphasizes height; choose this for taller vans or where ceiling height is adequate. Diagonal can work for 3D accent panels but complicates cutting and layout; avoid it unless you're an experienced carpenter.
Lighting integration: LED strips run beautifully along the top edge of slat panels or tucked into shadow lines of fluted panels. Pre-run wiring before panels go up. Soft white (3000K) strips feel warmer than cool white in a confined space.
Sealing seams: Use paintable caulk (not spray foam) in gaps between panels, around windows, and at edges. This maintains acoustic performance and prevents dust intrusion during highway miles. Paint caulk to match your panel finish or leave it natural.
Moisture barrier: In humid climates (coast, tropics, rainy regions), add a thin vapor barrier (15 to 20 mil poly sheeting) behind panels. Staple it to the furring strips before panels go on. This prevents moisture from reaching the aluminum frame and causing rust.
Troubleshooting common RV panel issues
Panels rattle during highway driving. Fasteners (usually ring-shank nails or screws) have loosened from vibration. Remove panels locally and re-secure with stainless steel screws spaced 12 to 16 inches apart. Use washers under screw heads to prevent puncture through veneers. Consider adding a resilient channel between furring and panels; it dampens vibration.
Visible gaps between panels widen over time. Wood expands and contracts with humidity changes. This is normal in RVs, especially when you travel between climates. Use flexible caulk (silicone or acrylic-latex blend) rather than rigid caulk. Repaint annually or touch up with a stain pen. If gaps exceed one-eighth inch, the substrate may have shifted; check fasteners and furring first.
Felt backing delaminating or bubbling. Moisture has reached the glue layer, usually because seams weren't sealed or a water leak occurred. Once delamination starts, that panel must be replaced. Check for water intrusion at windows, vents, or roof seams and fix the leak first before re-paneling.
Panels look dull or scratched after 6 to 12 months of travel. Road dust and sunlight fade wood finishes. Wipe panels monthly with a soft, dry microfiber cloth. Once or twice yearly, treat with a thin coat of wood oil or furniture polish to restore sheen and UV protection. Avoid water-based cleaners; they raise the grain and darken the wood unevenly.
Sound absorption feels weaker after a few months. Dust and pet hair clog the felt surface. Vacuum felt-backed panels every 2 to 3 months using low suction to avoid pulling fibers. If performance doesn't improve, the felt may have compressed from humidity; consider overlaying a second layer of acoustic panels in key listening zones.
Tools and resources
- Circular saw or miter saw for cutting panels to fit windows, edges, and angles. Use a fine-toothed wood blade at slower speed to avoid tearout on veneers.
- Stud finder or moisture meter to locate hidden aluminum studs and check substrate moisture before paneling.
- Corrosion-resistant fasteners such as stainless steel ring-shank nails or exterior-grade screws to prevent rust in humid RV environments.
- Resilient channel or furring strips to create air gaps that reduce vibration transmission and improve acoustic performance.
- Flexible caulk and paintable sealant to allow for wood movement in RV walls.
- Test finishes before committing: order a sample box first to check color and fit in your specific van under natural and LED light.
What to do next
Start by measuring your van interior in sections: sleeping area, galley, bathroom, living space. Sketch a layout showing ceiling height, window placement, and curves. Identify which areas get constant noise (sleeping area), which feel cramped (narrow sides), and which are visible to guests (living zone). Then order samples in your two top-choice finishes. Install a 2x3 foot test section on one wall under the lighting conditions where you actually spend time: daytime driving, nighttime LED, grey-day overcast. Live with it for 3 to 5 days before ordering full panels. This 3-week patience saves $800 in regret later.
Wood slat panels transform the RV experience from passing through to dwelling in. The right choice depends on your climate, style, and how much vibration and noise you're willing to tolerate. Natural oak hits the middle ground: light, warm, absorbs sound well, and works with nearly any interior theme. Walnut commands attention and feels intentional; buy it if you're committed to a specific aesthetic. Fluted panels offer flexibility for curved spaces and lower budgets. Whatever you choose, invest in samples first, seal seams carefully, and refresh fasteners every year or two.
As you plan your panel weight budget, factor in overall payload management; adding load assist for camper vans offsets the weight of interior upgrades and keeps handling stable when the van is fully kitted out.
FAQ
How much does it cost to panel an entire RV interior with wood slat panels?
A 200 sq ft interior costs $1,600 to $2,400 in materials in 2026. Natural oak or felt-backed walnut acoustic panels run $400 to $550 per 48 sq ft, plus trim, samples, and fasteners. Labor adds $1,200 to $2,000 if you hire professionals; many converters DIY to save cost.
Do wood slat panels add weight that will put my RV over GVWR?
Veneer-backed acoustic panels add only 2.5 to 3 lbs per 48 sq ft. A full 200 sq ft interior adds roughly 100 to 130 lbs, usually within acceptable limits. Solid wood would add 200 to 300 lbs and is not recommended for most RVs. Always verify your current GVWR and payload capacity before planning major interior upgrades in 2026.
Can I install wood slat panels on a curved RV wall myself?
Yes, if you use fluted or flexible panels and frame the wall properly with furring strips. Curved sections are easier to manage than you would expect since the panels flex naturally. Rigid 3D tiles and hard slat panels resist curves and require cutting or shimming. Budget 3 to 4 days for a full interior if experienced, 5 to 7 days for a first project.
What finish should I choose for a bathroom or wet area in an RV?
Avoid bare slat panels and unsealed wood in wet zones. Use felt-backed acoustic panels paired with a vapor barrier behind the panel and caulked seams. For direct moisture zones like a shower surround, consider 3D tile panels with sealed backing, or defer to tile or composite panels instead.
Will wood panels absorb odors in a small RV?
Felt-backed acoustic panels trap odors slightly more than bare wood, so ventilation and air circulation matter more than the panels themselves. Use a small exhaust fan, crack windows overnight, and vacuum felt monthly. Walnut and smoked oak finishes hide dust and odor sources better than light oak.
How do I protect wood panels from UV fading if my RV sits in the sun?
Factory finishes on acoustic panels include UV inhibitors, but they fade over time in 2026 like all wood. Use reflective window covers or park in shade when possible. Annually apply a thin UV-protective wood oil or furniture polish to maintain sheen and color. This is easier than replacing panels every few years.
Can I remove and reinstall wood slat panels if I want to change the design later?
Partially. Carefully remove fasteners and slide panels out; they usually come off intact if they weren't caulked heavily. Reuse is possible if you remove caulk and prep the substrate again. Felt backing can tear, so plan for 30 to 50% of old panels to be unusable if you switch designs within 3 to 5 years.
What is the difference between acoustic slat panels and fluted panels for RV use?
Acoustic slat panels are flat with visible horizontal slats and felt backing; they absorb sound excellently at 0.75 NRC. Fluted panels have parallel grooves, offer more flex for curves, and absorb slightly less sound at 0.65 to 0.70 NRC but cost less and work better around windows. Choose slat for sound priority, fluted for versatility.
One last thing
The best time to panel an RV interior is before you live in it full-time. Once you're using the space daily, removing panels for prep work becomes exponentially harder; you have to pack or relocate belongings, work around appliances, and manage dust in a confined area. Plan a 5 to 7 day install window immediately after purchase or during a planned service stop when the van is empty and accessible. The difference between a rushed weekend install and a deliberate weeklong project is the difference between panels that hold and ones that rattle.




 Better performance and aesthetic appeal
 In Stock




