


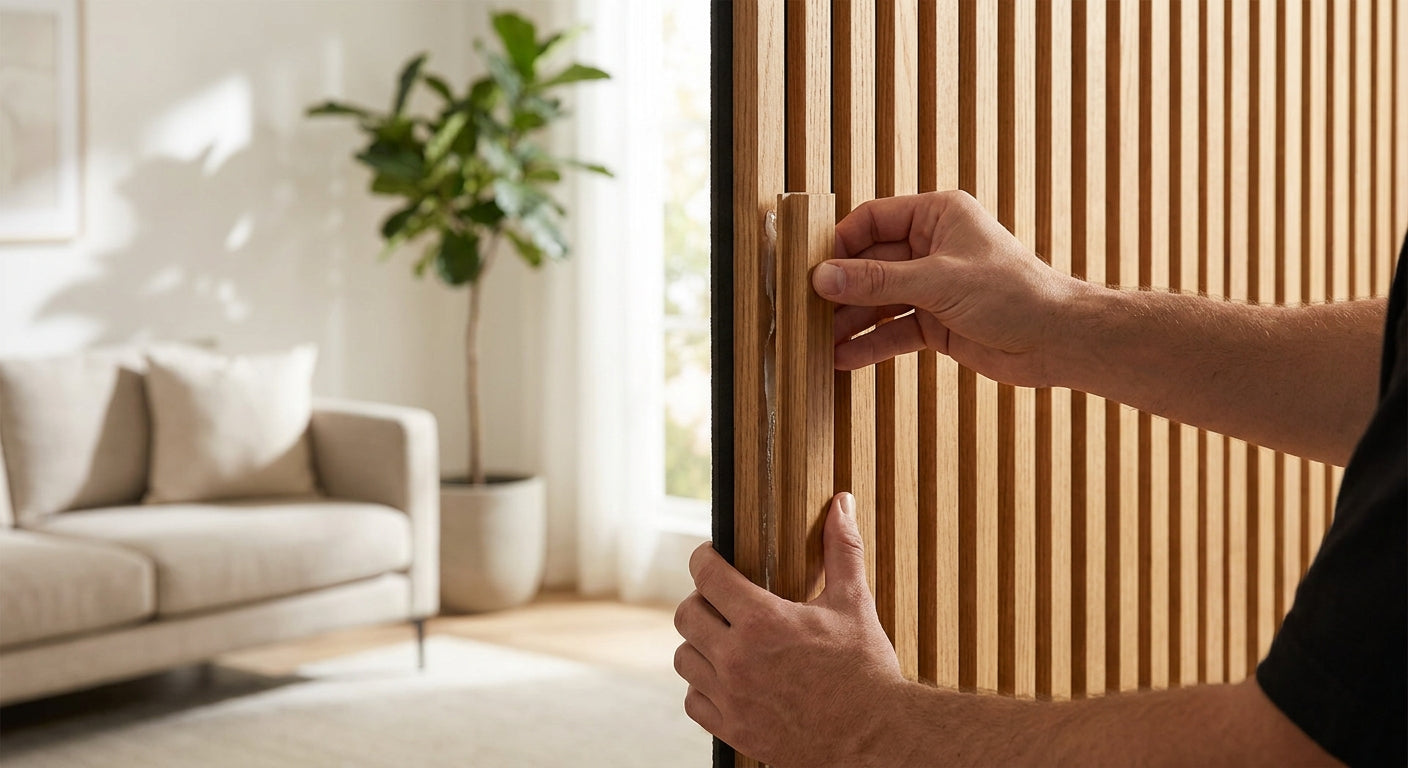
Cutting a slat wall panel flush against a wall, window, or corner leaves a raw plywood or MDF edge exposed — and that edge is the first thing a guest's eye catches. End pieces solve that in under an hour with the right cut and the right adhesive.
- End pieces for slat wall panels close raw edges at corners, windows, and wall terminations — Buy the matching end piece, not a generic trim.
- A 45-degree miter cut on the end piece hides the seam better than a butt joint in 2026 installs.
- Construction adhesive plus 2-3 finish nails holds an end piece for 15+ years indoors — clips alone loosen over time.
- Color-match the end piece to the panel batch before cutting; veneer tone shifts between production runs.
Why this matters
A slat wall panel looks finished when the slats run edge to edge with no visible substrate. The moment a panel gets cut to fit a corner, a window reveal, or a doorway, you expose the plywood or MDF core underneath the veneer. That raw edge is gray, flat, and obviously not wood.
End pieces are pre-finished caps designed to sit over that cut edge and continue the slat pattern without a visible seam. AKU Woodpanel ships them in the same veneer tones as the Natural Oak end piece line specifically so the transition disappears rather than standing out. Skip this step and the whole installation reads as a DIY job instead of a finished wall.
What you'll need
- Slat wall panel end pieces in the matching veneer tone (Natural Oak, Walnut, Smoked Oak, or Black Oak)
- Tape measure and pencil
- Miter saw or a fine-tooth handsaw with a miter box
- 120-grit sandpaper
- Construction adhesive rated for wood-to-wall bonding
- Finish nails (1.5") and a nail set
- A level
- Clean rag and mineral spirits for glue cleanup
The steps
1. Measure the exact termination point
Measure from the last full slat to the wall corner, window frame, or door casing where the panel run ends. Write the number down before you touch a saw — a 1/8" error compounds if you're finishing both sides of a run. Expected outcome: a single number, in inches, for the gap the end piece needs to cover.
Common mistake: measuring once and cutting immediately. Measure twice at different heights — walls are rarely perfectly plumb, and a 94.5" panel run can vary by 1/4" from top to bottom.
2. Dry-fit the end piece before cutting anything
Hold the end piece against the termination point without adhesive or nails. Check that the slat spacing lines up visually with the adjoining panel — the grooves should read as continuous, not offset. This step catches a batch mismatch before it's permanent.
If the veneer tone looks noticeably lighter or darker than the installed panel, stop and check the lot number on the box. Veneer batches shift color between production runs, and this is the cheapest point to catch it.
3. Cut the end piece to length
Set your miter saw to 45 degrees if the end piece meets an inside or outside corner, or 90 degrees for a straight butt finish against drywall or a window jamb. Clamp the piece before cutting — MDF-backed panels chip at the cut edge if the material shifts mid-cut.
For a corner return, cut two end pieces at 45 degrees each so they form a mitered seam rather than a butt joint. This hides the seam almost completely and is the standard finish for interior corners in 2026 installations.
4. Sand and test-fit the cut edge
Run 120-grit sandpaper over the cut face to knock down any splinters or saw marks. Test-fit the piece dry one more time — it should sit flush with zero force needed to seat it.
Expected outcome: the end piece slides into place with a gap under 1mm at the seam. Anything wider means the miter angle or the measurement is off, and you should recut rather than force it with extra adhesive.
5. Apply construction adhesive to the back
Run a bead of construction adhesive in a zigzag pattern across the back of the end piece, staying 1/2" from all edges so glue doesn't squeeze out visibly. Wall panel adhesive rated for interior wood-to-drywall bonding is the standard choice — avoid silicone-based sealants, which don't grip MDF backing as well.
If you're finishing the Walnut end piece against a painted surface, wipe the wall with a damp cloth first — adhesive bonds poorly to dust or old paint residue.
6. Press, align, and pin
Press the end piece into position and hold for 30 seconds of firm pressure — this is the window most construction adhesives need to grip. Check the slat alignment against the adjoining panel with a level before the adhesive sets.
Drive two to three 1.5" finish nails through the least visible groove to hold the piece while the adhesive cures fully, which typically takes 24 hours. Set the nail heads below the surface with a nail set.
7. Check the reveal and clean up glue lines
Once the adhesive skins over — usually 10 to 15 minutes — wipe any squeeze-out at the seam with a rag dampened in mineral spirits. Check the final reveal at the top and bottom of the run; both should match within 1/16".
Common mistake: cleaning glue squeeze-out too late. Once construction adhesive fully cures, it has to be scraped, which risks gouging the veneer.
Troubleshooting
Gap between the end piece and the wall. Usually caused by an out-of-plumb wall. Shim behind the end piece with thin cedar shims before the final adhesive application rather than forcing the piece flat.
Visible color mismatch after installation. This means the end piece came from a different veneer lot than the main panel run. Order end pieces and full panels in the same purchase whenever possible to reduce batch variation.
End piece pops loose within a few months. Adhesive alone without mechanical fastening fails under humidity swings. Always back up adhesive with 2-3 finish nails, especially in kitchens or bathrooms with fluctuating moisture.
Mitered corner seam is visibly open. The two 45-degree cuts weren't matched. Recut both pieces together, clamped side by side, so the angles are identical rather than cut independently.
Reveal is uneven top to bottom. The wall isn't plumb, or the original panel wasn't installed level. Check with a 4-foot level before blaming the end piece — this is almost always an upstream installation issue.
Nail heads show through the veneer. The nail set went too shallow. Countersink another 1/16" and fill with a wood filler pen matched to the veneer tone.
Tools and resources
- Miter saw or handsaw with miter box for angled cuts
- Construction adhesive rated for interior wood panel installs
- 120-grit sandpaper and a nail set
- A guide on how to cut acoustic wood slat panels to size if you're trimming the main panel before adding end pieces
- End pieces in Natural Oak, Walnut, Smoked Oak, and Black Oak to match any AKU Woodpanel slat panel order
What to do next
Once edges are finished, the next weak point in most slat wall installs is the corner where two walls meet at 90 degrees. That's a separate technique from a straight end-piece termination, and it's worth reading through before you tackle a full room in 2026 rather than fixing a bad corner after the adhesive has cured.
FAQ
What are end pieces for slat wall panels used for?
End pieces cap the raw cut edge of a slat wall panel where it meets a wall, window, or corner. They continue the slat pattern and veneer finish so the plywood or MDF core underneath never shows.
Do I need end pieces for every slat wall panel installation?
You only need end pieces where a panel is cut short of a full run - at corners, around windows, or at a room's terminal wall. A full wall-to-wall installation with no cuts doesn't need them.
Can I cut end pieces myself or do they come pre-sized?
End pieces ship at standard lengths and need to be cut to your exact gap with a miter saw or fine-tooth handsaw. Dry-fit before cutting to confirm the veneer tone matches your installed panels.
What adhesive works best for attaching end pieces?
Construction adhesive rated for wood-to-drywall bonding is the standard choice for 2026 installs. Back it up with 2-3 finish nails since adhesive alone can loosen under humidity swings in kitchens and bathrooms.
How do I match the end piece color to my panels?
Order end pieces in the same purchase as your main panel run whenever possible, since veneer tone shifts slightly between production batches. Dry-fit the piece against an installed panel before cutting to catch any mismatch early.
Is a mitered corner or a butt joint better for end pieces?
A 45-degree mitered corner hides the seam better than a 90-degree butt joint, especially at inside and outside wall corners. Cut both mating pieces together clamped side by side so the angles match exactly.
How long does an end piece installation take?
A single end piece takes under an hour including measuring, cutting, sanding, and adhesive application. Full cure time for construction adhesive is typically 24 hours before the wall should take any impact.
What's the biggest mistake people make finishing slat wall panel edges?
Skipping the dry-fit step before cutting is the most common error - it hides veneer color mismatches until the piece is already glued in place. Always test-fit dry first, even when the cut looks obvious.
One last thing
The seam that fails first isn't the one at the corner — it's the one nobody checks: the top edge where an end piece meets crown molding or a ceiling line. Glue alone won't hold there long-term because there's no lateral support from adjoining slats. Add a finish nail at the top 2 inches of every end piece, even when the rest of the run is adhesive-only, and you won't be back in that room with a nail set in 2027.



 Better performance and aesthetic appeal
 In Stock




