


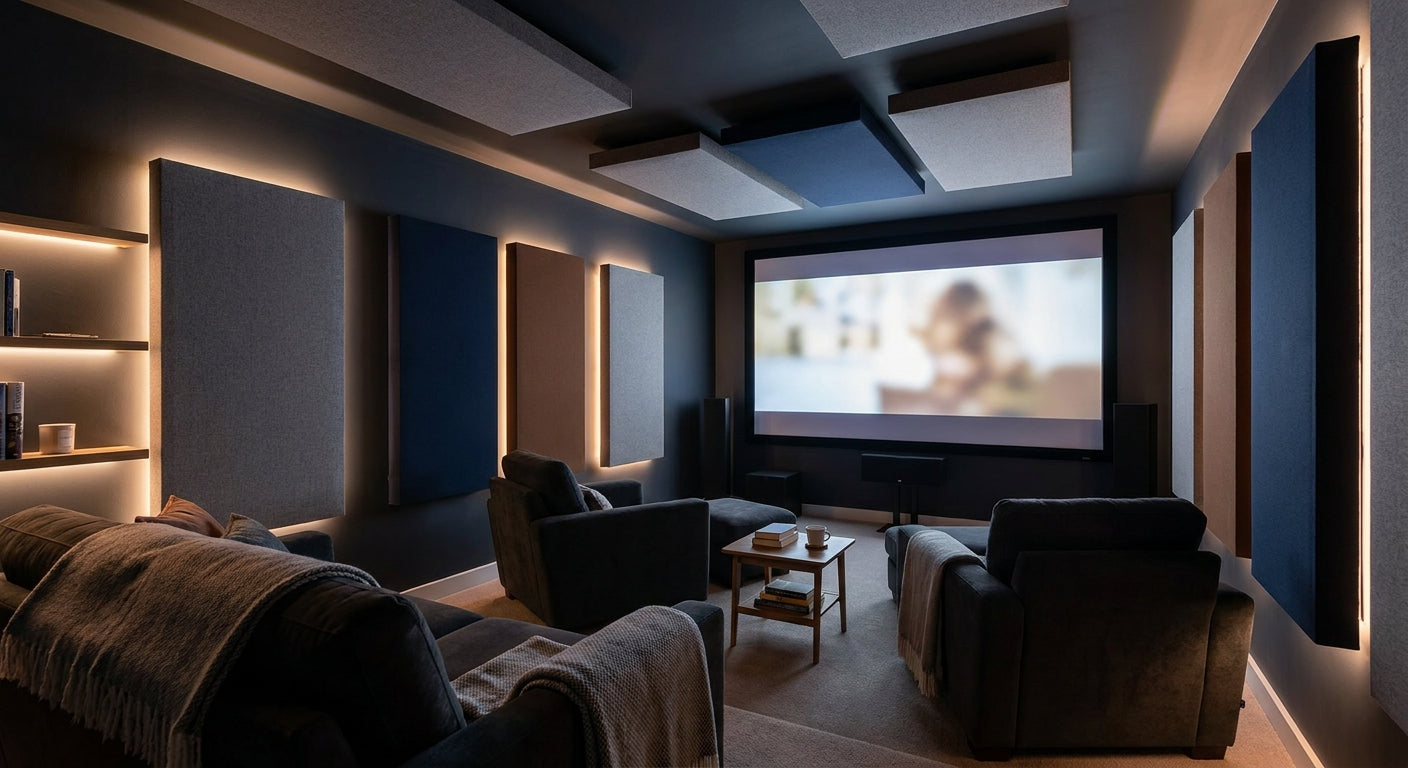
Echo in a home cinema room almost never comes from the whole wall — it comes from a handful of first-reflection points and a bare ceiling bouncing sound straight back at your seats. Fixing that with the right acoustic panels home cinema treatment turns muddy dialogue and boomy bass into a room that actually sounds like the mix engineer intended.
- Acoustic panels home cinema treatment starts at first-reflection points, not full walls — target 25-30% coverage.
- AKU Woodpanel's Black Oak acoustic slat panel and Natural Oak hexagon panel both carry a 0.75 NRC rating. Buy.
- Ceiling treatment above the seating row kills flutter echo faster than adding more wall panels in 2026.
- Skip foam-only setups for cinema rooms — wood-veneer slat panels absorb the mid-range dialogue frequencies foam misses.
Why this matters
A drywall box with a screen and a subwoofer is a reflection machine. Sound leaves the speakers, hits a hard parallel wall, and arrives at your ears a few milliseconds late — that delay is what you hear as echo, boxiness, or dialogue that sounds like it's coming from inside a barrel.
Most home theater rooms in 2026 are rectangular, drywalled, and carpeted at best, which means low-frequency energy stacks in corners and mid-range frequencies (where speech lives) ring off flat walls. Acoustic treatment for home cinemas isn't about deadening the room completely — it's about absorbing the reflections that arrive within about 20 milliseconds of the direct sound, because those are the ones your brain can't separate from the original.
Acoustic slat wall panels with a wood veneer face and felt or fabric backing solve this without turning the room into a padded cell. They absorb across the frequency range that matters for dialogue and effects while still looking like a finished wall, not a recording booth.
What you'll need
- A tape measure and a laser level (panel rows need to stay dead straight across a wide wall)
- A stud finder, or construction adhesive if the wall behind is masonry or concrete
- Acoustic slat wall panels or hexagon acoustic panels — felt-backed versions absorb more than felt-free finishes
- A pencil, chalk line, and a fine-tooth saw for trimming end pieces
- A helper for anything above shoulder height, especially ceiling sections
- A phone app or SPL meter if you want to measure before/after, though your ears will tell you most of what you need
The steps
1. Map your first-reflection points before you buy anything
Sit in your main viewing seat and have someone slide a mirror along each side wall at ear height. Wherever you can see the front speaker in the mirror is a first-reflection point — mark it. Do the same on the ceiling. This takes 15 minutes and stops you from wasting panels on walls that don't actually contribute to the echo.
Common mistake: treating the back wall first because it's the biggest empty surface. The back wall matters for bass, not for the early reflections that make dialogue sound smeared.
2. Work out your coverage number
Acoustic panels home cinema treatment generally needs 25-30% wall coverage, concentrated at reflection points rather than spread evenly. A 12x16 ft room with 8 ft ceilings has roughly 448 sq ft of wall and ceiling surface, which puts a realistic target around 110-135 sq ft of panel.
Going past 40% coverage in a small room over-deadens the space — dialogue gets flat and the room loses the sense of depth a mix relies on.
3. Treat the side walls at ear height first
Install panels at the marked first-reflection points on both side walls, centered roughly at seated ear height (about 38-42 inches off the floor for most theater seating). This single move removes the most audible flutter echo in the room.
The Black Oak acoustic slat wall panel works well here — the dark finish disappears against a dimmed theater room and the 3-sided wood veneer construction handles the felt-backed absorption without looking like a studio wall.
Expected outcome: a noticeably tighter, less boxy sound within the first two panels installed, even before you finish the rest of the room.
4. Treat the ceiling above the seating row
Ceiling reflections are the ones people forget and the ones that do the most damage to dialogue clarity, because there's no furniture or rug absorbing them the way there might be on the floor. A cluster of hexagon panels directly above the primary seating row breaks up that flat, hard surface.
The Natural Oak hexagon acoustic panel ships four panels per box and mounts without a full frame system, which makes ceiling work far less painful than a drop-ceiling acoustic tile retrofit.
Common mistake: skipping the ceiling entirely because it's harder to install. Rooms with wall-only treatment plateau at a muddier sound no matter how many extra wall panels you add.
5. Frame the front wall around the screen
The front wall reflects the loudest signal in the room — dialogue and center-channel effects — straight back at you. Panel the areas flanking the screen, leaving the screen surface itself untreated, and keep the same finish you used on the side walls for visual continuity.
Expected outcome: dialogue intelligibility improves noticeably, which matters more in a cinema room than raw bass response.
6. Handle bass with corner placement, not more wall panels
Low frequencies build up in room corners regardless of how much mid-range absorption you add elsewhere. Thicker panel assemblies or dedicated corner treatment absorb more low-end energy than flat wall-mounted slat panels alone — if bass still booms after wall and ceiling treatment, the corners are where to look next, not the remaining bare wall.
7. Do a listening pass and adjust
Play a scene with heavy dialogue and a scene with heavy bass. If dialogue still sounds harsh, add a panel at the point directly behind the main listening seat. If the room now sounds dead and flat, pull one panel and let a little more reflection back in — target reverberation time (RT60) for a home theater sits around 0.4 to 0.6 seconds, and you can judge that by ear once you know what to listen for.
Troubleshooting
- Echo persists after wall treatment — the ceiling is untreated. Add hexagon or slat panels directly over the listening position before adding more wall coverage.
- Sound feels flat and lifeless — you've gone past 35-40% coverage. Remove one or two panels from the least critical wall.
- Bass still booms in corners — flat wall panels don't absorb low frequencies efficiently. Corner-specific treatment is the fix, not more slat panels.
- Panels buzz or rattle during loud scenes — check screw tension and confirm panels are mounted to studs, not just adhesive on drywall, especially near a subwoofer location.
- Dialogue still unclear despite treatment — reflection points were mismarked. Redo the mirror test with the viewer seated in the actual primary seat, not standing.
- Uneven sound between seats — common in rooms with off-center seating rows. Treat reflection points relative to each seat, not just the room's geometric center.


Tools and resources
Before ordering enough panel for the whole room, run the numbers properly rather than eyeballing it — you can calculate acoustic panel coverage for your exact wall and ceiling dimensions and avoid over-buying or running short mid-install.
Keep these on hand through the project:
- A laser level for straight rows across wide front and side walls
- A stud finder or masonry adhesive depending on wall construction
- A basic SPL meter app if you want before/after numbers, not required but useful
- A saw for trimming panels around outlets, vents, or screen frames
What to do next
Once the primary treatment is in, most rooms benefit from a second pass on ceiling design and lighting integration rather than more wall panel. That's a separate project worth planning once you've lived with the room for a few weeks and know exactly where the remaining harshness sits.
FAQ
What's the best acoustic panel for a home cinema room?
Felt-backed wood veneer slat or hexagon panels with an NRC rating around 0.75 work best for home cinema rooms in 2026 because they absorb mid-range dialogue frequencies while still looking finished. Foam panels absorb less across that range and look less intentional in a living space.
How many acoustic panels do I need for a home theater?
Most home theater rooms need 25-30% wall and ceiling coverage, concentrated at first-reflection points rather than spread evenly. A 12x16 ft room typically needs 110-135 sq ft of panel.
Do acoustic panels really reduce echo in a home cinema?
Yes — panels placed at first-reflection points and on the ceiling above the seating row remove the early reflections responsible for most of the perceived echo. Bare drywall rooms show the biggest improvement after the first few panels go in.
Is ceiling treatment necessary for a home theater room?
Ceiling treatment is one of the most effective single changes you can make, because a flat hard ceiling reflects sound straight down onto the seating row with nothing to absorb it. Rooms with wall-only treatment plateau at a muddier sound.
Are wood acoustic panels better than foam for cinema rooms?
Wood veneer acoustic panels absorb similar mid-range frequencies to foam while doubling as finished wall decor, which matters in a room people actually sit in rather than a studio booth. Foam is cheaper per square foot but looks utilitarian.
Where should acoustic panels go in a home cinema?
Start at first-reflection points on the side walls at ear height, then treat the ceiling above the main seating row, then the areas flanking the front screen wall. Corners are for bass treatment, not flat wall panels.
How much does it cost to treat a home cinema room acoustically?
Cost scales with square footage and finish — check current panel pricing on the AKU Woodpanel site for exact per-box figures before budgeting a full room.
Can I install acoustic panels myself?
Yes, slat and hexagon acoustic panels are designed for DIY installation with basic tools like a stud finder, level, and saw for trimming. Ceiling sections go faster with a second person holding panels during mounting.
One last thing
The single biggest mistake in home cinema acoustic treatment isn't under-treating — it's treating the wrong wall first. Rooms that start with the ceiling and side-wall reflection points before touching the back wall get most of the improvement from the first 20% of the budget spent, because that's where the ear-brain system actually flags a reflection as unnatural.





 Better performance and aesthetic appeal
 In Stock




