


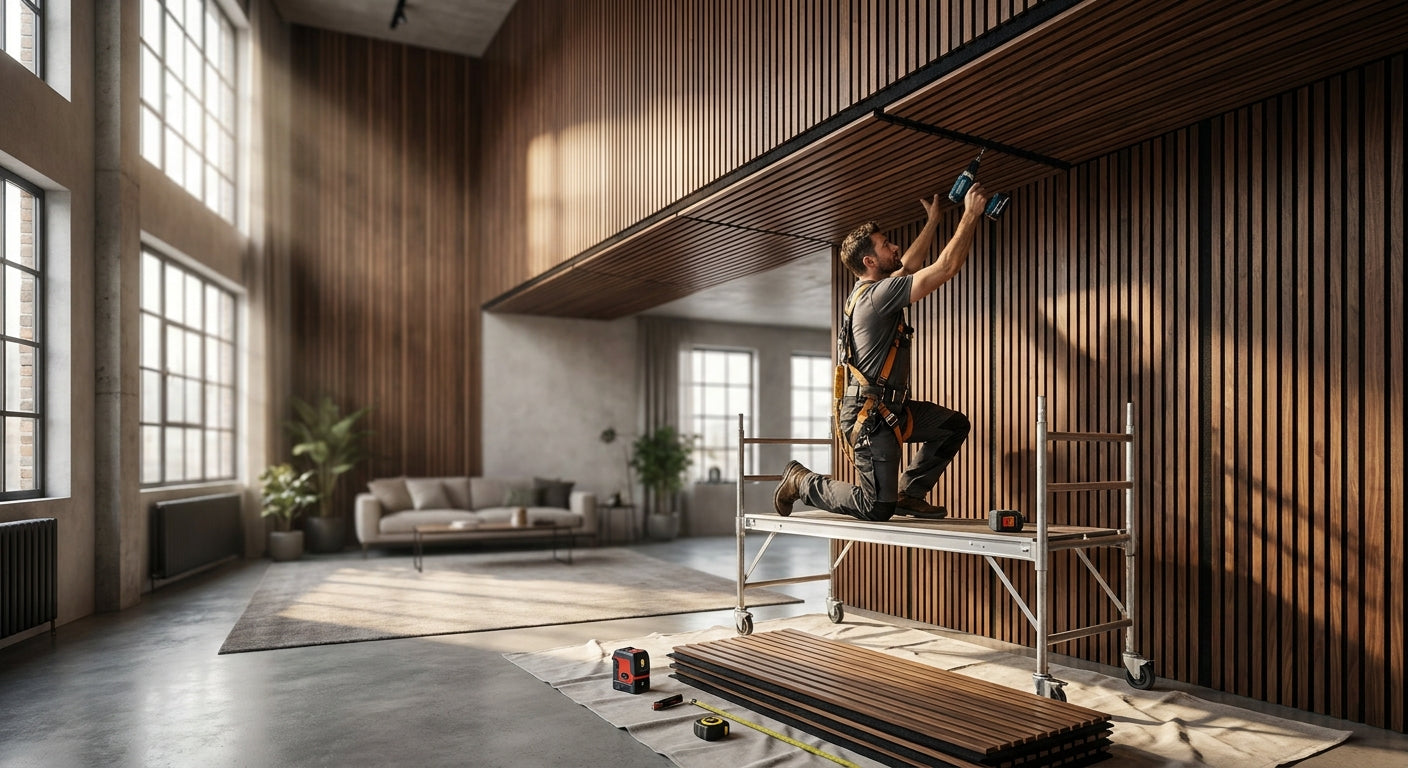
Installing XL slat wall panels on a wall that runs past 10 feet changes the math on layout, access, and fastening compared to a standard 8-foot run, and skipping the planning step is how installers end up with a visible seam at eye level.
- XL slat wall panels high ceiling installation works best when you start the layout from a chalk line at the tallest point, not the floor.
- Akuwood Panel's oak end pieces close the top run cleanly on walls above 10 feet, so skipping them leaves a raw cut edge showing.
- A scaffold tower beats a ladder for continuous fastening above 8 feet on any 2026 high-ceiling install.
- Budget an extra hour per 10 linear feet on ceilings over 12 feet for staging, re-leveling, and top-row trimming.
Why this matters
A standard slat wall panel install assumes you can reach the top row from a step stool and check level with a hand tool at arm's length. Above 10 feet, both of those assumptions break down.
Gravity and sightlines work against you on tall walls. A half-degree lean that's invisible on an 8-foot wall becomes a visible gap at 14 feet, and a panel that's out of true by a quarter inch at the bottom can be off by over an inch by the time you reach the top. XL slat wall panels for high ceiling installation demand a story pole and a fixed reference line before a single panel goes up — the XL slat wall panel guide for large open-plan walls covers layout math for runs beyond standard living-room dimensions if your wall exceeds 16 feet in width as well as height.
Acoustic slat wall panels also do real work on tall walls — hard, flat surfaces above 10 feet are exactly where sound bounces and echo builds, since there's more untreated surface area for it to travel across. Getting the install right on a high ceiling wall isn't just cosmetic; it's the difference between a room that sounds dead and one that still rings after the panels go up.
What you'll need
- Stud finder and a 4-foot level (swap for a laser level on runs over 12 feet — it saves repositioning)
- Chalk line and a story pole: a straight batten marked at each panel width, used to transfer measurements up the wall without re-measuring every row
- XL slat wall panels with real wood veneer — Akuwood Panel's Walnut Acoustic Slat Wall Panel is built for continuous runs and holds its finish under repeated handling during a multi-day install
- Natural Oak end pieces to close raw vertical edges — skip these and every cut edge at a corner or doorway shows the substrate
- Panel adhesive rated for interior wood veneer, plus an 18-gauge brad nailer loaded with 1.25-inch brads for mechanical hold while adhesive cures
- A scaffold tower or platform ladder rated for continuous work above 8 feet — an A-frame ladder isn't safe for repeated repositioning at 10 to 14 feet
- Safety glasses, dust mask, tape measure, pencil
- A fine-tooth jigsaw or circular saw blade for trimming top-row panels to the ceiling line
- A second person for anything above 10 feet — one holds and levels, one fastens
The steps
1. Measure the full wall height and mark your reference line
Measure at three points across the wall width — floor-to-ceiling can vary by half an inch or more even in newer construction. Use the shortest measurement as your working height so panels never bind against a low spot in the ceiling. Snap a level chalk line at the exact top of your first row before you cut anything.
2. Build a story pole before you touch a panel
Mark a straight batten with each panel width plus the gap you're using between slats, then hold it against the wall from floor to ceiling. This single step catches layout problems — like a narrow sliver panel ending up right next to a doorway — while they're still a pencil mark, not a cut mistake. Skipping the story pole is the single most common reason installers redo a wall over 10 feet tall.
3. Set up scaffolding, not a ladder, for continuous runs
A scaffold tower or rolling platform lets you work a straight horizontal band across the entire wall at one height before moving up, which keeps your level line consistent. Ladders force you to reposition every 2 to 3 feet, and each repositioning is a chance to lose your reference line. On any ceiling above 10 feet, plan for scaffold rental or a platform ladder rated for the height, not a standard step ladder.
4. Start the first row from a fixed, level point
Begin at the most visible corner of the room — usually the one facing the main entry or seating area — and work outward. Fasten the first panel exactly plumb using your level, since every following panel takes its alignment from this one. A first panel that's off by even an eighth of an inch compounds across a 12-foot-wide wall.
5. Work upward in fastened sections, not all at once
Complete and fully fasten one horizontal band across the wall before starting the next row up. This keeps the scaffold platform doing one job at a time and lets you catch a leveling error before it's buried under three more rows. Expect roughly 45 minutes per 10 linear feet per row on a wall over 10 feet, once staging is set up.
6. Cut and fit the top row against the ceiling line
The top row on a high ceiling almost never comes out to a full panel width — measure the remaining gap at both ends of the wall and split any difference between the two end panels so the cut isn't lopsided. Use the fine-tooth blade to avoid splintering the veneer face, and dry-fit before adhesive goes on.
7. Finish edges with end pieces before you step down
End pieces close the exposed edge at corners, door frames, and the top ceiling line. On a high ceiling installation this matters more than on a standard wall, because the top edge sits closer to eye level from across the room, not below it. Fasten end pieces with the same adhesive-plus-brad approach as the main panels.
Troubleshooting
- Panels drift out of level near the top of a wall over 12 feet — stop, re-check your story pole marks against the chalk line, and correct before the next row rather than trying to "absorb" the drift in the final row.
- A gap shows between the top panel and the ceiling — this usually means the ceiling isn't perfectly flat; scribe the top panel to follow the ceiling line rather than assuming a straight cut will match.
- A panel bows away from the wall mid-height — this is almost always insufficient adhesive coverage or a missed stud; add a brad at the bow point after adhesive sets.
- Seams show under side lighting — angle a work light along the wall during install, not just overhead, since ceiling-mounted lighting hides seam gaps that side lighting reveals later.
- Wall is out of plumb before you start — shim behind the first panel rather than forcing subsequent panels to compensate; the error only grows as you go up.
- Scaffold shifts mid-install — lock all wheels and use outriggers on any platform above 8 feet; a shift of even an inch throws off your level line for the rest of the row.
Tools and resources
- Story pole and chalk line (DIY from a straight furring strip)
- Laser level for runs over 12 feet
- Scaffold tower rental, rated for the ceiling height
- The wall panel coverage calculator guide to confirm panel count before ordering — high ceiling runs waste more material at the top row than standard 8-foot walls, so order with that in mind
- 18-gauge brad nailer and interior wood veneer adhesive
What to do next
Once the wall is up, most installers turn to the ceiling itself — a slat panel treatment that continues from wall to ceiling reads as one continuous surface and hides the transition line that high ceilings tend to expose.
FAQ
Can you install XL slat wall panels on a ceiling over 10 feet without scaffolding?
A ladder works for isolated spot repairs, but a full XL slat wall panel installation above 10 feet needs scaffolding or a rated platform ladder to keep the level line consistent across the whole run. Repositioning a standard ladder every few feet introduces small leveling errors that compound by the top row.
How much extra material do you need for a high ceiling install versus a standard 8-foot wall?
Plan for roughly one extra panel per 8 vertical feet of wall above standard height, since the top row on tall walls almost never lands on a full panel width. Running the coverage calculation before ordering avoids a mid-install shortage.
Do XL slat wall panels need a different fastening method on high ceilings?
The fastening method stays the same — adhesive plus 18-gauge brads — but high ceiling installs benefit from working in complete horizontal bands rather than vertical sections, since it's easier to hold a level line across a full row from scaffolding.
What's the best way to finish the top edge where slat panels meet a high ceiling?
Scribe the top panel to the actual ceiling line rather than assuming a straight cut, since ceilings over 10 feet are rarely perfectly flat. Finish with matching end pieces to close the raw edge at the ceiling transition.
Is a second person required to install XL slat wall panels above 10 feet?
Yes, for anything above 10 feet a second person holding and leveling the panel while the first fastens is standard practice. Working solo at that height on a scaffold platform increases both leveling error and fall risk.
How long does it take to install slat wall panels on a wall taller than 12 feet?
Expect roughly 45 minutes per 10 linear feet per horizontal row once staging is set up, plus extra time for top-row trimming and end-piece finishing. A 14-foot-tall, 12-foot-wide wall typically runs a full day including setup and cleanup.
Do acoustic slat wall panels still reduce echo when installed high on a wall?
Yes, and arguably more so, since tall walls have more untreated hard surface for sound to bounce off before panels go up. Coverage matters more than placement height for acoustic performance.
One last thing
Most installers underestimate the top row on a high ceiling wall by one full panel — measure your actual remaining gap after the last complete row, not your original story pole math, because ceiling irregularities almost always eat into that final calculation. Order the extra panel before you're standing on scaffolding without one.



 Better performance and aesthetic appeal
 In Stock




