


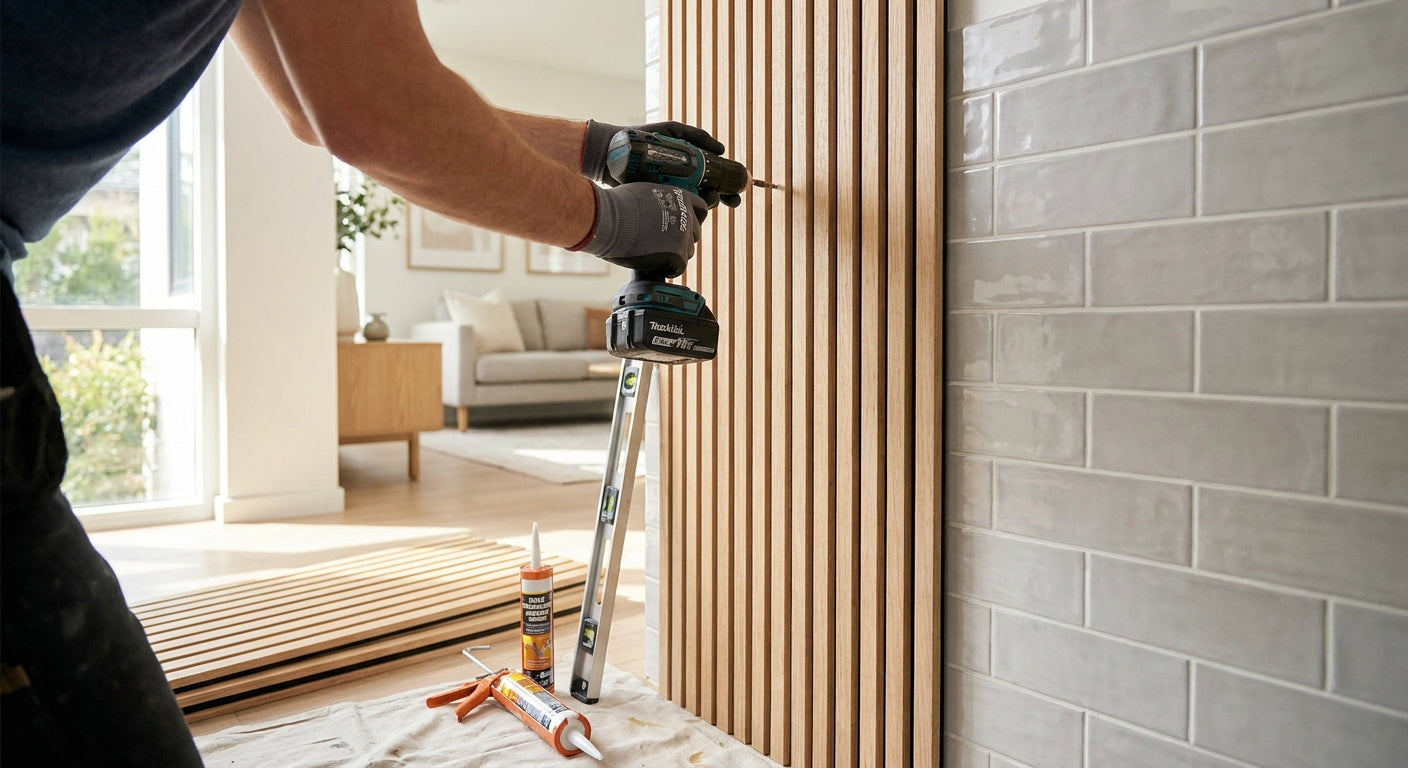
Covering a tiled wall with wood slat panels skips demolition entirely: furring strips bridge uneven grout lines, panels click into place over the strips, and you never touch a chisel. This guide walks through the full furring-strip method for how to install wood slat panels over tile in 2026, plus the mistakes that cause slats to bow or pop off within a year.
- Furring strips over tile beat direct adhesive when grout lines run deeper than 1/8 inch.
- AKU Woodpanel's acoustic slat wall panels mount to furring strips without removing a single tile.
- Grout lines deeper than 3/16 inch need a leveling shim layer before panels go up in 2026 installs.
- Order a sample before buying a full run; tile substrates vary enough to shift veneer tone under light.
- Skip liquid adhesive on glazed tile. It fails in under a year; mechanical fastening to furring strips holds.
Why this matters
Glazed and ceramic tile is not a nailable surface, and most construction adhesives rated for drywall or plywood will not bond reliably to a glossy glaze. Trying to glue wood slat panels straight onto tile is the number one reason installs fail within the first year — the bond releases at the grout lines first, then the whole panel sags.
The fix is mechanical, not chemical: furring strips screwed through the tile into the stud or masonry behind it give the panels a flat, continuous surface to grip, and they hide the grout pattern completely once panels go up. This is also the fastest way to update a dated tile backsplash or bathroom accent wall in 2026 without a single day of tile removal.
What you'll need
- Furring strips (1x2 or 1x3 pine), enough to run horizontal strips every 16 inches on the wall height
- Masonry/tile-rated screws and anchors, plus a hammer drill or impact driver with a tile bit
- A 4-foot level and stud finder (works through most tile thickness)
- Wood slat panels — acoustic slat wall panels in natural oak or your chosen finish, enough to cover the mapped area plus 10% waste
- End pieces for the wall's exposed edges and corners
- A sample box if you haven't committed to a veneer tone — tile lighting shifts wood color more than drywall does
- Construction adhesive as a secondary bond (not primary), painter's tape, a fine-tooth saw or panel cutter
- Shims for grout lines deeper than 3/16 inch
Budget a full weekend for a standard 8x10-foot wall: one day for furring strips and leveling, one day for panel mounting and trim.
The steps
1. Check the tile for hollow spots and depth
Tap across the tile with a knuckle. Hollow, drum-like sounds mean loose tile that won't hold a screw anchor reliably. Mark those spots — you'll need longer screws that reach past the tile into the substrate, or you'll skip that stud line entirely and shift your furring layout. Measure grout line depth with a fingernail; anything over 3/16 inch needs shimming before strips go on, or the panels will show a visible wave down the wall.
Common mistake: skipping the hollow-tile check and discovering a screw spins freely mid-install, with no way to back it out cleanly without cracking the tile around it.
2. Map the furring strip layout
Use the stud finder to locate framing behind the tile — most stud finders read through standard 3/8-inch ceramic tile without trouble. Mark horizontal lines every 16 inches vertically, and add a strip at the very top and bottom of the panel run. For a wall that's mostly hollow (no backing studs, common on tiled tub surrounds), plan for masonry anchors instead and space strips at 12 inches for extra grip.
3. Cut and mount the furring strips
Cut strips to width, pre-drill through the tile at each stud mark to avoid cracking the glaze, then drive screws through tile into stud. Check each strip with the level before moving to the next — tile surfaces are rarely perfectly flat, and an unlevel first strip throws off every strip above it. Space screws every 12 to 16 inches along each strip.
Expected outcome: a flat, level grid of strips proud of the tile surface by roughly 3/4 inch, ready to receive panels.
4. Dry-fit the panels before final mounting
Lay out full panels against the furring grid without fastening anything. Check the pattern lines up across seams, especially if you're mixing slat widths or running panels both horizontal and vertical around a corner. This is the point to catch a miscut panel or a color mismatch between boxes — not after everything is screwed down.
Common mistake: skipping the dry fit and discovering a 1/4-inch gap at the ceiling line after the first three rows are already mounted.
5. Mount the panels to the furring strips
Starting from a corner or the most visible sightline, fasten panels to the strips per the panel's mounting hardware, adding a bead of construction adhesive on the back as a secondary bond, not the primary hold. Work in one direction across the wall so slat lines stay continuous. Check level every second panel — small drift compounds fast over an 8-foot run.
6. Finish exposed edges and corners
Wherever a panel run ends at a doorway, window, or outside corner, use a matching end piece for a clean panel edge instead of leaving a raw cut edge exposed. Raw edges are the fastest way to make an otherwise sharp install look unfinished, and they're the detail most guests notice first.
7. Inspect and seal transitions
Run a bead of matching caulk or trim where the panel meets an adjacent tile field left exposed, or at the ceiling and floor lines. Check every screw point is snug, not overdriven — overdriving can crack the veneer face on thinner panel profiles.
Troubleshooting
- Panel bows away from the wall at the seams: furring strip isn't flat behind that section — back out the screw, re-shim, and reset.
- Screw spins without grabbing: you hit a hollow tile pocket. Switch to a masonry anchor rated for hollow-backed tile or relocate the screw 2 inches over.
- Grout lines show through as a faint ridge under the panel: grout depth exceeded 3/16 inch and wasn't shimmed. Pull the strip, add a thin plywood shim, remount.
- Color mismatch between two panel boxes: different production runs can shift veneer tone slightly. Order from the same batch when possible, or alternate panels from both boxes across the wall so any variation blends.
- Panel edge lifts near a corner: the end piece wasn't seated fully before fastening. Remove, clean the corner, and reseat with adhesive plus a mechanical fastener.
- Echo hasn't improved after installing over a large tiled bathroom or entry wall: slat spacing and felt backing vary by product — confirm you selected an acoustic-rated panel, not a solid decorative slat, if noise control was the goal.
For tighter tile fields where a full furring grid feels like overkill — a small backsplash accent or a shower niche wall — modular tile-format panels or hexagon acoustic tiles click into a smaller footprint and skip the long furring runs entirely.


“If the grout lines are deeper than the width of a nickel, put furring strips down before you touch a panel.”
Tools and resources
- Impact driver or hammer drill with a tile-rated bit
- 4-foot level, stud finder, tape measure
- Furring strips (1x2 or 1x3), masonry screws or anchors
- Wood slat panels and matching end pieces for clean transitions
- A sample box, ordered before committing to a full wall's worth of panels
What to do next
If your wall is a mix of tile and exposed concrete or block — common in basement and garage conversions — the mounting method shifts slightly. Read the guide to installing slat wall panels on a concrete wall before you buy anchors, since concrete anchoring hardware differs from what you'd use on tile-over-drywall.
FAQ
Can you install wood slat panels directly over tile without furring strips?
Direct adhesive mounting on glazed tile fails within months in most cases. Furring strips screwed through the tile into the stud behind it give a reliable mechanical hold instead of relying on glue bonding to a glossy glaze.
Do you need to remove tile before installing wood slat panels?
No. The furring strip method covers existing tile without removing a single piece, which is the main reason this method is used over full tile demolition in 2026 remodels.
How much does it cost to install wood slat panels over tile?
Cost depends on wall size, panel finish, and whether you hire a contractor for the furring strip work. Furring strips and screws add a modest material cost on top of the panel price, check current panel pricing before estimating a full wall.
What grout depth requires shimming before mounting furring strips?
Grout lines deeper than 3/16 inch need a shim behind the furring strip to keep the strip flat. Skipping this step shows up as a visible wave once panels are mounted.
Is it better to install wood slat panels horizontally or vertically over a tiled shower or bathroom wall?
Either works structurally once furring strips are level, but horizontal runs hide minor grout unevenness better in a small bathroom, while vertical runs make a low-ceiling tiled space feel taller.
Can acoustic slat wall panels reduce echo in a tiled bathroom or entryway?
Yes, felt-backed acoustic slat panels absorb sound that hard tile surfaces reflect. Confirm you're buying an acoustic-rated panel and not a solid decorative slat if noise reduction is the goal.
Do wood slat panels work over tile in a shower or wet area?
Standard interior slat panels are not rated for direct water exposure. Keep panel installs to dry tiled walls — bathroom accent walls outside the direct spray zone — rather than inside a shower enclosure.
How long does it take to install wood slat panels over a tiled wall?
A standard 8x10-foot wall takes a full weekend for one person: one day for furring strips and leveling, one day for panel mounting and trim.
One last thing
Most failed slat-over-tile installs in 2026 trace back to one shortcut: skipping the hollow-tile check before drilling. A single loose tile behind a furring strip line can undo an otherwise clean install months later, so spend the extra ten minutes tapping the wall before a single screw goes in.




 Better performance and aesthetic appeal
 In Stock




