


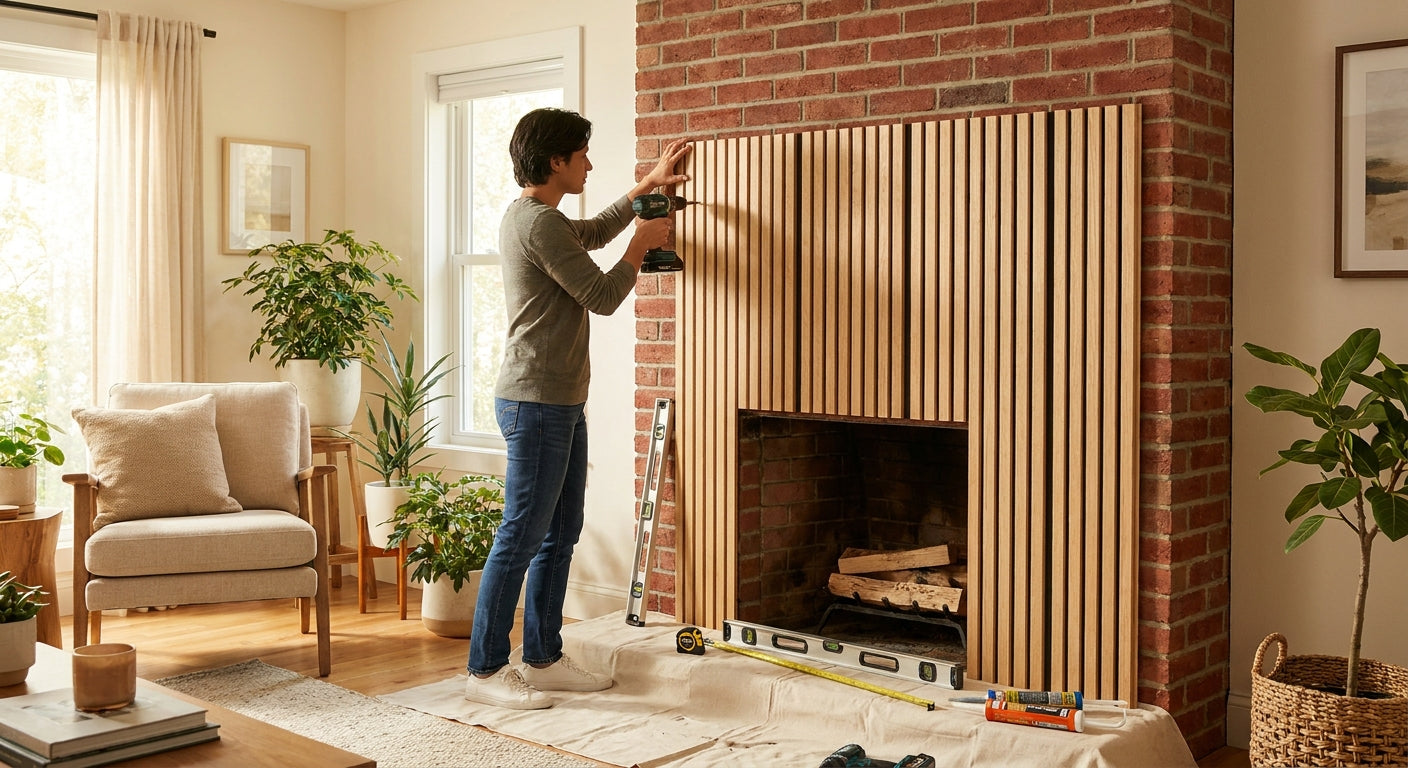
Installing slat wall panels over a brick fireplace turns a dated hearth into a textured focal wall in a single weekend, but brick behaves nothing like drywall, and skipping the prep step is why most DIY installs fail by month three.
TL;DR
Installing slat wall panels on a brick fireplace wall starts with building a flat, level substrate, because brick courses shift by a quarter inch or more and slat panels telegraph every dip in the surface below. Verdict: shim and screw 1x3 furring strips into the mortar joints, then adhere an acoustic slat wall panel on top, finishing exposed edges with a matching end-piece trim. Budget a full weekend in 2026 for a standard fireplace wall, plus 24 to 48 hours of adhesive cure time before you touch the panels again.
Why this matters
Brick fireplace walls are hard, flat-reflective, and usually the loudest surface in a living room. Sound bounces straight off mortar and masonry instead of getting absorbed, which is why rooms with exposed brick fireplaces often sound harsher than rooms with drywall. Swapping in an acoustic slat wall panel in natural oak with gray felt over that brick does two jobs at once: it hides uneven mortar lines and the felt backing knocks down the echo the brick was throwing back into the room.
The other reason this project trips people up is fasteners. Standard screws driven straight into a mortar joint pull loose as the panel expands and contracts with heat from the firebox across 2026's heating season. A furring-strip substrate spreads the load across the whole wall instead of a handful of mortar joints, which is the difference between a wall that holds for years and one that starts sagging by spring.
What you'll need
- Slat wall panels sized for your wall's square footage, with enough extra for cuts around the firebox opening
- 1x3 pressure-treated furring strips, enough to run every 16 inches on center across the wall
- Masonry screws and anchors rated for mortar and brick, not drywall anchors
- Polyurethane construction adhesive rated for wood-to-masonry bonds
- A 4-foot level, tape measure, and a stud finder or masonry detector
- A circular saw or miter saw with a fine-tooth blade for clean panel cuts
- Shims for leveling furring strips against uneven brick faces
- A drill with a masonry bit, caulk gun, and safety glasses
- A full sample box to check how the wood tone reads under firelight before you commit to a full order
- A full weekend: one day for furring strips and dry-fit, a second for adhesive and finishing
Check your local building code and your fireplace manufacturer's specified clearance zone around the firebox opening before you cut a single panel. This step gets skipped more than any other on this project, and it is the one that actually matters for safety.
The steps
1. Confirm clearance and order samples
Pull your fireplace manufacturer's clearance spec for combustible materials around the firebox opening, and hold panels back from that line, no exceptions. While you're at it, order samples so you can see the wood tone against your actual brick color and your room's lighting, not a screen.
2. Map the brick and mark furring strip lines
Measure the wall's total width and height, then mark horizontal lines every 16 inches on center where furring strips will run. Brick faces sit proud of mortar joints by roughly a quarter inch on most walls, so plan your strip lines to land on mortar joints where possible; drilling into brick face itself is harder and more prone to cracking.
3. Anchor furring strips into the mortar joints
Drill pilot holes with a masonry bit, drive masonry screws through the furring strips into the mortar, and shim behind any strip that rocks against an uneven brick face. Check each strip with a level before moving to the next; an out-of-plumb strip here means a visibly crooked slat pattern later. Common mistake: skipping shims on a bowed wall section, which leaves a visible wave once panels go up.
4. Dry-fit panels and mark the firebox cutout
Lay panels against the furring strips without adhesive first, working from one corner outward, and mark exactly where the firebox opening and mantel will interrupt the pattern. Dry-fitting catches slat-alignment problems before they're permanent.
5. Cut panels around the opening
Use a fine-tooth blade to cut panels along your marked lines, cutting from the finished face down to avoid splintering the veneer. Test-fit each cut piece against the opening before applying adhesive; a piece that's an eighth of an inch too long is an easy fix now and a frustrating one later.
6. Adhere panels to the furring strips
Apply construction adhesive in a zigzag bead across the back of each panel, press firmly into place against the furring strips, and hold for the adhesive's stated open time, typically around 15 minutes before final set. Work in sections rather than the whole wall at once, so you can correct alignment before the adhesive grabs. Common mistake: rushing the whole wall in one pass and locking in a misaligned first panel.
7. Finish edges with end-piece trim
Exposed panel edges around the firebox opening or wall corners look unfinished without a matching cap. A natural oak end-piece trim closes those edges cleanly and keeps the slat profile from looking cut-off mid-groove.
8. Let it cure and inspect
Leave the wall untouched for 24 to 48 hours while the adhesive fully cures, then run a hand across every seam to catch any panel edge that's lifting. Small gaps at this stage are normal to fix with a touch-up of adhesive; gaps ignored now widen with heat cycling from the fireplace.
Troubleshooting
- Panels bow away from the wall near the top: usually a sign the top furring strip wasn't shimmed to match the wall's lean. Add a shim behind the strip and re-adhere the affected panel section.
- Adhesive won't bond to painted brick: painted or sealed brick needs a light sanding or a bonding primer before adhesive will grip; skipping this step is the top reason panels release from painted surfaces.
- Gaps show up at the firebox surround: this is a dry-fit problem, not an adhesive one. Pull the panel, trim an eighth of an inch, and refit before reapplying adhesive.
- Furring strip screws won't bite into mortar: older mortar can be soft and crumbly. Shift the anchor point half an inch and try again rather than forcing a stripped hole.
- Panel color looks different once the fireplace is lit: warm firelight shifts how wood tones read compared to daylight or LED bulbs, which is exactly why a sample box under your actual lighting beats ordering from a screen.
- Panels feel warm or you smell a faint wood odor when the fireplace runs: stop use and recheck your clearance measurement against the manufacturer spec immediately; this is a safety issue, not a cosmetic one.
Tools and resources
Beyond the furring strips, adhesive, and trim listed above, a full walkthrough on attaching wood slat panels to a brick wall covers general brick-mounting technique if your fireplace wall extends into a broader accent wall beyond the hearth itself. Keep a shop vacuum on hand for masonry dust, and a stack of clean rags for wiping excess adhesive before it sets.
What to do next
Once the fireplace wall is finished and cured, most homeowners extend the same slat pattern up the chimney breast or across an adjoining wall to keep the room's sightline consistent. Measure that adjoining run before you order more panels in 2026, since matching a wood lot across two separate orders gets harder the longer you wait between purchases.
FAQ
Can you install slat wall panels directly on brick without furring strips? Not reliably. Brick's uneven face telegraphs through thin slat panels and adhesive alone struggles to hold across an irregular mortar surface, so furring strips are the standard fix in 2026 installs.
Do slat wall panels need clearance from a fireplace opening? Yes. Wood panels are a combustible material, and every fireplace manufacturer specifies a minimum clearance zone around the firebox opening that panels must not cross.
What adhesive works best for wood panels on brick? A polyurethane construction adhesive rated for wood-to-masonry bonding is the standard choice, applied over furring strips rather than directly onto brick.
How long does it take to install slat panels on a brick fireplace wall? Plan on a full weekend: one day for furring strips and dry-fitting, a second day for adhesive application, plus 24 to 48 hours of cure time before the wall is load-bearing for anything hung on it.
Can you cut slat panels around an uneven brick edge? Yes, but dry-fit and mark the cut line before applying any adhesive, since brick fireplace openings are rarely perfectly square.
Are slat wall panels heat safe near a fireplace? Only outside the manufacturer's specified clearance zone around the firebox opening. Inside that zone, wood panels are not an approved material regardless of finish.
How much does it cost to panel a brick fireplace wall in 2026? Cost scales with wall square footage and panel finish, so measure the wall first and check current panel pricing before budgeting the full project.
One last thing
Most people plan for the wood tone and forget the acoustics, but a brick fireplace wall is often the single loudest surface in a living room, and swapping it for a felt-backed slat panel changes how the whole room sounds, not just how it looks.



 Better performance and aesthetic appeal
 In Stock




