


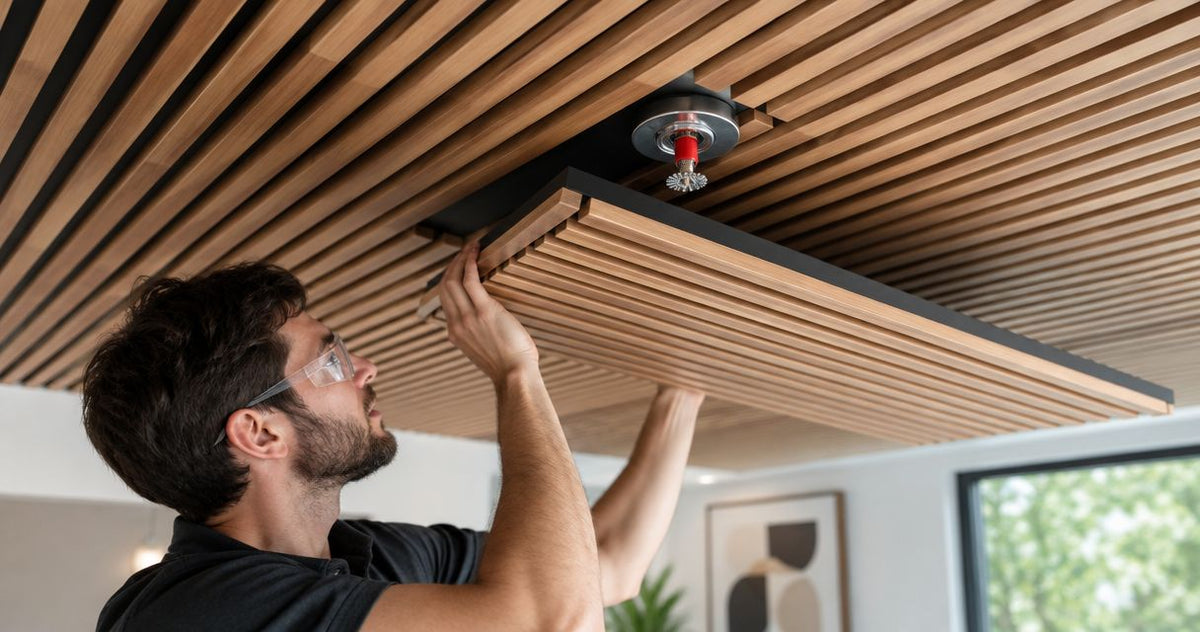
Instead of cutting panels around a live sprinkler and discovering that the new finish interferes with it, approve the sprinkler detail first, then measure, cut away from the head, and install to that detail. To install acoustic panels around fire sprinkler heads, keep the sprinkler untouched and have a qualified fire sprinkler contractor confirm the finished surface, opening, and obstruction requirements before work begins.
- Install acoustic panels around fire sprinkler heads only after a qualified sprinkler contractor approves the finished-surface detail.
- Akustiq USA acoustic wood panels provide decorative treatment; sprinkler compatibility requires a separate, project-specific review.
- Panel thickness, backing, and mounting supports all affect the finished surface near a sprinkler.
- Never move a sprinkler, alter its cover plate, or fill its opening to make wood panels fit.
Why this matters
A sprinkler is not an ordinary ceiling fixture. Its position, heat-sensitive components, and water-distribution pattern must remain compatible with the surrounding construction. A neat opening does not prove that the installation is safe.
Akustiq USA acoustic wood panels are best for homeowners and businesses seeking decorative acoustic treatment, not a substitute for sprinkler-system design. Explore Akustiq USA for panel options, then assess the selected panel as part of the complete installation assembly.
For a 2026 US renovation, the review must address the locally adopted requirements, the sprinkler manufacturer's instructions, and the building's existing system. Depending on the building, applicable installation standards include NFPA 13, NFPA 13R, or NFPA 13D; the authority having jurisdiction determines which requirements apply.
There are separate questions to answer: whether the sprinkler remains correctly installed, whether the new panels obstruct its operation, and whether the finish assembly meets the building's fire-performance requirements. Passing one check does not answer the others.
Before you start
- Get access and approval. Obtain the property owner's permission, the sprinkler model and installation instructions, and a qualified fire sprinkler contractor's review. Ask whether permits, design revisions, or inspection are required before installing the finish.
- Gather the actual assembly. Have the selected panel specifications, backing and support details, suitable cutting tools, measuring tools, and a stable work platform. Confirm that the panel manufacturer permits the proposed wall or ceiling application and attachment method.
- Resolve the hidden gotcha: added thickness. Paneling changes the finished surface. A concealed or recessed sprinkler that fits the original ceiling is not automatically compatible with the new surface; do not assume its cover plate can simply be moved outward.
Keep responsibility clear. The panel installer handles approved finish work; the sprinkler contractor handles sprinkler components, changes, and any required impairment procedure. Do not shut a valve, unscrew a head, or remove a concealed cover plate as a DIY shortcut.
Sprinkler identification and approved detail
Confirm the sprinkler and its surroundings
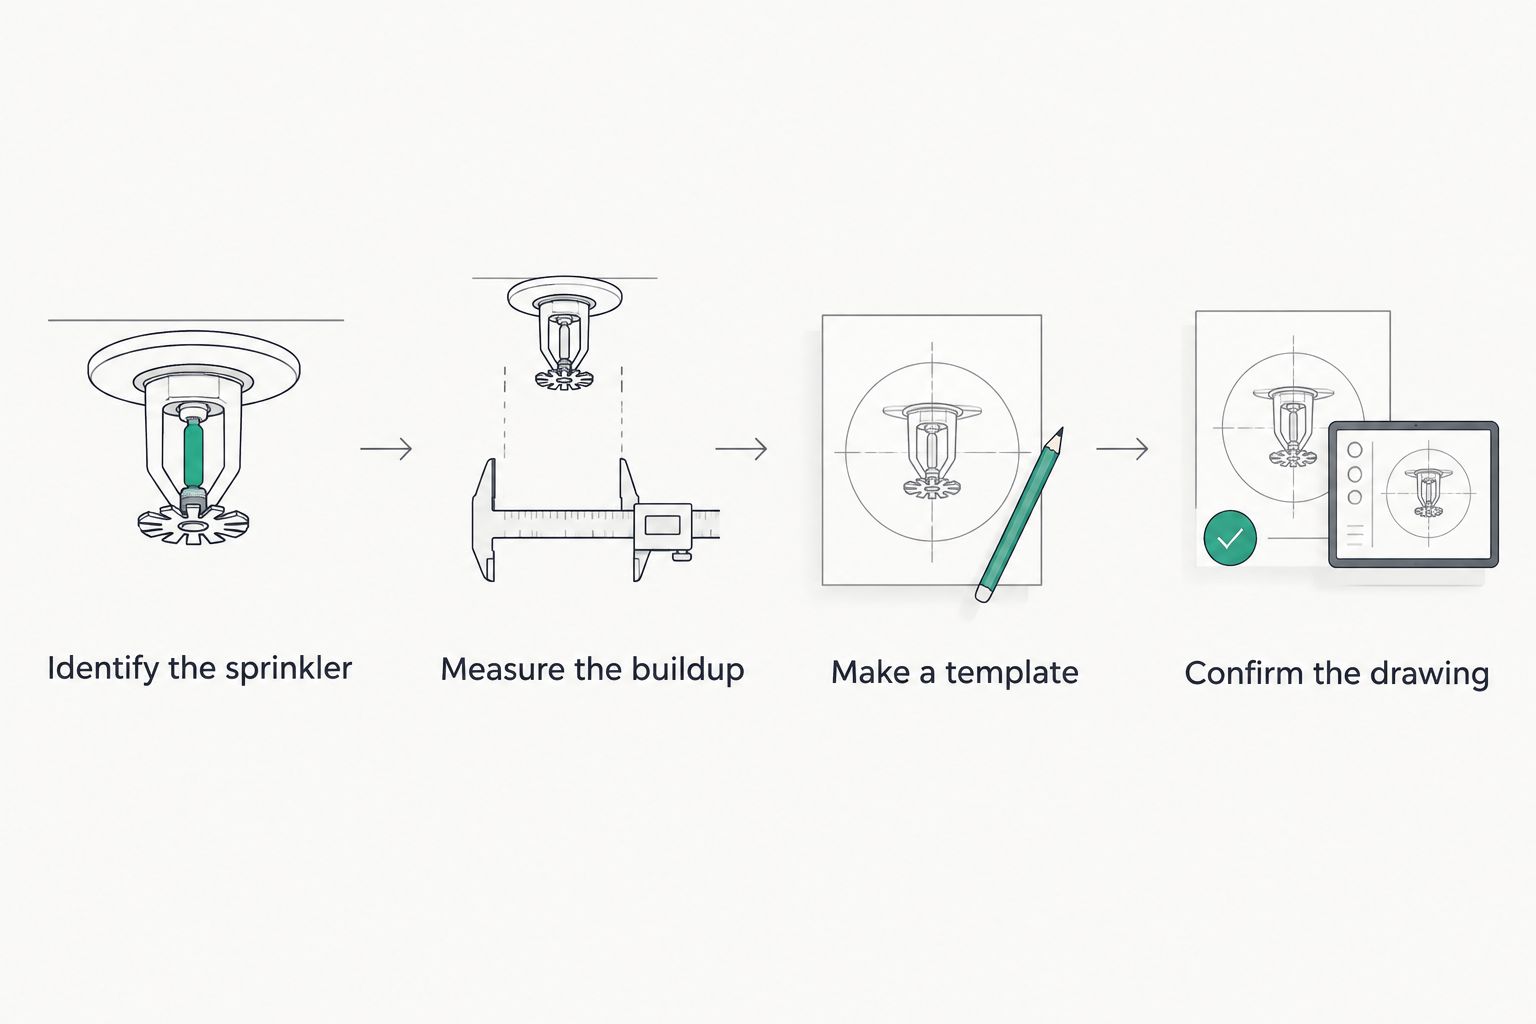
- Identify the sprinkler arrangement. Ask the sprinkler contractor to confirm whether it is pendent, upright, sidewall, recessed, or concealed. Photograph the visible arrangement without touching it. Do not identify a concealed sprinkler from its cover plate's appearance alone.
- Confirm the exact model. Use building records and contractor identification to obtain the manufacturer's installation instructions. Record the approved escutcheon or cover-plate arrangement and the contractor's requirements for the proposed finish.
- Show the whole layout. Include panel edges, battens, backing, adjacent lights, beams, ceiling changes, and nearby wall projections. Review the space around the sprinkler, not just the proposed hole.
- Obtain a written installation detail. Have the contractor specify the opening, finished-surface relationship, relevant obstruction limits, and whether sprinkler modification is necessary. Resolve required approvals with the authority having jurisdiction.
Expected result: You have an identified sprinkler and a documented finish detail that the panel installer can follow without changing the sprinkler.
For your 2026 project file, take 2 photographs per affected location: a wide view showing nearby features and a closer view showing the existing finish relationship. These are planning records, not evidence that the system complies.
Choose the finish approach
The practical choice is between retaining an unpaneled area and bringing the approved finish closer to the sprinkler. Neither approach is automatically compliant.
| Finish approach | Best for | Advantage | Limitation |
|---|---|---|---|
| Unpaneled border or zone | Layouts where leaving the original surface exposed is acceptable | Avoids forcing a tight decorative opening around the head | Its width and surrounding panel projections still need obstruction review |
| Approved opening in the panel assembly | Continuous finishes with a documented sprinkler detail | Keeps the intended panel layout across the surface | Requires precise coordination of opening, finish thickness, and listed sprinkler components |
| Sprinkler modification by a qualified contractor | Designs that cannot fit the existing sprinkler arrangement | Addresses conflicts through sprinkler-system work | Requires separate coordination and any applicable permits, testing, and inspection |
Choose the approach that meets the sprinkler detail, not the one that hides the largest gap. Do not add a decorative collar, homemade extension, or trim ring to disguise a conflict.
Finished-surface layout and template
Measure the complete buildup
- Record the panel assembly. Measure the selected panel and include every proposed backing layer, batten, spacer, and mounting component that changes its position. Use the actual installation materials rather than a photograph or nominal description.
- Locate the sprinkler from fixed references. Measure from stable wall or ceiling references that will remain visible during layout. Do not rest a tape, straightedge, or template on the sprinkler or its cover plate.
- Transfer the approved opening. Mark the contractor-specified opening and keep-out area on the layout. Distinguish the decorative cut line from any larger zone required to avoid obstructions.
- Check the neighboring slats and supports. Review the full panel profile against the approved detail. A felt gap between slats does not automatically remove an obstruction created by the slats themselves.
Expected result: The drawing shows the real finished surface and the approved opening, including nearby projections and hidden mounting layers.
Record 3 measurements per location: the horizontal position from a fixed reference, the vertical or perpendicular position from a fixed reference, and the complete finish buildup. The contractor determines any additional measurements needed for the sprinkler arrangement.
Prove the layout before cutting
- Make a full-size template. Reproduce the approved panel boundaries and opening on a lightweight template. Check it visually from a safe position without passing it over, pressing it against, or attaching it to the sprinkler.
- Check the slat pattern. Adjust panel joints outside the required opening so that narrow pieces and unsupported edges do not become the default solution. Submit layout changes that affect the sprinkler detail for review.
- Prepare an off-site mock-up. Make 1 mock-up per distinct detail using representative panel and mounting materials. Use it to check cutting quality, edge support, and finish depth away from the live system.
- Confirm the final drawing. Compare the mock-up with the approved section before cutting the installation panels. Keep the drawing available for the installer and sprinkler contractor.
Expected result: The panel layout is buildable without using the live sprinkler as a cutting guide or test fixture.
A 2026 finish drawing should show the same assembly that will actually be installed. If backing, battens, or panel orientation changes, revisit the detail before proceeding.
Panel cutting and independent attachment
Cut away from the sprinkler
- Move cutting work to a separate work area. Support the panel on a stable surface and follow its manufacturer's cutting instructions. Do not use a hole saw, jigsaw, router, or utility knife around an installed sprinkler.
- Cut the approved opening and panel boundaries. Follow the confirmed template. If an opening crosses a joint, cut each piece separately rather than forcing an assembled panel over the head.
- Check the edge condition. Remove loose material and verify that the cut has not left unstable slats or backing. Edge treatment must stay within the approved detail and must not reduce the opening.
- Compare the cut with the drawing. Check dimensions at the bench. Stop if the intended installation requires removing a sprinkler component or slipping a tight opening over it.
Expected result: The finished panel pieces match the approved detail and can be positioned without contact with sprinkler components.
Do not improvise a split-panel arrangement solely to avoid calling the sprinkler contractor. A joint helps with assembly only when the approved layout and attachment method support it.
Attach the panels to the building structure
- Verify the attachment location. Confirm suitable support and locate concealed services before drilling. Never attach panels, battens, or trim to sprinkler piping, fittings, hangers, or the sprinkler itself.
- Position each piece without contact. Use adequate help and a stable platform for overhead work. If a piece cannot be placed without striking or loading the sprinkler, stop and change the approved installation sequence.
- Secure the panel using the approved method. Follow the panel manufacturer's requirements and the project's support detail. Keep adhesive, fasteners, trim, and backing out of the approved sprinkler opening and keep-out area.
- Arrange the final sprinkler review. Have the qualified contractor check the installed finish relationship and surrounding obstructions. Complete any required inspection before treating the project as finished.
Expected result: The panels have independent support, the sprinkler remains untouched, and the completed installation has received the required review.
For a 2026 handover, retain the approved drawing, material information, installation photographs, and applicable inspection records together. A photograph of a tidy opening is not a replacement for inspection.
Variant: wall panels beneath a ceiling or sidewall sprinkler
Wall-only paneling still needs sprinkler coordination. Upper edges, corner returns, thick battens, and decorative projections can change the conditions near a ceiling-mounted or sidewall sprinkler.
- Show the wall's final profile. Include the upper panel termination, backing depth, trim, and any shelf or return. Do not review only the flat face of the panel.
- Confirm the wall-head relationship. Have the contractor assess the proposed finish against the exact sprinkler's installation and obstruction requirements. Sidewall sprinklers require particular attention to nearby wall and ceiling geometry.
- Keep the approved termination. If the detail calls for panels to stop below or beside the sprinkler, maintain that boundary across all layers. Do not continue felt, trim, or supports into the excluded area.
- Recheck added accessories. Submit later lighting channels, shelving, signage, and decorative features for review when they affect the area around the sprinkler.
Expected result: The wall treatment follows an approved termination rather than wrapping tightly around a safety device for appearance.
The advantage is a simpler decorative layout when panels stop clear of the affected area. The trade-off is an exposed strip or interrupted pattern; do not erase that interruption without renewed review.
Troubleshooting
The cover plate no longer meets the finished surface
Stop installation at that location. Have the sprinkler contractor check the listed assembly and its permitted adjustment. Do not pull the plate outward, add a spacer, substitute another plate, or conceal the mismatch with caulk.
The opening fits, but slats project near the sprinkler
Recheck the complete profile. Opening size alone does not establish acceptable water distribution. Give the contractor the installed section and neighboring projections; revise the panels or arrange sprinkler work as directed.
Felt, adhesive, or finish has reached a sprinkler component
Stop and report the contamination to the sprinkler contractor. Do not scrape, wipe, paint over, or attempt to clean the sprinkler yourself. Keep remaining work away from the affected location until the contractor resolves it.
The panel requires sprinkler removal to fit
Change the installation plan before proceeding. Ask whether an approved jointed layout is feasible or whether contractor-led sprinkler work is necessary. Never temporarily unscrew the head or remove its cover to pass the panel over it.
The sprinkler is struck, leaking, or visibly damaged
Stop work and follow the building's emergency procedure. Notify building management and the sprinkler contractor immediately; contact emergency services when conditions require it. Do not keep installing, operate valves without authorization, or attempt a repair.
Customize your workflow
For Akustiq USA acoustic wood panels, separate decorative decisions from life-safety approval. Select the finish and layout you want, then submit the actual assembly before committing to cuts or attachment locations.
Use the guide to cutting acoustic wood slat panels to size for the panel-cutting portion of the work. It does not replace the sprinkler manufacturer's instructions or contractor-approved detail.
For repeated rooms, create a location schedule rather than copying an opening indiscriminately. Record each sprinkler model, finish assembly, approved detail, and inspection status. Reuse a detail only after the contractor confirms that the relevant conditions match.
FAQ
Can I install acoustic panels around fire sprinkler heads myself?
You can perform approved panel work if you have the necessary skills and permissions, but sprinkler identification, compatibility review, and system changes belong with a qualified fire sprinkler contractor. Do not alter or use sprinkler components during panel installation.
How much clearance should I leave around a sprinkler head?
Use the clearance and obstruction requirements for the exact sprinkler and installation, confirmed by the sprinkler contractor. There is no universal decorative cutout dimension that makes every wood-panel installation compliant.
Can I move a concealed sprinkler cover plate onto the new panels?
Do not move the cover plate yourself. A qualified sprinkler contractor must confirm whether the listed assembly accommodates the new finished surface or requires modification.
Does leaving a large hole around the sprinkler make paneling safe?
A large hole alone does not establish a safe installation. Panel thickness, nearby projections, the sprinkler's finished-surface relationship, and the applicable installation requirements still need review.
Can I use caulk or trim to hide the gap around a sprinkler?
Do not fill the opening or add trim unless the sprinkler contractor confirms the exact detail is permitted. Decorative material must not interfere with the sprinkler, its listed components, or required operation.
Are acoustic wood panels automatically fire-rated because the room has sprinklers?
No, sprinklers do not give acoustic wood panels a fire rating. Confirm the required finish classification and supporting documentation for the actual panel assembly separately.
Do wall panels need review if the sprinkler is on the ceiling?
Yes, review wall panels when their upper edges or projections affect the area around a sprinkler. The contractor must assess the final geometry, including trim, battens, returns, and later accessories.
One last thing
Approve the edge of the panel installation, not just the hole. An opening can look correct while a neighboring slat, support, or trim piece conflicts with the sprinkler detail. Before closing your 2026 project, compare the complete installed profile with the approved drawing and resolve every change.



 Better performance and aesthetic appeal
 In Stock




