


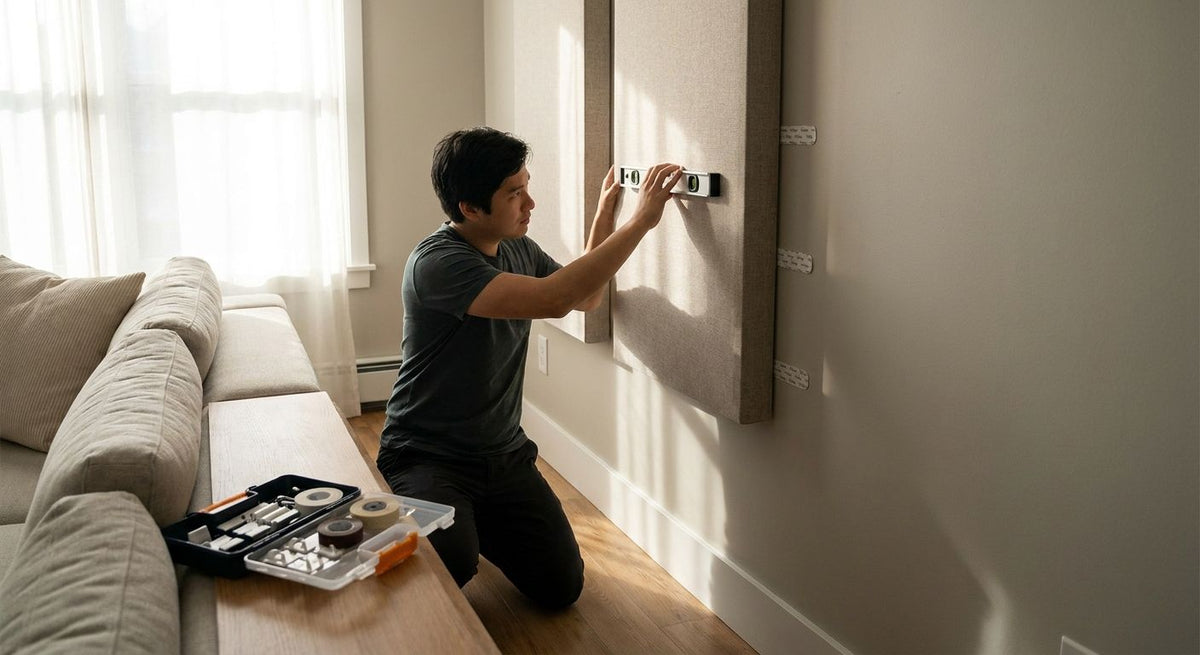
Landlords keep the security deposit if drywall anchors leave holes bigger than a pushpin — but bare rental walls still bounce sound around the room, especially in open-plan apartments with hardwood or tile floors. This guide walks through mounting acoustic wood panels in a leased space using zero-drill methods that come off clean at move-out.
- Command-style strips rated to 16 lbs hold most acoustic slat tiles without a single screw hole.
- Akuwood Panel's tile pack (4 pieces, $126.95) is sized for small rental walls and test runs before a full room commitment.
- A $10 full sample box settles the color question before you buy panels for the whole wall in 2026.
- Test-fit with painter's tape for 48 hours before final mounting — drywall paint reacts differently to adhesive than primer.
- Photograph the wall before and after installation; it's your proof against a bogus damage claim at move-out.
Why this matters
Apartment leases in 2026 still treat drywall holes the same way they did a decade ago: patch fees range from a flat charge to a chunk of the deposit, and most property managers don't distinguish between a nail hole and a lag bolt. Acoustic wood panels solve two rental problems at once — they cut the flutter echo that concrete and drywall boxes create, and the better mounting methods leave the wall exactly as you found it.
The catch is that most tutorials assume you own the wall. Renters need a different sequence: test the wall material first, buy small before buying big, and mount with hardware built to release cleanly. Get that order wrong and you're either stuck with a panel that falls off in July humidity or a landlord invoice in your inbox.
What you'll need
- A stud finder or a flashlight held at a low angle to spot uneven drywall seams
- Removable mounting strips or hooks rated for at least the panel's weight (check the packaging rating, not just the brand name)
- Painter's tape and a pencil for marking layout lines
- A level, 4 feet minimum, or a laser level for wider walls
- Isopropyl alcohol wipes to clean the wall surface before any adhesive goes up
- One acoustic slat wall panel tile pack sized for the section of wall you're testing first
- A hair dryer or heat gun, for adhesive removal at move-out
Start smaller than you think you need. A tile pack of four panels covers a single accent zone — enough to judge how the veneer reads in your light before committing to a full wall in 2026.
The steps
1. Test your wall type before you buy anything
Knock across the wall in a grid pattern. A hollow, papery sound usually means drywall over a stud cavity — good news, because most adhesive strips are rated for exactly this surface. A dull, solid thud usually means plaster, brick, or concrete, which needs a different adhesive formula and often a lower weight limit per strip.
Common mistake: skipping this step and buying panels sized for a full wall before confirming the surface will hold adhesive at all. Test on a hidden section — behind a door, inside a closet — with a single strip for 24 hours first.
2. Choose mounting hardware rated for the panel's actual weight
Most heavy-duty removable strips are rated up to 16 lbs per pair. A four-panel tile pack from Akuwood Panel weighs far less than that per section, which is why the tile format works well for strip-and-adhesive mounting rather than screws. Larger single panels or a full accent wall may need a hybrid approach — strips plus a French cleat that rests on, rather than pierces, the baseboard trim.
Common mistake: buying the cheapest strips in the multipack without checking the weight rating on the box. Underrated strips creep for weeks before they let go — usually while you're not home.
3. Dry-fit the layout with painter's tape
Lay the panels out on the floor first, then tape their outline directly onto the wall at the height and spacing you want. Live with it for a day. Natural light shifts how slat shadow lines read at 9am versus 6pm, and that's the detail people miss when they mount straight off a photo.
Expected outcome: a taped grid that matches your panel count exactly, with no guesswork on the day you actually mount.
4. Clean the wall and apply adhesive strips
Wipe the mounting zone with isopropyl alcohol and let it dry fully — skipping this cuts adhesion strength dramatically on painted drywall. Press each strip for a full 30 seconds per manufacturer guidance, then wait the full cure time listed on the packaging (often an hour or more) before hanging any weight.
Common mistake: hanging the panel the second the strips are on the wall. Adhesive strips need their full cure window, and full weight before that window closes is the number one cause of panels sliding down mid-week.
5. Mount in sections, not one giant panel
For detailed guidance on positioning without leaving a mark, mounting hexagon acoustic panels without damage covers the segment-by-segment approach that works for any modular wood panel, not just hexagon shapes. Mounting in smaller sections spreads the load across more strips and makes it easy to remove one piece at a time if you move a section later.
Expected outcome: a wall section that goes up cleanly in under an hour, spread across two or three mounting sessions rather than one long push.
6. Let the walls with wallpaper or textured paint sit longer
Textured orange-peel paint and vinyl wallpaper both reduce adhesive contact area. If your rental has either, extend the cure time before hanging weight, and consider a second reinforcing strip per panel rather than pushing the rated limit.
If the wall type is genuinely uncertain — older buildings sometimes hide plaster-over-lath behind a skim coat that looks like drywall — bringing in professional handyman services to confirm what's actually behind the paint before you commit adhesive to a full wall costs less than replacing a section that pulled plaster off with it.
7. Document the wall before and after
Photograph every mounting zone before any adhesive goes up, and again after removal at move-out. This is the single biggest protection against a disputed deposit deduction — a timestamped photo showing no gouges beats an argument every time.
Troubleshooting
- Strip won't hold on textured paint — sand the mounting zone lightly with fine-grit paper first, wipe clean, and use a strip rated one weight class above what the panel needs.
- Panel sags after a few weeks — the adhesive likely never hit full cure before weight went on. Remove, re-clean, and give it the full cure window this time, usually 60 minutes minimum.
- Humidity is peeling the strips in summer — bathrooms and un-air-conditioned rooms push adhesive past its rated temperature range. Move humidity-sensitive walls to a hybrid mount with a cleat resting on trim.
- Landlord flags faint adhesive residue — isopropyl alcohol removes most residue within a few passes; a hair dryer on low heat softens stubborn spots before wiping.
- Uneven wall creates visible gaps between panels — shim behind the panel with a thin foam pad rather than forcing the mount tighter, which stresses the adhesive bond.
- Panel color looks different once it's up — this is the exact problem a sample box solves before a full purchase; light in a room reads differently than a product photo.
Tools and resources
- Full sample box with four panels across natural, smoked oak, and walnut finishes for $10 — settle the color question before buying a whole wall's worth
- Acoustic slat tile packs sized for single-zone test installs
- Removable mounting strips rated to the panel weight, sold at any hardware retailer
- A laser level for wider walls where a 4-foot level can't reach edge to edge
What to do next
Once the test section holds for two to three weeks without shifting, scale up. For a renter-specific breakdown of adhesive-only panel formats, the guide on peel-and-stick wood wall panels built for renters covers which finishes handle repeated removal best.
FAQ
Can you install acoustic panels in a rental apartment without drilling?
Yes — removable adhesive strips rated to 16 lbs per pair hold most acoustic slat tile panels without any screws or anchors. Full cure time before hanging weight, usually an hour, is what makes the bond last.
What's the best way to install acoustic panels in a rental without damage?
Test the wall surface first, mount in small sections with rated adhesive strips, and document the wall with photos before and after. Skipping the cure time on the adhesive is the most common cause of panels falling.
Do acoustic wood panels actually reduce echo in an apartment?
Felt-backed acoustic panels rated around 0.75 NRC absorb a meaningful share of mid-to-high frequency reflection in a typical living room. A full wall does more than a single accent panel, but even one zone cuts noticeable flutter echo.
Will adhesive strips damage rental walls when removed?
Properly cured strips designed for removal pull away cleanly on painted drywall, especially with isopropyl alcohol and gentle heat from a hair dryer. Textured paint or wallpaper carries more risk and may need extra care during removal.
How much does it cost to test acoustic panels before buying a full wall?
A sample box runs around $10 and includes four finishes to test color and texture. A tile pack of four panels runs roughly $126.95 and lets you test a real mounted section before committing to a full room.
Is peel-and-stick better than slat panels for a rental?
Peel-and-stick backsplash tiles suit smaller accent zones like a kitchen wall, while slat tile packs give better acoustic performance for living rooms and bedrooms. The right choice depends on whether the goal is decoration or actual echo reduction.
How long do removable adhesive strips hold acoustic panels?
Rated strips hold for months to years indoors at normal humidity, provided they were given the full cure time before weight went on. Bathrooms and un-cooled rooms shorten that lifespan due to heat and moisture.
Can renters use hexagon acoustic panels instead of slat panels?
Yes — hexagon panels mount the same way with adhesive strips and work well for smaller geometric accent walls. They carry the same 0.75 NRC sound rating as felt-backed slat versions.
One last thing
The detail most renters miss: cure time matters more than strip strength. A 16 lb-rated strip that gets weight loaded five minutes after mounting behaves like an 8 lb strip — the adhesive hasn't finished bonding to either surface yet. Wait the full hour in 2026 before hanging anything, and the same strips that failed in a rushed install will hold for a full lease term.






 Better performance and aesthetic appeal
 In Stock




