


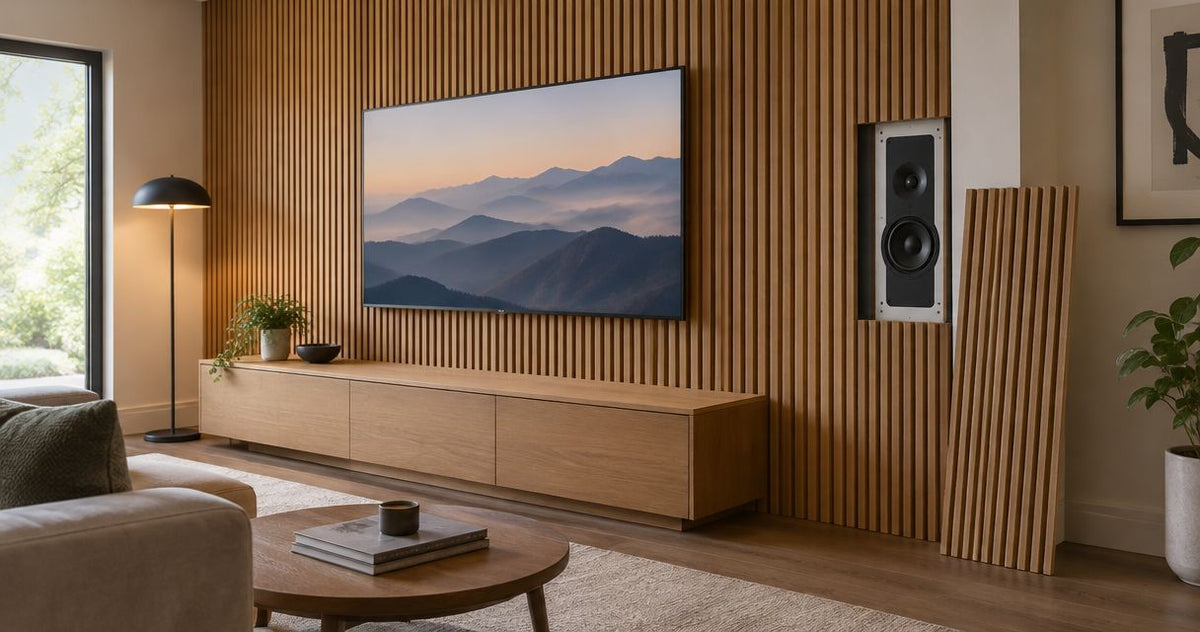
To hide in-wall speakers behind wood slat panels, build a removable speaker opening into the slat wall rather than covering the drivers with wood and felt. Instead of removing fixed cladding whenever a speaker needs attention, use a serviceable grille or manufacturer-approved fabric insert that keeps the sound path clear.
- Hide in-wall speakers behind wood slat panels using separate speaker openings, not uninterrupted wood and felt.
- Akustiq USA acoustic wood panels belong around speaker openings; speaker-cover compatibility requires separate confirmation.
- Use the speaker manufacturer's grille as the default; test any alternative acoustically transparent fabric before installation.
- Make speaker covers removable and compare sound before and after fitting the finished surround.
Why this matters
Sound absorption and sound transmission are different jobs. Acoustic wall treatment absorbs some sound reaching the wall. A speaker covering needs to let sound travel from the drivers into the room without unwanted changes. The word acoustic does not make a decorative panel a suitable speaker grille.
For a 2026 feature-wall project, separate those jobs in your drawing: panels treat and decorate the surrounding wall; the speaker opening preserves the loudspeaker's intended output. Wood slats in front of a driver obstruct part of its radiation, and backing material adds another layer to evaluate.
Akustiq USA acoustic wood panels suit homeowners planning a slat feature wall with separate, serviceable speaker openings. Use the panels as the surround, not as an assumed acoustically transparent cover. The trade-off is a visible opening or fabric insert instead of an uninterrupted slat pattern.
Before you start
- Collect the installation documents and access requirements. You need the speaker's exact cutout template, mounting-depth requirements, grille instructions, and guidance for the selected panels. Gather measuring tools, suitable cutting equipment, eye protection, dust control, and access to the amplifier's power switch.
- Check the wall before cutting. Locate framing and concealed services; confirm a suitable cable route and a mounting location permitted by the speaker instructions. Use a qualified installer for uncertain wall conditions, electrical work, or changes to a fire-rated assembly.
- Resolve the hidden gotcha: finished wall thickness. Added cladding changes the surface around an existing speaker. Confirm that the mounting clamps, grille attachments, and removal tools remain usable; do not assume the speaker can clamp through the combined wall and panel thickness.
Prepare 1 full-size mockup of the opening before committing to the wall. It should include the actual cover material and edge arrangement, not just a pencil rectangle. A small finish sample helps you judge appearance, but it does not establish how a complete speaker covering sounds.
Speaker-opening design
Choose the covering method
The safest starting point for your 2026 installation is the speaker manufacturer's intended grille, with the wood panels stopping around it. If hiding the grille matters more than preserving the slat pattern, investigate a removable fabric insert instead.
| Covering method | Best for | Advantage | Limitation | Recommendation |
|---|---|---|---|---|
| Manufacturer grille | Keeping the speaker's intended installation | Uses the covering designed for that speaker | The grille remains visible within the slat wall | Default choice |
| Removable fabric insert | Concealing the speaker within a contrasting wall section | Hides the opening without placing wood across the drivers | Fabric, frame geometry, and clearance need approval and testing | Use after confirmation |
| Continuous slats and felt over the speaker | Visual continuity only | Keeps the wall pattern uninterrupted | Obstructs the sound path and complicates access | Skip without explicit system approval |
A fabric insert is not automatically transparent because you can see light through it. Select fabric intended for loudspeaker coverings, then confirm suitability with the speaker manufacturer or AV installer. Do not substitute upholstery fabric, decorative felt, or a solid backing board.
Map the opening
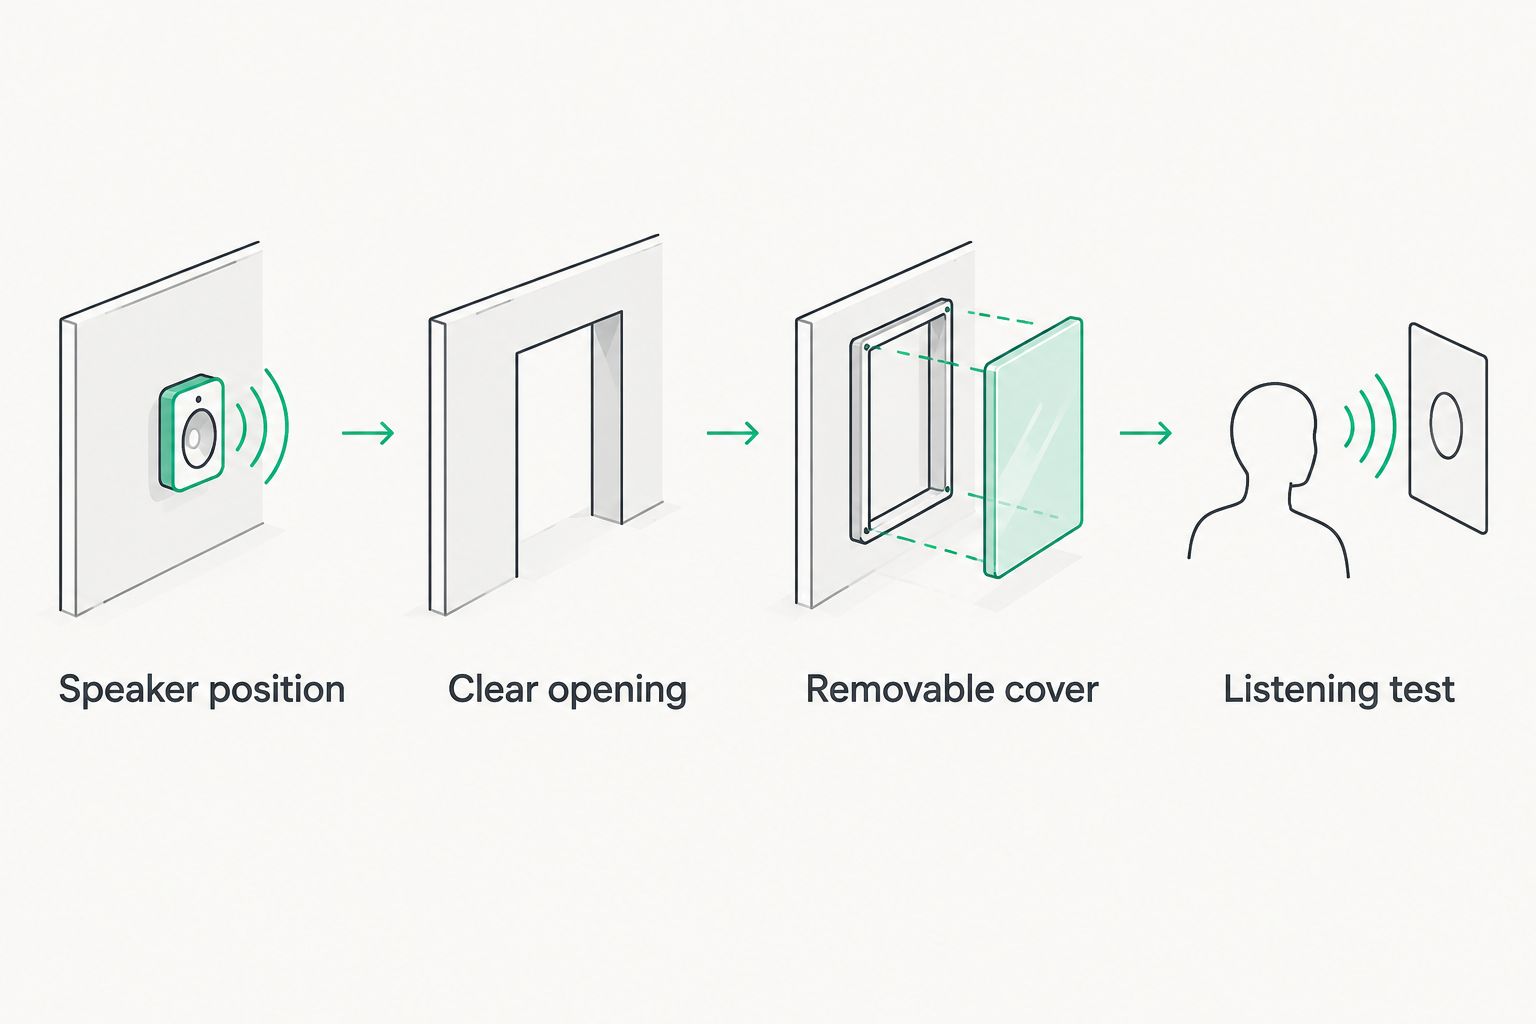
- Mark the speaker position using its supplied template. Follow its placement guidance rather than moving the speaker solely to match a slat seam.
- Draw the speaker cutout, outer frame, and grille footprint separately. Leave the access required to remove the grille and operate the mounting hardware.
- Draw the panel joints and slat pattern around that footprint. Place any decorative trim outside the required sound opening.
- Mark a separate removable cover boundary if you are using fabric. Keep its supporting frame outside the unobstructed opening required by the speaker instructions.
Expected result: your drawing shows where the speaker mounts, where the panels stop, and how the speaker comes out without dismantling the surrounding wall.
Wall preparation and cable route
The speaker and the decorative panels need secure mounting arrangements suited to their respective instructions. Do not treat felt backing, thin decorative slats, or a removable cover as structural support for the speaker.
- Verify the proposed location against framing, pipes, wiring, and the speaker's required cavity space. A stud finder is a starting check, not proof that the entire cavity is clear.
- Confirm the speaker's enclosure requirements. Use any specified back box; do not assume an added decorative cavity replaces it.
- Route cable rated for the installation location and applicable local requirements. Keep speaker wiring separate from mains wiring as required, and leave the service slack specified by the installer or speaker instructions.
- Establish approved fixing points for the panels and any cover frame. Keep fasteners clear of concealed services and the speaker cavity.
- Label the speaker cable at both ends before closing the wall. Record the route and mounting arrangement for future repairs.
Expected result: the speaker has its required mounting space and cable connection, while the panel supports remain outside its opening and removal path.
For a 2026 remodel, photograph the accessible wall and wiring before covering them. Keep those photographs with the installation documents. They help the next installer distinguish panel fixings from the speaker's mounting hardware.
Do not cut a structural member to make the template fit. Move the proposed opening or have a qualified professional design an appropriate solution. Similarly, keep electrical boxes accessible and address any required extensions separately from the decorative panel work.
Panel cuts and removable cover
Build the surround on a stable work surface before taking it to the wall. Cutting panels while they are positioned over an installed speaker risks damage to the drivers and leaves debris inside the opening.
- Transfer the opening from the verified layout to the panel sections. Check the orientation and visible slat spacing before making irreversible cuts.
- Follow the panel manufacturer's cutting instructions. Support the slats and backing throughout the cut; use an offcut to check the finish before cutting the visible edge.
- Remove loose debris and inspect the cut edges. Keep exposed edges outside the speaker's required opening and finish them using a suitable method for the selected material.
- Dry-fit the surround without fastening it permanently. Check that the grille detaches and that the speaker's mounting mechanism remains accessible.
- If using fabric, construct a rigid, removable frame with the opening kept clear. Secure the fabric without placing staples, adhesive, trim, or backing material across the speaker's required sound path.
- Fasten the surrounding panels according to their instructions. Use a serviceable fastening arrangement for the cover, and keep it separate from the speaker's own mounting hardware.
Expected result: the wall looks finished, the cover stays secure, and you can remove the speaker without cutting the cladding.
For material-specific preparation, see how to cut acoustic wood slat panels to size. Keep the speaker template and the decorative surround dimensions separate throughout the cutting process.
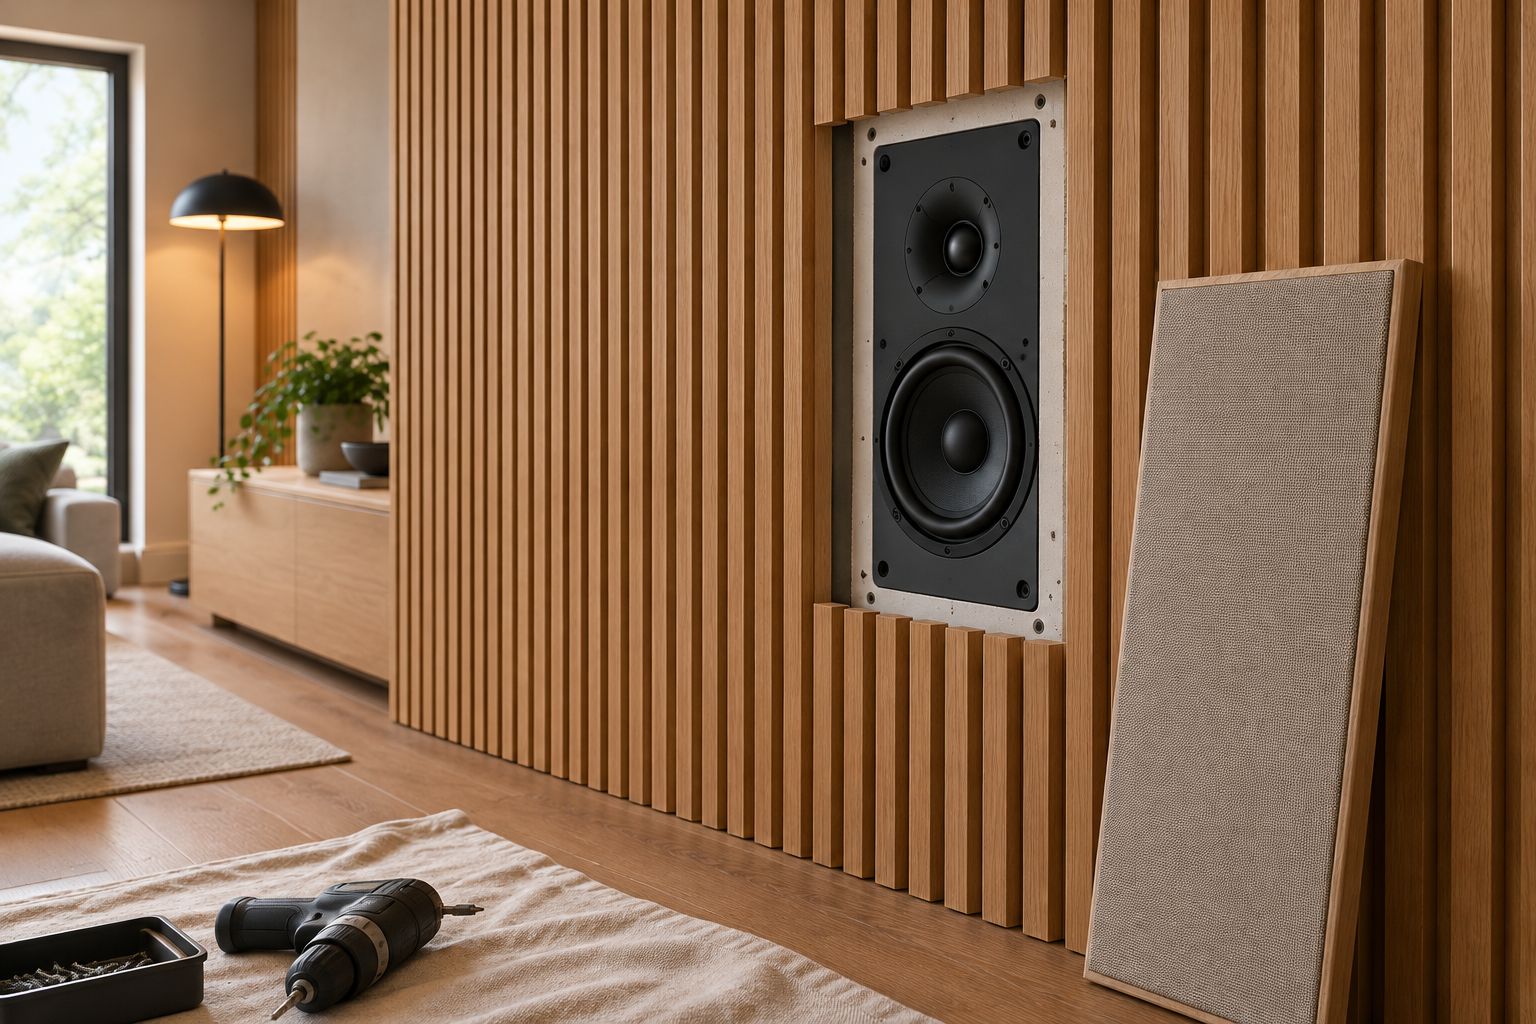
A dark insert can make an opening less conspicuous, but it still creates a break in the wood pattern. Judge that compromise from your actual seats and under the room's lighting. Avoid solving a visual problem by adding an acoustically unverified layer over the speaker.
Listening checks and final fastening
Test the actual assembly before you finish the wall. Receiver calibration cannot remove a physical obstruction or stop a loose frame from rattling.
For your 2026 handover check, select 3 test tracks: clear spoken dialogue, familiar music with vocals, and music containing bass. These are repeatable listening references, not a substitute for professional acoustic measurement.
- Listen with the speaker installed correctly and its normal grille arrangement in place. Keep the source, volume setting, and receiver processing unchanged for the comparison.
- Fit the proposed removable cover. Replay the same passages and compare dialogue clarity, vocal balance, and any new vibration.
- Check from 2 listening positions: the main seat and a seat toward the side. A covering that sounds acceptable directly in front still needs checking across the seating area.
- Remove the cover and repeat any passage that sounded different. This helps separate covering-related changes from recording or room effects.
- Inspect the surround while playing at your normal listening level. Correct loose components, then complete the final fastening and any receiver calibration specified for the system.
Expected result: the finished assembly produces no obvious new muffling or rattling in the comparison, and the cover remains removable. For a performance-critical cinema or listening room, have an AV professional measure the covered and uncovered response before accepting the design.
Retrofit an existing slat wall
An existing installation needs a different starting point: discover the speaker's position and service requirements before deciding where the decorative cut belongs. Do not cut blindly through a finished wall toward a concealed speaker.
- Turn off the amplifier and remove the accessible decorative section using its intended removal method. Protect the speaker from dust and accidental contact.
- Expose enough of the installation to identify the speaker frame, mounting hardware, and wiring route. Confirm the required opening from the model's documentation.
- Rework the surrounding panels to form a clear, serviceable aperture. Replace damaged sections rather than using loose slat pieces to bridge the opening.
- Fit the intended grille or a separately approved removable fabric insert. Repeat the same covered-versus-uncovered listening checks before closing the work.
Best for: homeowners who already have a slat wall and need to restore speaker access. The limitation is visual: the new opening must work with existing joints, and a perfect continuation of the previous wood pattern is not guaranteed.
Troubleshooting
Dialogue sounds muffled
Remove the added cover and replay the same dialogue at the same setting. If clarity returns, inspect the fabric and opening geometry; remove decorative backing and keep wood clear of the drivers. Do not compensate first by increasing treble.
Bass makes the cover buzz
Check the removable frame, nearby slats, grille attachments, and loose cable contact. Secure the loose component using a suitable fastening method without touching the driver. If the noise persists with the cover removed, investigate the speaker installation itself.
The grille no longer fits
The decorative surround has entered the grille footprint or changed its attachment access. Rework the surround to restore the manufacturer's required geometry. Do not force the grille against the cladding or improvise extensions to the speaker's clamps.
The speaker cannot be removed
The aperture or trim blocks the frame, tools, or mounting tabs. Enlarge or redesign the decorative access arrangement according to the speaker instructions. A removable fabric face is insufficient if the rigid surround still traps the speaker.
Sound changes between seats
Compare the same seats with the added cover removed. If the difference follows the cover, keep trim and slats out of the required opening and seek professional measurement. Do not reposition the speaker merely to conceal an unsuitable covering.
Customize your workflow
Extend the opening plan to the rest of the feature wall: television mounts, cable access, outlets, lighting, and panel edges. Resolve their access requirements before fastening the panels, rather than treating each opening as a later repair.
When selecting Akustiq USA acoustic wood panels, keep finish selection separate from speaker-cover approval. A finish sample helps coordinate wood and fabric; it does not certify the fabric, grille, or complete wall assembly for sound transmission.
For a 2026 installation record, save the speaker model, cutout template, cable labels, cover-removal instructions, and photographs together. Include the test tracks used for the listening comparison so you can repeat it after a repair or equipment change.
FAQ
Can I hide in-wall speakers behind wood slat panels without affecting sound?
Do not assume continuous wood slats and felt will leave speaker output unchanged. Build separate speaker openings, and use the intended grille or an approved removable fabric cover.
Are acoustic wood panels the same as acoustically transparent speaker fabric?
No. Acoustic panels absorb sound reaching a surface, while speaker fabric is selected to transmit sound from the drivers into the room; those are different requirements.
Should I remove the felt behind the speaker?
Removing felt alone does not make a slat panel a suitable speaker cover. Wood still obstructs part of the sound path, so plan a clear opening unless the complete covering arrangement has explicit approval.
Can I use black fabric to hide an in-wall speaker?
Use fabric intended for loudspeaker coverings, subject to the speaker manufacturer's or AV installer's confirmation. Color does not establish acoustic transparency, and the supporting frame must keep the required opening clear.
Can receiver calibration fix sound blocked by wood slats?
Receiver calibration cannot remove a physical obstruction or repair a rattling cover. Resolve the covering and mounting problems before performing the system's final calibration.
How do I access a speaker after installing a slat wall?
Provide a removable cover and an opening that allows access to the speaker's mounting hardware. Test actual speaker removal before completing the surrounding cladding.
Should I mount the speaker through the panel and drywall together?
Mount through the combined thickness only when the speaker instructions permit that assembly. Added cladding can affect clamp reach and grille attachment, so verify the mounting arrangement before cutting.
One last thing
Prove removal, not just installation. Before accepting the finished wall, take off the cover and demonstrate access to the speaker's mounting hardware. A speaker that disappears neatly but cannot be serviced is an unfinished design.




 Better performance and aesthetic appeal
 In Stock




