


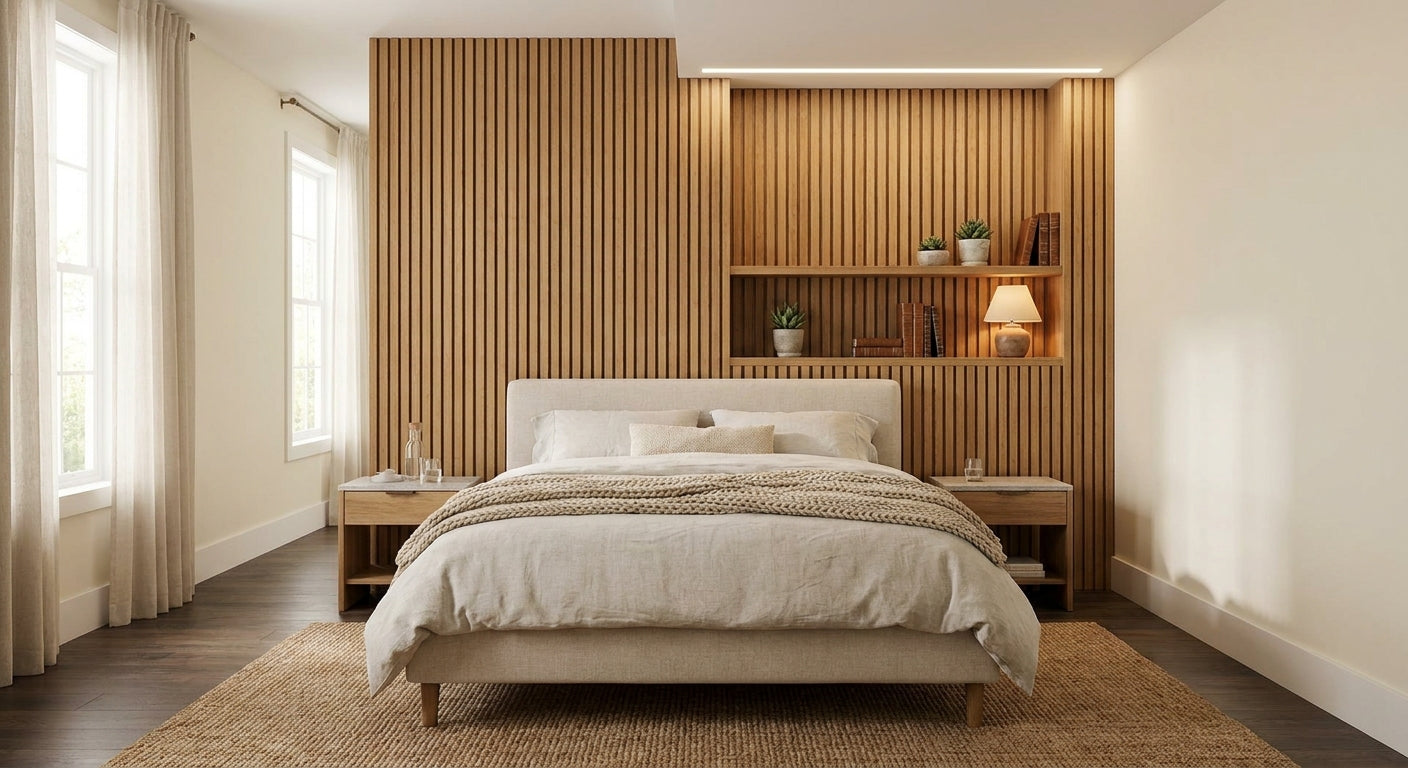
Turning slat wall panels into a headboard feature wall is a weekend project that swaps a flat, boring wall behind the bed for a textured, sound-softening focal point without the cost of custom millwork.
TL;DR: Building a slat wall panels headboard feature wall takes a free weekend, a stud finder, construction adhesive or a French cleat, and 3-5 acoustic slat panels depending on bed width. The Natural Oak with Gray Felt acoustic slat panel is the safe pick for most bedrooms because the felt backing kills flutter echo behind the headboard. Verdict: Buy if your bedroom has a queen or king bed against a shared or exterior wall — skip it if you're renting without permission to attach to drywall.
Why this matters
A headboard wall isn't just decoration. The wall directly behind your head is the single biggest source of flutter echo in a bedroom because sound bounces off it and back off the headboard within milliseconds. Flat drywall reflects almost all of that sound; a felt-backed slat panel absorbs a meaningful chunk of it instead.
Most people jump straight to paint or a fabric headboard and never touch the acoustic problem. Slat panels solve both at once — they look like a designed feature wall and they quiet the room, which matters more in 2026 than it did a decade ago now that open floor plans and hard-surface flooring have made bedrooms louder by default.
What you'll need
- Stud finder (magnetic or electronic)
- Level (4-foot minimum) and a pencil
- Tape measure
- Construction adhesive (polyurethane-based, paintable) or a French cleat/rail system
- Caulk gun
- Miter saw or fine-tooth handsaw for trims
- 3-5 acoustic slat wall panels in Natural Oak with gray felt for a queen-to-king headboard span
- One walnut end-piece panel if you're finishing an exposed side edge
- Safety glasses and a dust mask for cutting
Order a sample panel before you commit to a full run. Wood tone reads differently under bedroom lighting than it does on a screen, and matching it to your bedding and floor color matters more here than in any other room in the house.
The steps
1. Measure the headboard zone, not the whole wall
Measure the width of your bed frame plus 6-12 inches of overhang on each side — that's your feature wall zone, not the entire wall. Most queen setups land between 66 and 78 inches wide; king setups run 90 to 100 inches. Mark the height you want, typically 48 to 60 inches off the floor, with painter's tape so you can stand back and check it before committing.
Common mistake: measuring wall-to-wall instead of bed-width-plus-overhang. It wastes panels and makes the feature look like wallpaper instead of a headboard.
2. Find studs and mark your grid
Run the stud finder across the marked zone and mark every stud location in pencil, usually every 16 inches on center in US residential framing. If you're using construction adhesive alone on drywall, you still want at least two stud strikes across the panel width for long-term hold — don't rely on adhesive plus drywall anchors as your only support for anything over 40 inches tall.
3. Dry-fit the panels before any adhesive touches the wall
Lean the panels against the wall in the order you'll install them and check the slat direction lines up edge to edge. Slat wall panels are directional — flip one upside down by mistake and the grain pattern breaks at the seam. Give yourself 10-15 minutes here; it's the cheapest insurance in the whole project.
4. Apply adhesive in a bead pattern, not a full coat
Run a serpentine bead of construction adhesive roughly 1 inch from each edge and a zigzag through the middle, skipping full coverage. Full coverage traps air and prevents a flush bond. Press each panel into place and hold firm pressure for 60 seconds, then use masking tape at the top and bottom to hold it while the adhesive sets — most polyurethane construction adhesives need 24 hours to reach full cure strength, even though they grab within minutes.
Common mistake: skipping the tape-and-hold step because the panel feels stuck. Panels that shift a quarter-inch overnight telegraph as a visible seam gap once cured.
5. Work outward from center, checking level every panel
Start your first panel centered on the bed, then work outward left and right. Check level with every single panel, not just the first one — drywall and framing are rarely perfectly true, and errors compound across a 90-inch span. A gap of even 1/8 inch at panel three becomes a visibly crooked line by panel five.
6. Finish exposed edges with an end piece
If the panel run stops mid-wall instead of running into a corner, cap the exposed edge with a matching end-piece slat panel rather than leaving a raw cut edge. It's the detail that separates a finished feature wall from an obvious DIY patch job, and it takes under 15 minutes per edge.
7. Let it cure, then style the bed against it
Give the full run at least 24 hours before pushing the bed frame back against the wall or hanging anything heavier than a picture from it. Once cured, add sconces, a floating nightstand shelf, or LED strip lighting along the top edge — slat panels hide LED channel gaps naturally, which is part of why they read as intentional rather than retrofitted.
Troubleshooting
- Panel won't sit flush at the seam. Usually a stud bump or old paint ridge behind the wall — sand the high spot down before reapplying adhesive rather than forcing the panel to conform.
- Slat lines don't match between panels. You likely flipped one panel vertically. Pull it while adhesive is still workable (within the first 10 minutes) and reset it.
- Adhesive squeezes out at the seams. You used too much. Wipe immediately with a damp cloth — cured polyurethane adhesive on wood veneer is very hard to remove cleanly.
- Panel feels hollow or rattles when tapped. Insufficient adhesive contact or a stud you missed. Add a bead along the affected edge and re-clamp with tape for another 24 hours.
- Wall looks too dark or heavy over the bed. Reduce panel height to 42-48 inches instead of running floor-adjacent, or break the run with a lighter wood tone at the outer edges.
- Renters worried about wall damage. A French cleat / rail-mounted system lets you remove the whole run without drywall adhesive residue — ask about mounting rail options before you buy panels if this applies to you.
Tools and resources
- Stud finder, level, tape measure, miter saw, caulk gun (standard hardware store items)
- Polyurethane construction adhesive, paintable and waterproof-rated
- Full sample box of slat wall panels if you're still deciding between wood tones before you commit to a full order
- For a deeper look at drywall-specific mounting, see how to install acoustic slat wall panels on drywall
What to do next
Once the panels are up and cured, the next decision is whether to treat the whole wall as an acoustic zone or just the headboard strip. For a complete walkthrough of turning this same technique into a full sound-dampening headboard build, read how to create an acoustic headboard wall with slat panels — it covers felt density choices and full-wall coverage math that this guide doesn't.
FAQ
What's the best wood tone for a slat wall panel headboard? Natural oak with gray felt backing works in the widest range of bedrooms because it reads warm without pulling the room dark, and the felt adds acoustic absorption you don't get from a solid veneer panel.
Is a slat panel headboard better than a fabric headboard? For noise control, yes — felt-backed slat panels absorb flutter echo that fabric headboards barely touch since fabric only covers a fraction of the reflective wall surface. For softness against your back while sitting up in bed, a fabric headboard still wins.
How much wall coverage do I need for a queen bed? Plan for 66-78 inches of width and 48-60 inches of height, which typically runs 3-4 acoustic slat panels depending on individual panel width.
Can I install slat wall panels over a textured or popcorn ceiling wall? No — panels need a reasonably flat substrate. Skim-coat heavy texture before installing, or the adhesive bond will be inconsistent across the panel.
Do slat wall panels actually reduce bedroom echo, or is that just marketing? Felt-backed slat panels measurably absorb mid-to-high frequency reflections in the zone directly behind the bed, which is where flutter echo originates in most bedrooms — a flat drywall or painted wall reflects nearly all of that same sound back at you.
How long does a slat panel headboard wall take to install? Budget a half-day for measuring, dry-fitting, and adhesive application, plus a full 24-hour cure before you push furniture back against the wall.
Can renters do this without damaging the wall? Yes, with a French cleat or rail-mounted system instead of direct adhesive — it's removable without leaving adhesive residue on drywall.
What's the safest bet if I've never installed wall panels before? Order a sample panel first, dry-fit before any adhesive, and start centered on the bed working outward — that sequence prevents almost every common installation mistake.
One last thing
Most people install the panels flush to the ceiling line out of habit, copying how they'd hang wallpaper. Stopping the panel run 6-8 inches short of the ceiling and letting paint carry the rest of the wall up actually reads as more intentional in 2026's bedroom design trends — it frames the headboard as a discrete feature rather than a full accent wall, and it uses one fewer panel per run.




 Better performance and aesthetic appeal
 In Stock




