


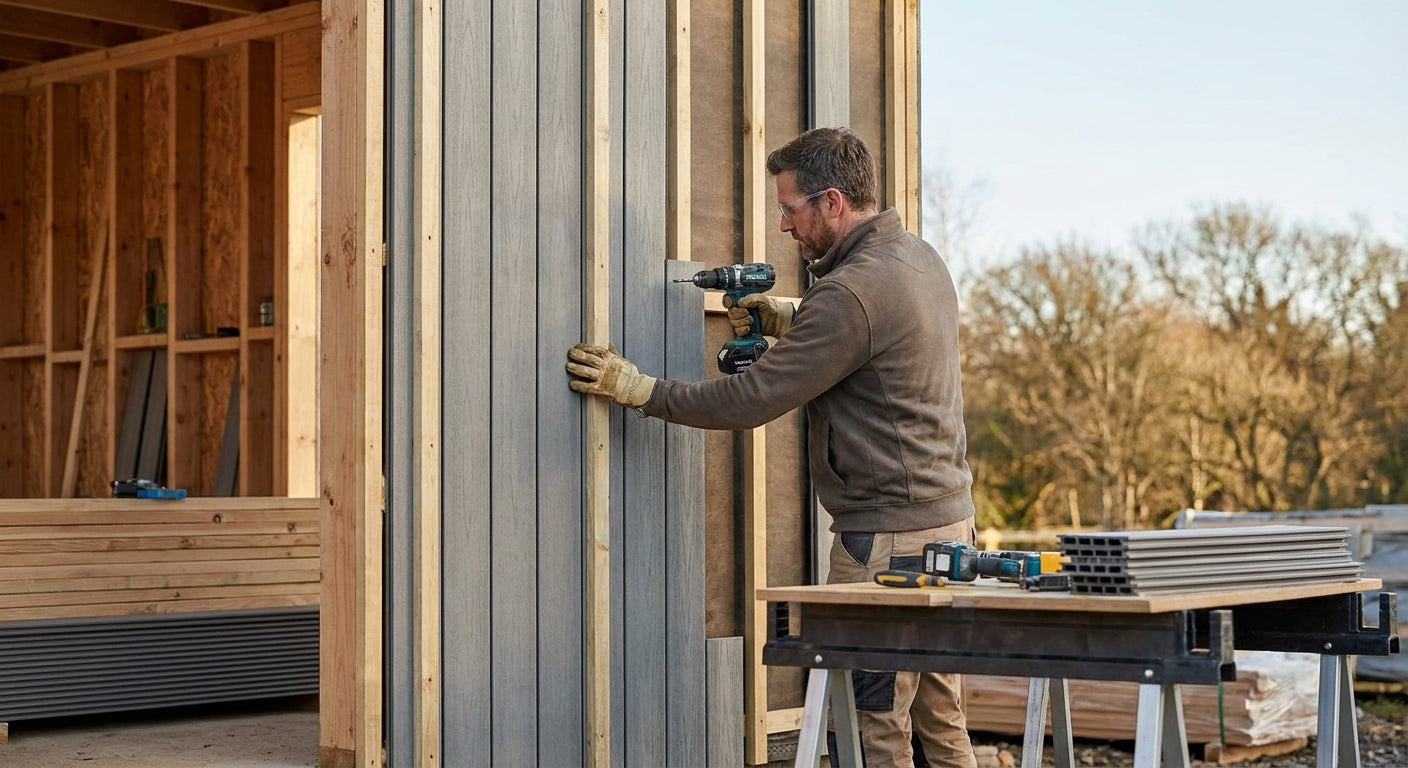
Installing exterior cladding on a timber frame is a weekend-to-week project depending on wall size, and doing the furring, spacing, and fastening right the first time saves you from panels bowing or trapping moisture behind the frame.
TL;DR: Installing exterior cladding on a timber frame means building a vertical batten frame with a 20mm air gap, using stainless or coated screws spaced every 400mm, and finishing joints with trim to keep water out. AKU Woodpanel exterior wall panels (available in oak, birch, black, and stone gray) are rated for this kind of install and pair with matching screws and finishing trim sold separately. Budget one full day for a 10-square-meter wall in 2026 pricing and labor conditions. Verdict: Buy if your timber frame is sound and dry; Wait if the frame shows rot or moisture staining until that's fixed first.
Why this matters
A timber frame gives cladding somewhere to breathe, but only if the fastening pattern and air gap are correct. Skip the gap and you trap condensation behind the panel, which rots the frame from the inside where you can't see it until the cladding starts sagging. Get the fastener spacing wrong and wind uplift works the panels loose within a season, not a decade.
Exterior wood cladding in the US market varies from cedar shakes to composite boards, but wood-veneer panel systems like AKU Woodpanel's exterior line are built for exposed facades, sheds, carports, and fence cladding where you want real wood grain without full solid-timber cost. The install method below applies whether you're covering a garden wall, a shed, or a house facade.
What you'll need
- Pressure-treated timber battens (38x25mm minimum) for the vertical frame
- A level, chalk line, and tape measure
- Impact driver or drill with a torque clutch
- Exterior wall panels in oak or another finish sized to your wall dimensions
- Coated exterior screws rated for outdoor use
- Finishing trim for edges and corners
- Breathable membrane or building wrap if cladding directly onto a timber-framed structure
- Silicone sealant for cut edges
- Circular saw with a fine-tooth blade for clean panel cuts
Plan on one full day per 10 square meters for a two-person crew in 2026, more if the wall has windows or corners to work around.
The steps
1. Check the timber frame before you touch a panel
A facade is only as good as what's underneath it. Press a screwdriver into the timber at ground level and around any window openings — if it sinks in easily, you've got rot and need to replace that section before cladding goes up. Common mistake: cladding over damp or rotting timber because it "looks fine" from the outside. It never is.
2. Install the breathable membrane
If the timber frame is a structural wall (not just a garden fence or shed frame), staple a breathable membrane across the studs before battens go up. This stops wind-driven rain from reaching the frame while still letting trapped moisture escape outward. Overlap each membrane run by at least 100mm. Common mistake: using a vapor barrier instead of a breathable membrane — vapor barriers trap moisture on exterior walls and cause the exact rot problem cladding is supposed to prevent.
3. Set out and fix the vertical battens
Mark batten positions every 400-600mm on center using a chalk line, then fix each batten through the membrane into the studs with 80mm exterior screws. Use a level on every batten — even a 2-degree lean shows up badly once panels are on. This batten layer creates the air gap that lets the wall breathe and gives you a flat, true surface to work from. Common mistake: skipping the batten frame on a flat masonry-adjacent section because "it's already flat" — panels still need the air gap for drainage.
4. Dry-fit the first panel and check your lines
Before driving a single screw, hold the first panel against the battens and check it's plumb with a level, then mark where it lands relative to corners and openings. This is the step that prevents a crooked run across the whole wall. Measure twice here — correcting a 5mm lean at panel one is easy; correcting it at panel twelve means pulling the whole run apart.
5. Fasten panels working left to right (or bottom to top)
Screw through the panel into each batten at 400mm intervals, driving screws flush but not overtightened — over-driving compresses the wood fiber and causes cupping over time. Leave a 3mm expansion gap between panel ends to account for thermal movement across a 2026 seasonal temperature swing. Common mistake: driving screws too tight near panel edges, which splits the veneer edge and voids any panel warranty.
6. Cut around openings with a fine-tooth blade
For windows, vents, or corners, measure the exact cutout from the dry-fit panel, mark it, and cut slow with a fine-tooth circular saw blade to avoid splintering the veneer face. Seal every cut edge with silicone before it goes up — an unsealed cut edge is the single most common point where water gets into a cladding system.
7. Finish edges and corners with trim
Run finishing trim along every exposed panel edge, corner, and the top of the run where the cladding meets the roofline or coping. Trim isn't cosmetic here — it's what keeps rain from wicking sideways into the panel end grain. Skipping trim on an exposed edge is the fastest way to see swelling within one wet season.
Troubleshooting
- Panels look wavy after install — usually means the batten frame wasn't level. Pull the affected section and re-check with a level before refixing.
- Water staining appears behind a panel joint within weeks — the expansion gap was likely sealed shut instead of left open, or trim wasn't used at that joint.
- Screws are backing out after a few months — you're likely using standard screws instead of exterior-rated coated ones, or the batten timber wasn't dry enough when fixed.
- Panel edges are splitting — screws were driven too close to the edge or overtightened; back off torque and move the fastening point 15-20mm from the edge.
- Persistent musty smell near the wall — check the membrane overlap and the air gap; a blocked gap traps moisture that has nowhere to go.
- Color mismatch between panel batches — wood veneer varies by batch; order from the same production run when covering a single wall.
Tools and resources
Beyond the fastening tools above, keep a torque-adjustable driver on hand specifically for panel screws — a standard drill without clutch control is the number-one cause of split edges on this kind of job. If you're planning a wet-climate install, review the guide on weatherproofing exterior wall cladding panels before you start, since sealant choice and gap sizing shift slightly in high-rainfall regions.
What to do next
Once the frame and panels are up, the next question is usually maintenance — how the finish holds up through a first winter and what cleaning routine keeps the veneer looking new into 2027 and beyond. That's a separate job from installation, so plan for it once the cladding is fixed and sealed.
FAQ
What's the best exterior cladding for a timber frame? Wood-veneer panel systems rated for outdoor use, like AKU Woodpanel's exterior line, work well on timber frames because they're lighter than solid board and pair with matching trim and screws for a finished edge.
Is a 20mm air gap really necessary? Yes — the air gap behind the panel lets moisture that gets past the cladding evaporate instead of sitting against the timber frame, which is the main cause of hidden rot.
How much does it cost to clad a timber frame in 2026? Cost scales with wall area, batten timber, panel finish, and trim; get a wall measurement first and price panels, screws, and trim together rather than panels alone.
Can I install exterior cladding panels without a professional? Yes, for most single-story walls and sheds, a competent DIYer with a level, driver, and saw can complete the install in a day or two; steep gables and multi-story facades are better left to a contractor.
How far apart should screws be on exterior cladding? Space fasteners every 400mm along each batten, and never closer than 15-20mm from a panel edge to avoid splitting.
Does exterior wood cladding need sealing after install? Cut edges need silicone sealant during install; the face finish depends on the specific panel line, so check the product page for that panel's factory finish before assuming extra sealing is required.
What's the difference between cladding a timber frame and a masonry wall? A timber frame needs a batten and membrane system to manage moisture from both sides; masonry cladding usually only needs battens for the air gap since the wall itself doesn't hold moisture the same way.
How long does exterior cladding installation take? Budget one full day per 10 square meters for a two-person crew, more with window cutouts or corner trim work.
One last thing
The expansion gap is the detail most DIYers skip because it looks wrong to leave a 3mm space between panels — but that gap is doing more work than any sealant on the job. Seal it shut and you've built a system with nowhere for thermal movement to go, which is exactly how a clean install in spring turns into buckled panels by the second summer.



 Better performance and aesthetic appeal
 In Stock




