


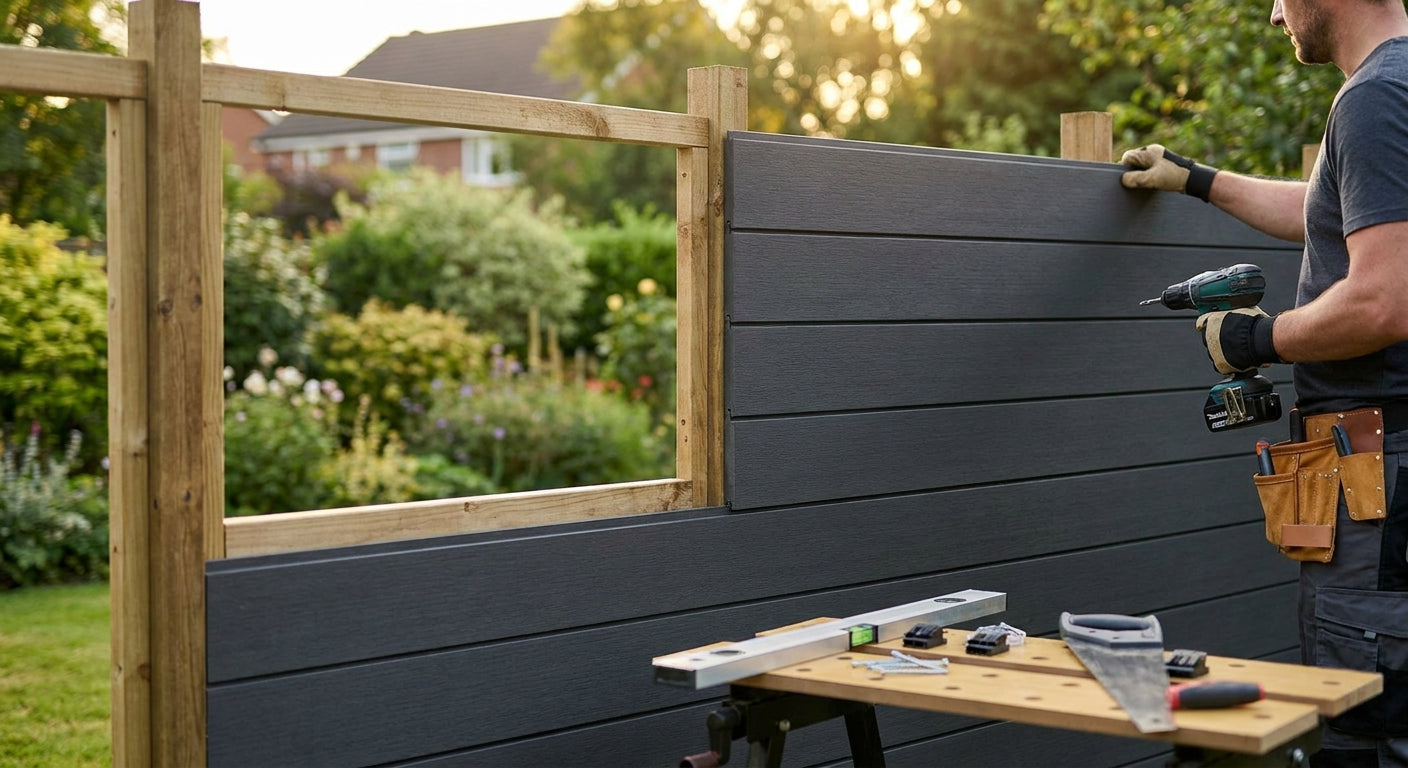
Composite cladding turns a tired timber fence into a weatherproof, wood-look screen that won't rot, warp, or need re-staining every spring. This guide walks through the full installation process for composite cladding panels on a garden fence, from measuring the run to sealing the final edge, using the framework Akuwood Panel builds its own exterior wall panel installs around.
- Composite cladding installation on a garden fence takes a weekend for a 20-foot run with two installers in 2026.
- Akuwood Panel's exterior wall panels ship at 94.5 inches long, two panels per box, and rated for over 25 years of maintenance-free use.
- Batten spacing of 16 inches on center is the baseline for wind-exposed fence lines; go to 12 inches in coastal zones.
- Corner trim and finishing trim aren't optional extras - skip them and the panel edges curl within the first season.
- Buy: composite cladding over painted timber fencing for any 2026 fence rebuild where low maintenance matters.
Why this matters
A painted timber fence needs re-coating every 2 to 3 years, and most homeowners skip it until the boards are already gray and splitting. Composite cladding panels solve that problem at the material level - the wood-grain finish is baked into a weather-resistant composite shell, not a surface coating that wears off.
The install itself isn't complicated, but it's unforgiving of shortcuts. Panels that go up out of level, without proper batten spacing, or without trim at the edges will look fine for a month and then show every flaw once the weather turns. Get the substructure right and the cladding takes care of itself for decades.
What you'll need
- Composite cladding panels sized for your run - oak exterior wall panels ship at 94.5 inches per panel, two panels per box, at $126.95 a box
- Pressure-treated battens or an existing timber fence frame to mount to
- A level, chalk line, and tape measure
- A circular saw or jigsaw with a fine-tooth blade for composite material
- Stainless or coated exterior screws rated for composite panels
- Corner trim and finishing trim to close off edges and joints
- A cordless drill, safety glasses, and work gloves
- 2 to 3 hours per 8-foot section if you're working solo, less with a second pair of hands
Measure the full fence run before ordering. A standard 6-foot-tall, 20-foot-long garden fence needs roughly 8 boxes of panels once you account for a 5-10% waste allowance for cuts and trim.
The steps
1. Check the fence frame is sound
Composite cladding is only as good as what it's screwed into. Push on every post and rail before you start - any post that flexes more than half an inch at the top needs bracing or replacing first.
A loose frame is the single most common reason a cladding job fails within the first year. Fix the substructure now; you can't fix it after the panels are up.
2. Install or confirm batten spacing
Run horizontal or vertical battens across the fence frame at 16 inches on center for most residential runs, tightening to 12 inches on center in high-wind or coastal locations. Battens give the panels a flat, ventilated surface to attach to and stop moisture from pooling behind the cladding.
Use a chalk line to keep every batten straight - even a quarter-inch drift becomes visible once panels go up.
3. Dry-fit the first panel and set your line
Hold the first panel against the battens before driving a single screw. Check it's plumb with a level and confirm the tongue-and-groove edge sits square against the corner or starting point.
This is the step people skip, and it's the one that determines whether the whole run finishes flush. If the first panel is off by even a small amount, that error compounds across every panel after it.
4. Fix the starting panel with corner or finishing trim
Secure the first panel using corner trim at an outside corner, or finishing trim if the run starts against a flat edge or wall. Screw through the trim's pre-drilled channel, not through the panel face - visible screw heads are the tell-tale sign of a rushed install.
Trim isn't decorative padding here. It locks the panel edge against moisture and wind lift, which is exactly where composite cladding fails first if left uncovered.
5. Work panel to panel along the run
Slot each subsequent panel into the tongue-and-groove joint of the one before it, tap gently into place with a rubber mallet, then screw into the battens through the panel's mounting flange. Keep a consistent gap of about 1/8 inch at expansion joints - composite material expands and contracts with temperature swings across the year.
Check plumb every third panel, not just at the start. Small errors are easy to correct early and painful to fix after ten panels are locked in.
6. Cut panels to fit posts, gates, and corners
Measure twice before cutting - composite panels don't forgive a mismeasured cut the way timber does with a quick plane. Use a fine-tooth blade and cut from the finished face down to avoid chipping the surface texture.
At gate openings and end posts, finish every exposed edge with trim rather than leaving a raw cut face exposed to weather.
7. Finish the top and bottom edges
Cap the top of the run with finishing trim to stop water from sitting on exposed panel edges, and leave at least a half-inch gap at ground level so the bottom edge never sits in standing water or wet grass. That gap is the difference between a fence that lasts 25 years and one that starts swelling at the base within two seasons.
8. Inspect the full run before calling it done
Walk the length of the fence and check every seam is tight, every screw head is flush or hidden, and every trim piece is sealed at the corner. Fix anything loose now - composite cladding installation on a garden fence is far easier to correct on install day than after six months of weather exposure.
“If the first panel isn't plumb, every panel after it inherits that error.”
Where the right panel makes the difference
Color and grain finish matter for curb appeal, but the spec that actually determines how the fence performs over time is the panel's weather rating and how it's trimmed at the edges. Akuwood Panel's exterior wall panel line covers four finishes commonly used on garden fence lines - each rated for the same multi-decade outdoor exposure.


Troubleshooting
Panel edges won't sit flush against the batten. The batten line isn't flat - check with a straightedge and shim low spots before continuing, rather than forcing the panel to close the gap.
Gaps appear between panels a few weeks after install. This is usually a missed expansion joint. Composite material moves seasonally; if panels were locked tight with zero gap, they'll separate as the material contracts in cooler weather.
Screw heads are visible on the finished face. Pull them and redrive through the mounting flange or trim channel instead of the panel face. Visible fasteners are also an entry point for water.
The bottom of the fence looks swollen after heavy rain. Check the ground clearance gap - it needs to be at least half an inch. Standing water at the base is the fastest way to shorten a panel's lifespan.
Corners look uneven at the top of the run. Recheck level at the starting panel. Once one panel is out of plumb, every panel that follows it drifts a little further off.
Tools and resources
- Level, chalk line, and tape measure for layout
- Circular saw with a fine composite-rated blade
- Birch exterior wall panels if you're cladding against a lighter existing fence tone
- Corner and finishing trim matched to your panel color
- A second person for holding panels plumb during fastening on longer runs
- Full walkthrough: how to install exterior wall panels on a fence post for post-specific mounting details
What to do next
Once the cladding is up, the next decision is upkeep. Composite panels don't need staining, but a light rinse twice a year keeps grain detail visible and clears debris from the base gap before it traps moisture.
FAQ
How much does composite cladding installation on a garden fence cost in 2026?
Panel material alone runs $123.95 to $126.95 per box covering roughly 15.75 square feet at current 2026 pricing, before trim, battens, or labor. A 20-foot fence run typically needs 7 to 9 boxes plus trim pieces.
Is composite cladding better than timber for a garden fence?
Composite cladding needs no staining or repainting and is rated for over 25 years of maintenance-free use, while painted timber needs recoating every 2 to 3 years. Timber is cheaper upfront but costs more in upkeep over a decade.
What batten spacing do composite fence panels need?
Standard residential runs use battens spaced 16 inches on center. Coastal or high-wind sites should tighten that to 12 inches on center to keep panels from flexing.
Can I install composite cladding over an existing timber fence?
Yes, as long as the existing frame is structurally sound and posts don't flex more than half an inch at the top. Add battens over the existing rails rather than screwing panels directly to old timber.
Do composite cladding panels need an expansion gap?
Yes, leave about 1/8 inch between panels at every joint. Composite material expands and contracts with temperature, and a zero-gap install will show separation within a season.
How long does it take to clad a garden fence with composite panels?
A 20-foot fence run takes a full weekend for two installers, or 2 to 3 hours per 8-foot section working solo, including trim and edge finishing.
What tools do I need for composite cladding installation?
A level, chalk line, circular saw with a fine composite-rated blade, cordless drill, and exterior-rated screws cover the core install. A rubber mallet helps seat tongue-and-groove joints without marking the finish.
Does composite cladding need a gap at the bottom of the fence?
Yes, leave at least half an inch of clearance between the panel bottom and the ground. Skipping this gap is the most common cause of swelling and premature panel failure.
One last thing
The detail most first-time installers underestimate isn't the panel - it's the trim. A fence clad in composite panels with no corner or finishing trim will look nearly identical to a properly trimmed one on install day, and completely different twelve months later once uncovered edges start curling from moisture exposure. Buy the trim in the same order as the panels; don't treat it as an optional add-on.




 Better performance and aesthetic appeal
 In Stock




