


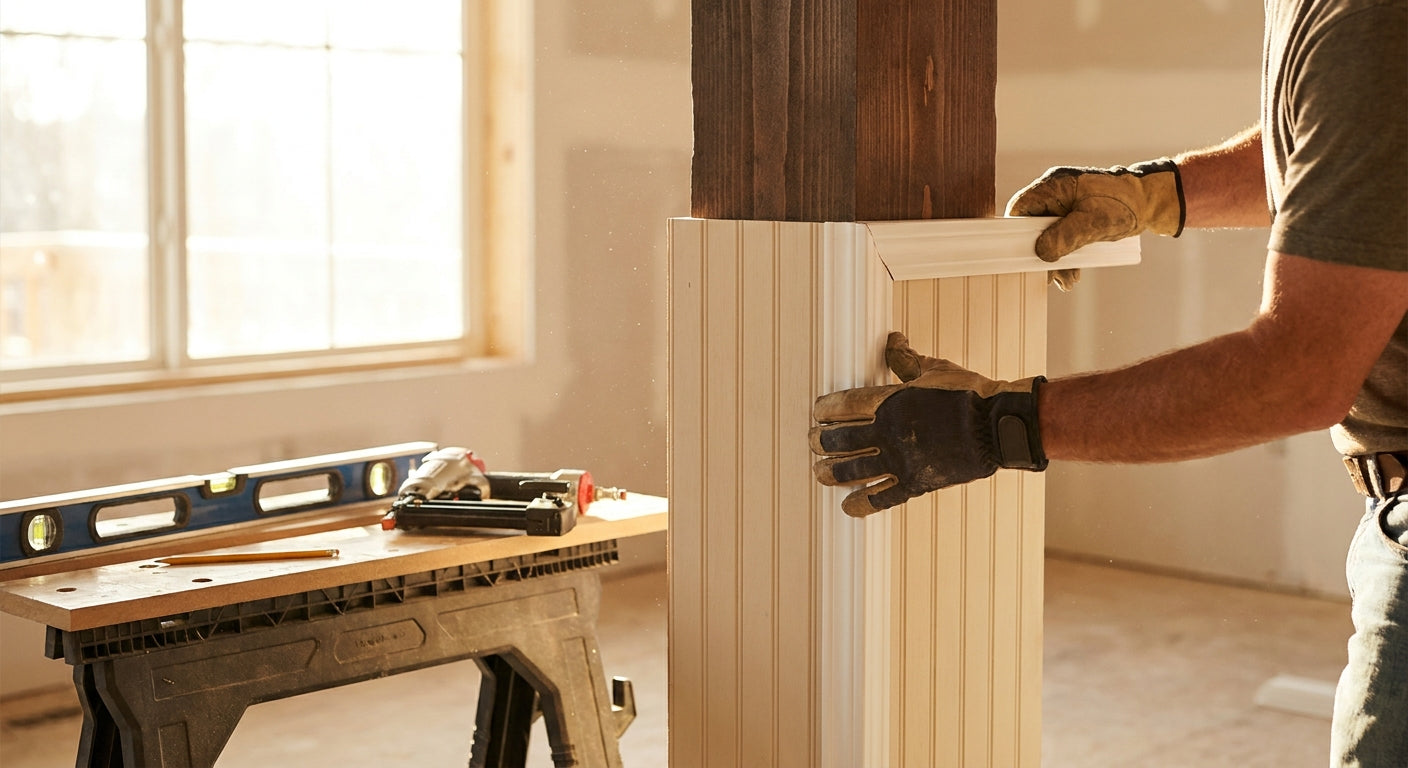
Wrapping a column in wood panel only looks finished if the corners are handled right — skip corner trim and you're left with raw edges, exposed fasteners, and gaps that read as a rushed job from ten feet away. This guide covers measuring, cutting, and fastening corner trim so a panel wraps a square or rectangular column cleanly on all four sides in 2026.
- Corner trim for panel around column hides raw panel edges at 90-degree corners; Akuwood Panel's Exterior Panel Corner Trim Birch is the Buy pick for square columns.
- Measure the column's full perimeter first, then add roughly 1/2 inch per corner so panel sections meet the trim channel instead of butting against bare wood.
- Fasten through the trim channel, not through the panel face — reversing that order is the single most common mistake on this job.
- Corner trim suits square and rectangular columns; round columns need scored or flexible panel sections instead.
Why this matters
A column is four surfaces meeting at four corners, and every one of those corners is a place where a straight cut can go wrong. Butt two panel edges together without trim and you get a visible seam that opens up as the wood moves with humidity. Corner trim solves that by giving each edge a channel to land in, so the seam disappears and the fastener holes stay hidden.
This matters more on columns than on flat walls because columns get touched, bumped, and viewed from every angle — there's no "back corner" to hide a sloppy cut behind furniture. A birch exterior panel column wrap done with corner trim in 2026 should look like one continuous surface, not four panels stapled together.
What you'll need
- Wood panel stock sized to the column's face width (Akuwood Panel's birch exterior wall panels ship at 94.5 inches long, two panels per box)
- Exterior panel corner trim — one length per vertical corner, four total for a square column
- Exterior-rated construction adhesive
- Corrosion-resistant screws or panel fasteners
- Miter saw or fine-tooth handsaw with a miter box
- Tape measure, pencil, and a speed square
- Level (torpedo or 24-inch)
- Caulk gun and paintable exterior caulk for the top and bottom edges
Budget half a day for a single column if the surfaces are already flat and square. Add another hour per column if you're shimming an out-of-square post first.
The steps
1. Measure every face of the column separately
Columns are rarely perfectly square, especially on older porches or structural posts that have shifted slightly. Measure the width of all four faces individually rather than assuming they match — a difference of even 1/4 inch changes how the corner trim seats.
Write the four measurements down and use the smallest one as your cutting reference if they're close. Common mistake: measuring once at the top of the column and assuming the base is identical — posts taper or bow more than people expect.
2. Dry-fit the corner trim before cutting panels
Hold a length of corner trim against one vertical edge of the column and check that it seats flush without forcing it. The trim channel needs to accept the panel's edge thickness without gapping.
Mark the trim's cut length at the column's top and bottom now, before any panel goes up. Cutting trim after panels are installed means working around finished surfaces and doubles your risk of a chipped miter.
3. Cut panels to width, accounting for trim overlap
Each panel face needs to run slightly short of the column's raw face width — typically 1/8 to 1/4 inch short on each side — so the corner trim's lip can overlap the panel edge instead of butting against it. Cutting panels flush to the exact face width is the fastest way to end up prying trim off and re-cutting.
Use a fine-tooth blade for veneer-faced stock to avoid chipping the surface layer. A speed square guide keeps the cut line perpendicular, which matters more here than on a flat wall since a skewed cut telegraphs at every corner.
4. Set the first panel face and check plumb
Start with the most visible face of the column — usually the one facing a doorway, walkway, or seating area. Apply construction adhesive in a zigzag pattern across the back, then press the panel into place and check it with a level before it sets.
A face that's out of plumb by even a small amount compounds around all four corners of the column, so this check is worth the extra two minutes. Hold the panel for the adhesive's open time, then move to fasteners.
5. Install the first corner trim length
Set the corner trim over the seam between the installed face and the adjoining raw column surface. The trim should cover the panel's raw edge completely and present a clean, continuous line from base to top.
Fasten through the trim's screw channel — never through the visible face of the panel or trim. This is where most installs go wrong: driving a screw through what should be a clean surface leaves a permanent hole that no amount of touch-up paint fully hides.
6. Repeat panel-then-trim around all four corners
Work around the column in one direction: panel face, corner trim, panel face, corner trim. Each new panel butts against the previous trim's channel rather than against bare column material, which is the entire point of using corner trim in the first place.
Check plumb again on the third and fourth faces — small errors accumulate as you work around the column, and by the last corner a compounding 1/8-inch drift becomes visible.
7. Finish top and bottom with caulk
Run a bead of paintable exterior caulk along the top and bottom edges where panel meets ceiling, soffit, or base. This seals out moisture and gives the transition a finished line instead of a raw cut edge.
Tool the caulk with a wet finger or caulk tool immediately — cured caulk is far harder to smooth and will show every ridge once painted or left natural.
Troubleshooting
- Corner trim won't seat flush: the panel edge underneath is too thick or wasn't cut short enough — trim the panel back another 1/16 to 1/8 inch rather than forcing the trim.
- Visible gap between trim and adjacent face: the column isn't square at that corner — shim behind the panel before final fastening rather than trying to close the gap with caulk alone.
- Screws showing through the trim face: you're fastening through the wrong channel — back the screw out and relocate it to the trim's designated fastener slot.
- Panel bows away from the column mid-face: adhesive coverage was too thin or too far from the edges — add a mechanical fastener near the panel's midpoint on wide faces.
- Miter joints at the top open up over a season: wood movement is normal — leave a small reveal (roughly 1/16 inch) at miters rather than cutting them tight, and caulk it once the panel has acclimated.
- Corner trim color doesn't match the panel batch: wood veneer varies by production run — order corner trim and panels together rather than as separate purchases months apart.


Tools and resources
- Miter saw with a fine-tooth blade for veneer-faced panel stock
- Speed square for perpendicular cutting lines on both panels and trim
- Exterior panel screws rated for outdoor fastening into the trim channel
- Torpedo level for checking each of the four column faces individually
- Paintable exterior caulk for top and bottom transitions
What to do next
Once the column is wrapped, the same corner-trim logic applies to any adjoining flat wall section, window surround, or post base on the same project. A dedicated clean panel installation guide walks through the same channel-and-overlap method for straight wall runs, which is useful if the column sits against a larger panel installation rather than standing alone.
FAQ
What is corner trim for panel around column used for?
Corner trim conceals the raw cut edges of wood panel at a column's vertical corners, giving a wrapped column a continuous, seamless look instead of visible butt joints. It also hides fastener holes that would otherwise show on the panel face.
Can corner trim be used on a round column?
No — corner trim is built for the 90-degree corners of square or rectangular columns. Round columns need scored or flexible panel sections that curve around the surface without a corner joint.
How much shorter should panels be cut for corner trim to fit?
Cut panel faces roughly 1/8 to 1/4 inch short of the column's raw face width so the corner trim's lip can overlap the edge cleanly. Cutting panels flush to the full width usually means re-cutting after a failed dry-fit.
Do you screw through the corner trim or the panel face?
Fasteners go through the trim's dedicated screw channel, never through the visible panel or trim face. Driving a screw through the face is the most common mistake on column wraps and leaves a permanent visible hole.
How long does it take to wrap one column with panel and corner trim?
A single square column with flat, square faces takes about half a day for one person, including measuring, cutting, and caulking. Add roughly an hour if the column needs shimming to true it up first.
Does corner trim need caulk at the top and bottom?
Yes — a bead of paintable exterior caulk at the top and bottom transitions seals out moisture and gives a finished line where the panel meets the ceiling, soffit, or base. Skipping this leaves a raw edge that's more visible than the corner seams themselves.
What causes a gap between corner trim and the panel face?
A gap usually means the column isn't square at that corner, so the trim can't seat flush against both adjoining faces. Shim behind the panel before final fastening rather than trying to close the gap with caulk alone.
One last thing
The detail that separates a clean column wrap from an obvious DIY job isn't the panel — it's the reveal left at the miter joints. Leave roughly 1/16 inch of gap at each top corner rather than cutting miters dead-tight, because wood panel moves seasonally and a tight miter in 2026 can telegraph a visible crack by 2027. Caulk that small reveal once the panel has acclimated for a week or two, and the seam disappears for good.




 Better performance and aesthetic appeal
 In Stock




